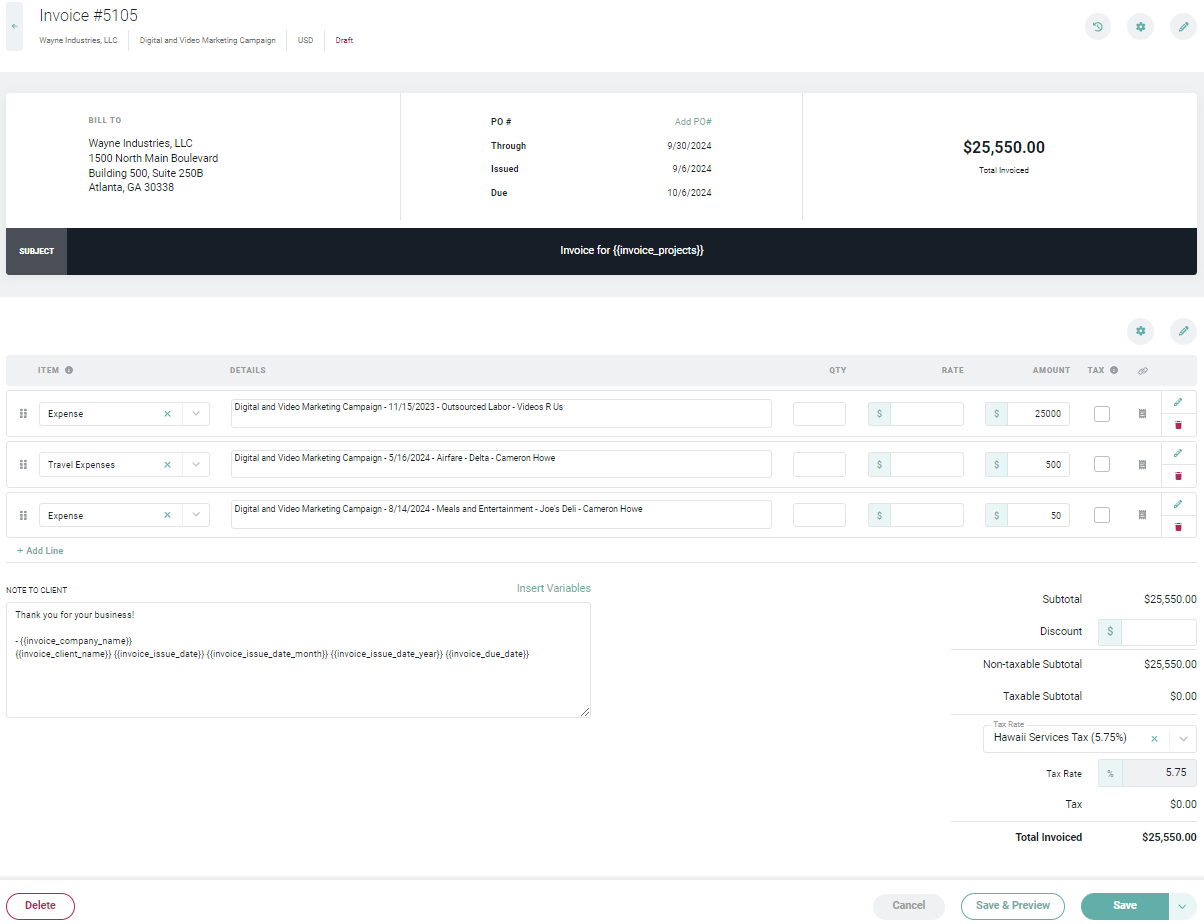
When a draft invoice is created from the Ready to Bill screen, you will be taken to the edit view of the invoice (Figure 1).
Edit Invoice in Draft mode

Figure 1 - Edit Invoice in Draft mode

From here you can control the items that will be included on the invoice, the grouping and display of those items, and general invoice information such as the client street address, purchase order number, discount, and taxes. Note that in order to create a draft invoice, you must have the Create and edit draft invoices permission on your security role. When viewing the invoice in draft mode, you can edit individual areas of the invoice:

Invoice Header

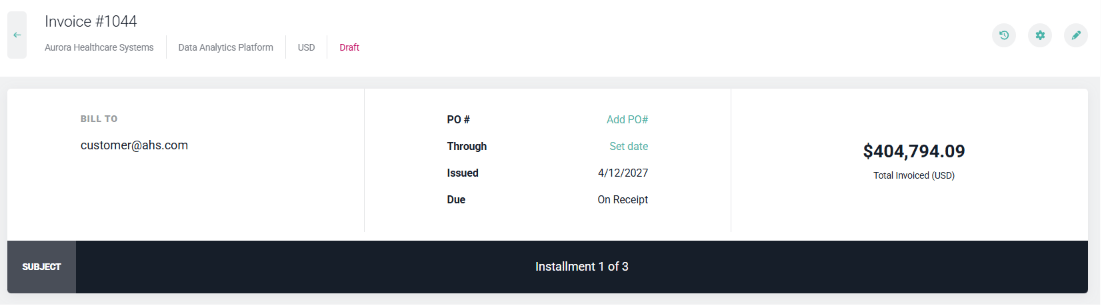
The invoice header (Figure 2) shows the high-level invoice information including the client name and street address, issued date, due date, purchase order number, invoice number, and total invoice amount. The total is labeled Total Invoiced followed by the invoice’s currency code, such as Total Invoiced (USD), and the same label appears on the invoice preview and the PDF. When the invoice is created, Ruddr leverages either the client’s invoice settings or the project’s invoice settings to populate various fields on the invoice. When a single project is associated with an invoice, the project’s invoice settings override the client invoice settings, when those are different. In that case the invoice is populated with the single project’s invoice settings. When an invoice is created for multiple projects, the client’s invoice settings override the individual projects’ settings and are populated on the invoice. These settings include invoice To: recipients, Cc: recipients, billing address, payment terms, etc. The lone exception to this rule is the PO Number. PO Number The purchase order number is populated from the Project record. If there are multiple projects associated with the invoice, multiple purchase order numbers will be shown. You can also change the invoice number and choose to reset the invoice seeding.
View Client Details and Invoice Terms in the Invoice Header
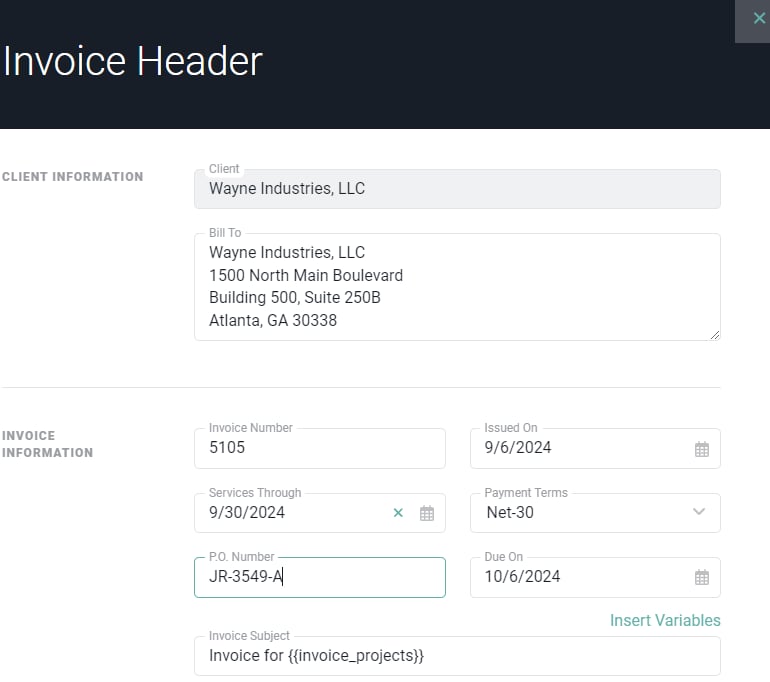
Figure 2 - View Client Details and Invoice Terms in the Invoice Header

To edit the header invoice information, simply click the pencil icon (Figure 2) which is next to the gear icon. This will bring up the Invoice Header drawer (Figure 3). The client name will be read-only because an invoice can not have its client changed once the invoice is created. Note that changes to the street address and billing terms on a given invoice will not update those same fields on the Client record. Similarly, any change to the purchase order number will not change the underlying Project record. Changes made in this drawer will only be applied to this invoice.
Update Invoice Header Information in the Invoice Header Drawer

Figure 3 - Update Invoice Header Information in the Invoice Header Drawer

Invoice Variables

Note that you can employ invoice variables in the Invoice Subject on the header by clicking the Insert Variables link above this field (Figure 3). Invoice variables provide a way of inserting invoice-specific data into the invoice without the need to rekey the value. When you click on the Insert Variables link, you will be presented with a list of variable, such as Client Name, Due Date, Issue Date Year, Invoice Total, Project Names, and so on. Furthermore, you can configure the default text for the Invoice Subject in Invoice settings within the workspace settings area. NOTE: When viewing a draft invoice, you will see the invoice variables presented. While in draft mode, variables will resolve on the invoice preview only. Once an invoice is published, the invoice variables will no longer appear - you will see the actual values of the variables presented on the invoice screen, as well as on the web view of the invoice itself (what the client will see).

Invoice Numbering

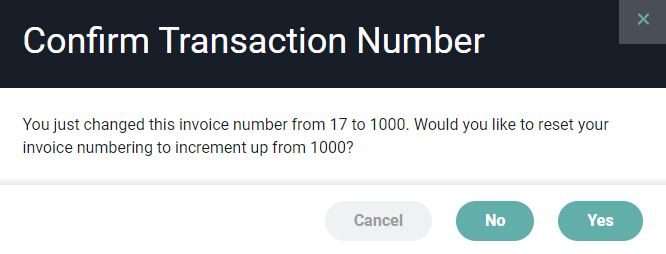
When an invoice is created in Ruddr, Ruddr applies an Invoice Number to the invoice. If, while in Draft mode, you change the invoice number in the Invoice Header, Ruddr will recognize that you are doing so. As such, Ruddr will prompt you (Figure 4), asking if you would like to reset the invoice numbering to increment from the new invoice number you are specifying.
Choose to Reset or Keep the Current Invoice Seeding when Overriding the Invoice Number

Figure 4 - Choose to Reset or Keep the Current Invoice Seeding when Overriding the Invoice Number

To change the invoice number on the invoice without resetting the invoice seeding, choose No on the confirmation prompt (Figure 4). To change the invoice number and to reset the invoice seeding, choose Yes. To avoid taking either of these actions, click Cancel.

Invoice Settings

To adjust the settings for the invoice, click the gear icon at the top-right which will bring up the Invoice Settings drawer (Figure 5). From this drawer you have the option to associate the invoice with additional projects, include receipts with the invoice as well as a detailed time report. You can also specify which columns on the invoice you want displayed for the client-facing versions (digital and PDF) of the invoice. The details to be provided in the time report can be specified as well.
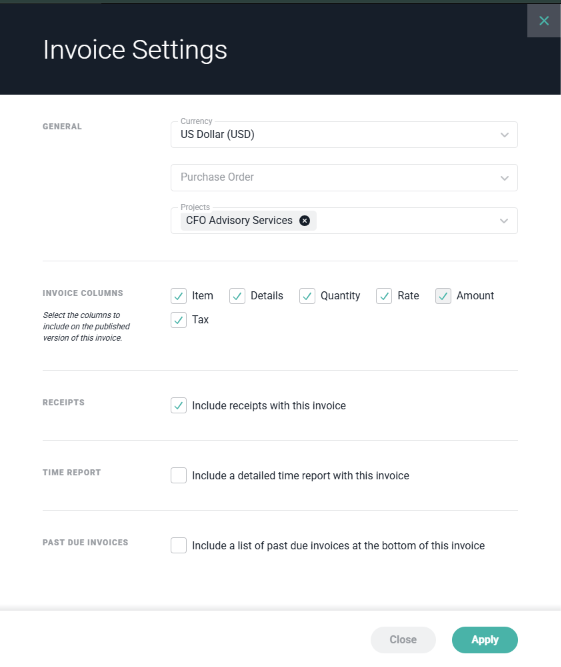
The Invoice Settings drawer with General, Invoice Columns, Receipts, Time Report, and Past Due Invoices sections

Figure 5 - Invoices Settings Drawer

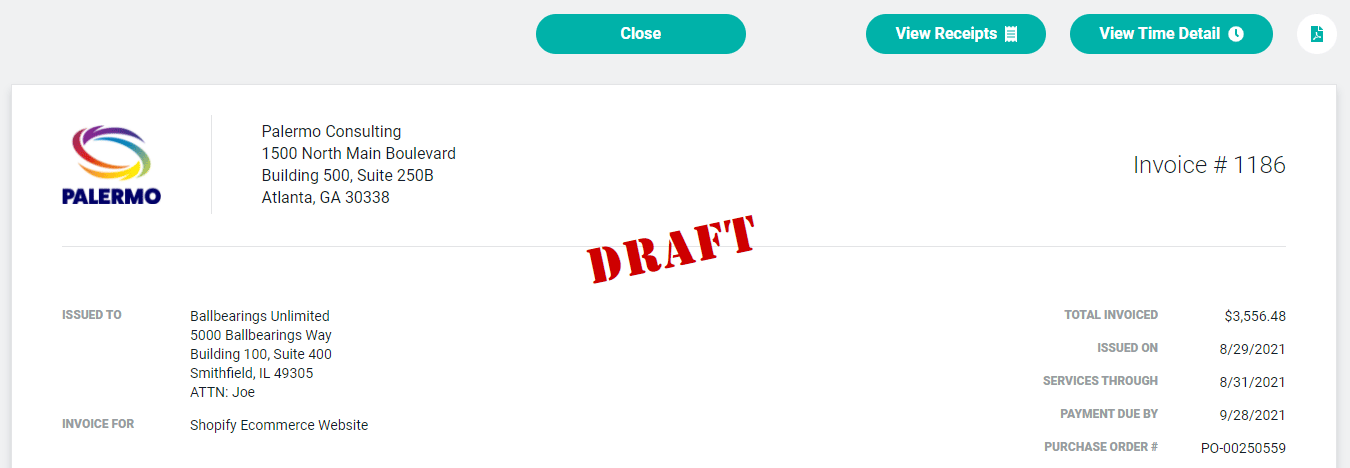
When the Time Detail Report and / or Include Receipts options are enabled, buttons will show at the top of the invoice (Figure 6). These buttons can be used by the client to review the receipts and time detail associated with the invoice. Additionally, a button will be available to download a compressed (zip) file with the expenses.
Invoice Preview Displays the View Receipts and View Time Detail Buttons Based on Invoice Settings

Figure 6 - Invoice Preview Displays the View Receipts and View Time Detail Buttons Based on Invoice Settings
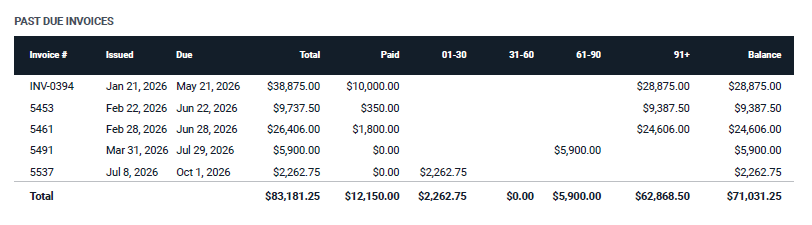
When viewing the Time Detail report, you can download it using the export menu in the top-right corner of the report. Choose Export to CSV for a spreadsheet or Export to PDF for a formatted document. The PDF matches the detailed time report that Ruddr attaches to invoice emails, and both files include the columns you selected in the invoice’s time report settings. The Invoice Settings drawer also includes the option to Include a list of past due invoices at the bottom of this invoice (Figure 5). New invoices start with the workspace’s default for this setting, which you can change on each invoice. When it’s on, the invoice preview and PDF end with a Past Due Invoices table that lists the client’s other open invoices that are past their due date, oldest due date first. For each invoice, the table shows the invoice number, issued and due dates, total, amount paid, and balance, with the balance also shown under the matching aging column: 01-30, 31-60, 61-90, or 91+ days past due (Figure 7). Amounts are shown in this invoice’s currency. If the client has no past due invoices, the table doesn’t appear.
The Past Due Invoices table listing the client's past due invoices with total, paid, aging columns, and balance

Figure 7 - The Past Due Invoices Table at the Bottom of an Invoice, with Aging Columns
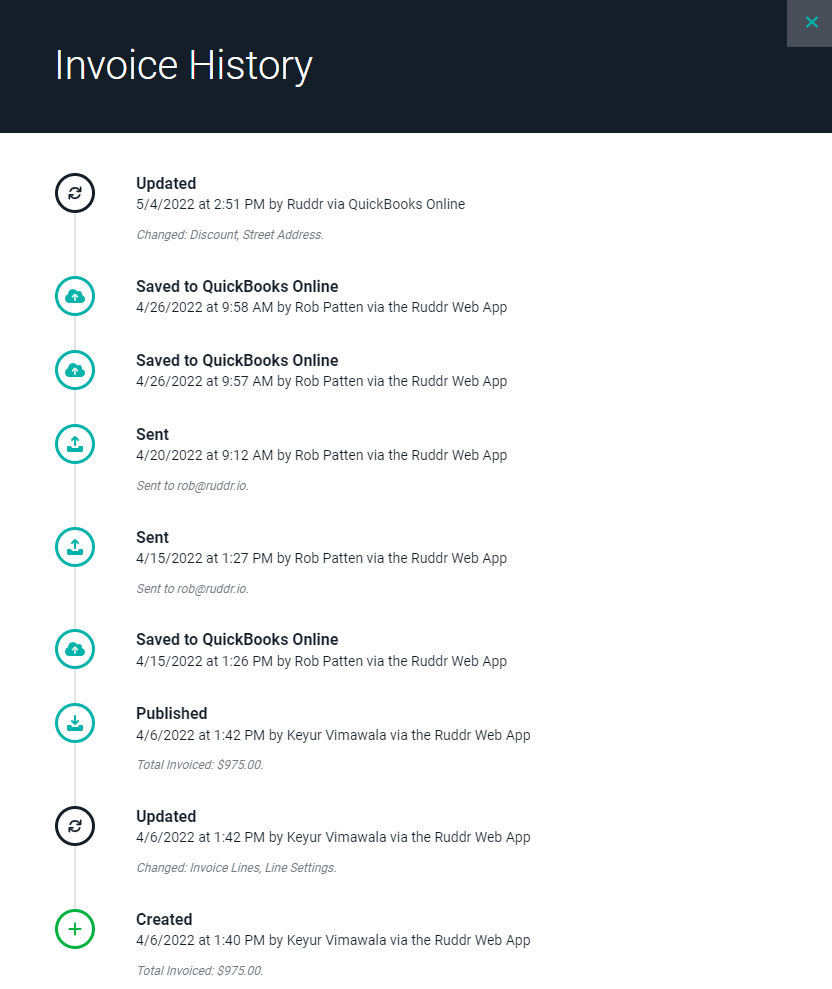
You can also access details regarding the history (Figure 8) of the invoice record in Ruddr by clicking on the View History button (Figure 9) at the top right of the screen (Figure 2).
View a History of the Invoice Record in Ruddr

Figure 8 - View a History of the Invoice Record in Ruddr

Click this Button to View the Invoice History

Figure 9 - Click this Button to View the Invoice History

Invoice Line Items

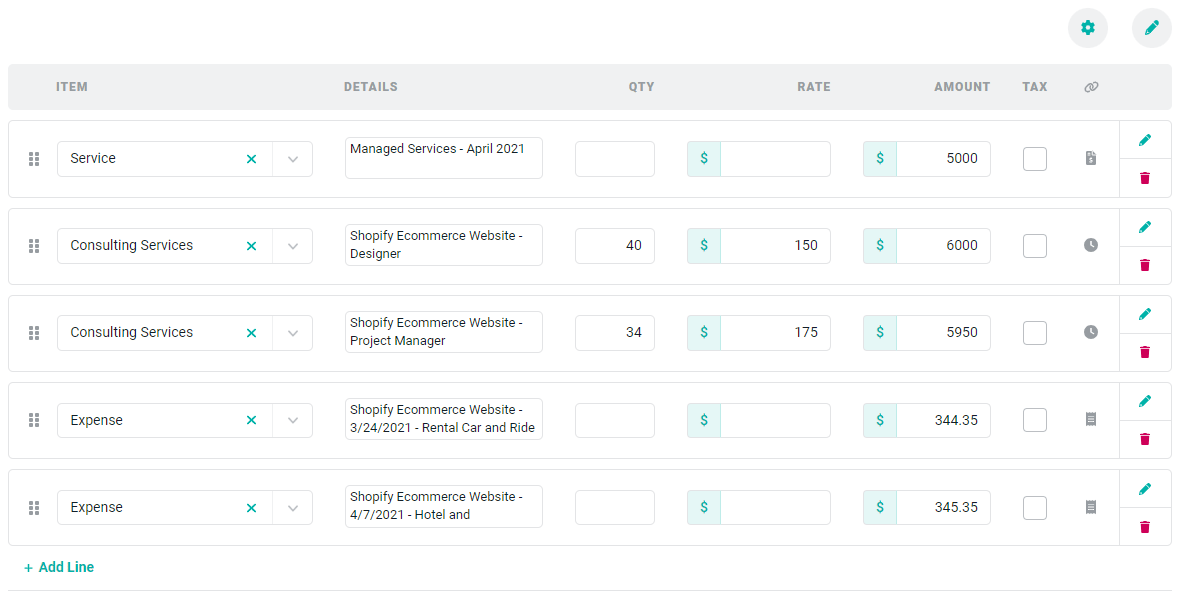
Below the header information are the invoice line items (Figure 10). The lines represent the fees that will be charged to the customer. You can add, edit, remove, or reorder the line items.
Review and / or Edit Invoice Line Items

Figure 10 - Review and / or Edit Invoice Line Items

The first column in the invoice line items list is the Invoice Item. Any invoice row that has a total amount must have an Invoice Item selected. Each Ruddr workspace includes two built-in Invoice Items which are “Service” and “Expense”. Additional items can be created by a Workspace Admin using the Custom Data tab within the Settings area. For example, if your company sells products or different types of services, you can set up distinct Invoice Items for those. You can edit any of the fields on the draft invoice for each line item. If you edit a quantity, rate, or amount, you will see a warning indicator (Figure 11) if the new amount does not match the original amount. If you put your mouse over this indicator, you will see a message explaining that the amount no longer matches the underlying time entries, fixed-fee milestones, or expense items.
Ruddr will Provide a Warning when Edits do not Equal the Original Amount
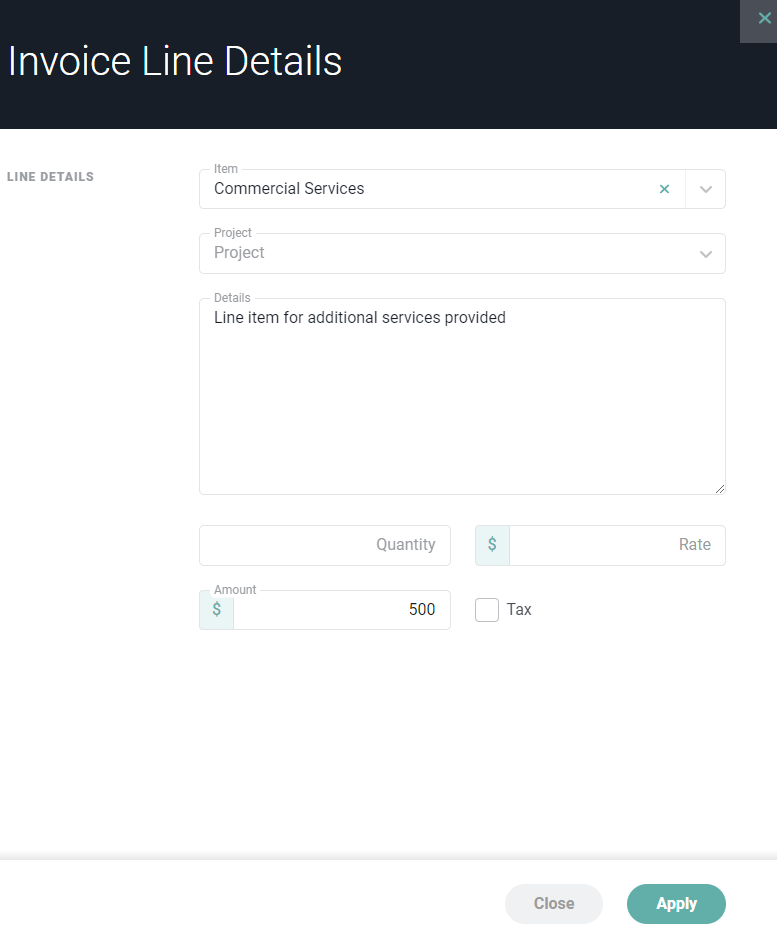
Figure 11 - Ruddr will Provide a Warning when Edits do not Equal the Original Amount

While you can make these types of changes directly to an invoice, it is recommended that you change the underlying time entries, expense items, or milestones and then recreate the invoice. Changing items in an ad-hoc manner on an invoice will cause a disconnect between invoice amounts and the underlying operational data. Add Custom Line Items to an Invoice To add a custom line to an invoice, simply click the + Add Line button at the bottom of the invoice item list (Figure 10). You can then specify the item, details, quantity, rate, amount (calculated for you), and whether or not the item is taxable. Any invoice line items that are manually added to an invoice will not be correlated with underlying operational data. You can associate a custom line item (or ad hoc line item) to a project by specifying the project in the Invoice Line Details drawer (Figure 12) that is available when clicking on the Edit (pencil) icon on the invoice line item row (Figure 10) on the invoice.
Provide Additional Details and Associate a Ad-hoc Line Item with a Project
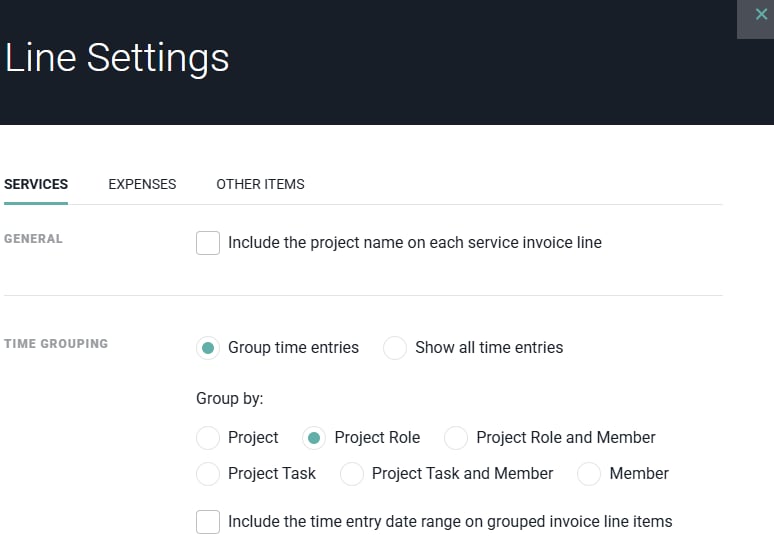
Figure 12 - Provide Additional Details and Associate a Ad-hoc Line Item with a Project

Setting Invoice Line Items as Taxable Individual line items on a draft invoice can be designated as taxable. To do this, simple click the checkbox in the Tax column on the right-side of the invoice line item (Figure 10). Tax will be calculated for any taxable items using the tax rate specified in the footer area (Figure 15) of the invoice. Adjust the Invoice Line Settings Click the settings wheel icon at the top-right of the line items (Figure 10) to bring up the Line Settings drawer (Figure 13). The settings on this drawer allow you to control the display format for time entries and expense items. Any changes made to these settings will cause the draft invoice to be recreated.
Invoice Line Settings Drawer

Figure 13 - Invoice Line Settings Drawer
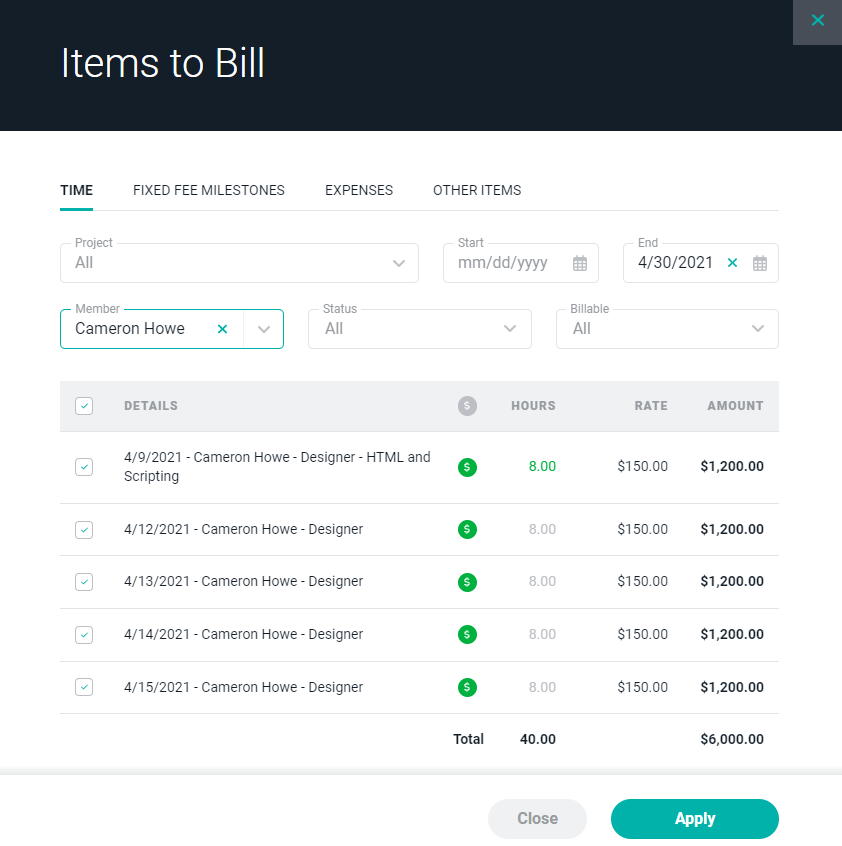
For services and expenses, you have the option of listing all time or expense items on the invoice or you can group those items. For a large project with multiple team members and a large volume of hours, you likely would not want to show each time and expense item because this can result in the invoice being many pages. If your client prefers to view this detail, you may option to include a detailed time report in lieu of displaying all of the items on the invoice itself. Remove Items from the Invoice The pencil icon at the top-right of the list (Figure 10) will open the Items to Bill drawer (Figure 14) that will allow you to remove any time entries, expense items, or billing schedule milestones that you don’t want to invoice at this time. Any items that are unchecked from the drawer will be available to bill in the future from the Ready to Bill screen.
Determine which Invoice Items to Exclude / Include from this Invoice

Figure 14 - Determine which Invoice Items to Exclude / Include from this Invoice

Note that you can also remove time, expenses, or milestones from an invoice by deleting an entire line item via the delete button on the right side of the row (Figure 10). Any items associated with the deleted line will move back to the Ready to Bill screen. If you do not want to bill for the time/expense items in the future, you should edit the underlying items and set them to non-billable or move them to a non-billable role. At the bottom of the draft invoice is the footer (Figure 15). The footer summarizes the invoice totals and also allows you to apply a discount or tax to the invoice. Additionally, you can provide a note to the client.
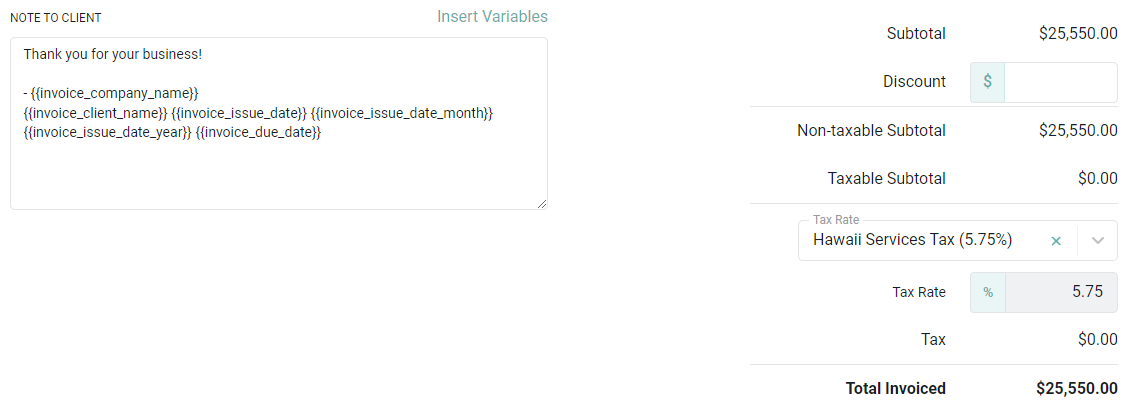
View the Invoice Totals and Apply a Discount and / or Tax Rate
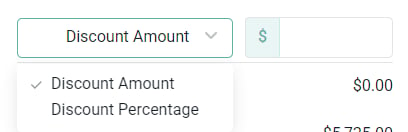
Figure 15 - View the Invoice Totals and Apply a Discount and / or Tax Rate

When applying a discount to the invoice (Figure 16), you can specify a computed dollar amount by which to discount the invoice (Discount Amount) or you can specify a percentage discount (Discount Percentage). When supplying a percentage discount, you will enter the percentage and Ruddr will calculate the amount of monies by which to discount the invoice based on that percentage.
Specify Whether You Want to Apply a Discount Amount or a Discount Percentage to the Invoice

Figure 16 - Specify Whether You Want to Apply a Discount Amount or a Discount Percentage to the Invoice

Invoice Variables

Note that you can employ invoice variables in the Note to Client field by clicking the Insert Variables link above this field (Figure 15). Invoice variables provide a way of inserting invoice-specific data into the invoice without the need to rekey the value. When you click on the Insert Variables link, you will be presented with a list of variable, such as Client Name, Due Date, Issue Date Year, Invoice Total, Project Names, and so on. Furthermore, you can configure the default text for the Invoice Note in Invoice settings within the workspace settings area. NOTE: When viewing a draft invoice, you will see the invoice variables presented. While in draft mode, variables will resolve on the invoice preview only. Once an invoice is published, the invoice variables will no longer appear - you will see the actual values of the variables presented on the invoice screen, as well as on the web view of the invoice itself (what the client will see).

Preview the Invoice

Once you have made the necessary changes to the invoice, click the Preview button in the bar (Figure 17) at the bottom of the screen. This will bring up a preview of how the invoice will look to the client.

Each Invoice is Available for Preview

Figure 17 - Each Invoice is Available for Preview

The invoice preview will have the word “DRAFT” across the top until the invoice is published.