
- Task name - Type in a partial or full task name.
- Status - The status of a task can be either:
- Not Started
- In Progress
- Completed
- Task Archived - Toggle between Active and Archived Tasks on the Project
Board View
In addition to the list view of tasks (Figure 1), you can view tasks in a board view (Figure 2), allowing you to see tasks as categorized by task status. To toggle to the board view, you can click on the board icon (Figure 3) just above the tasks.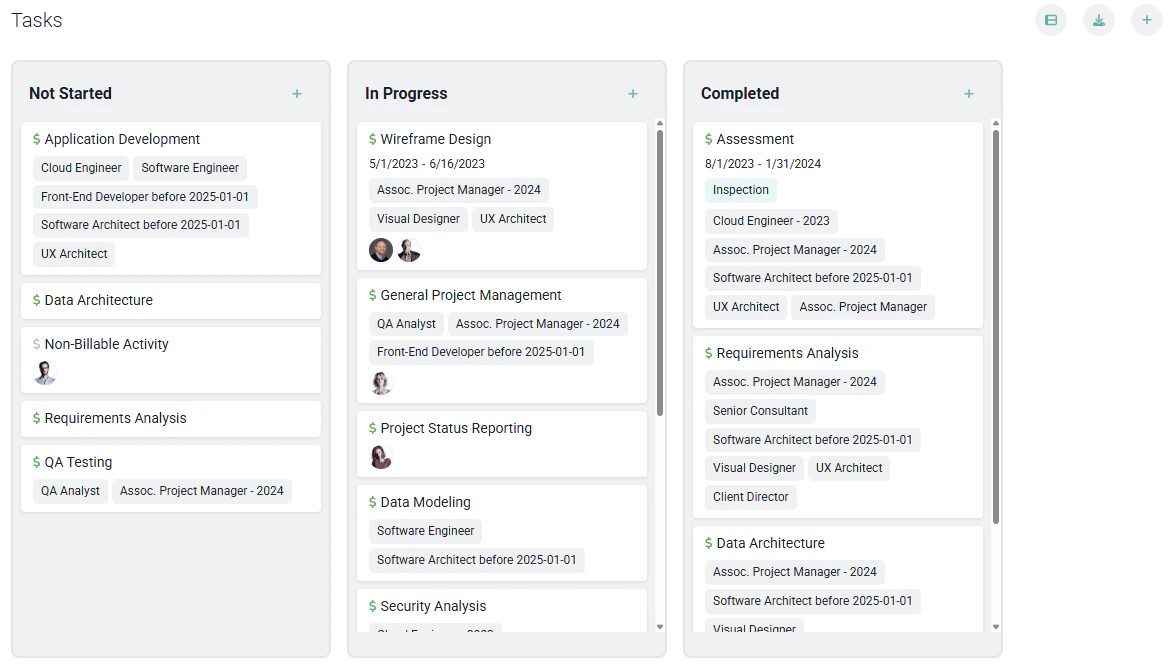

Benefits of Using Tasks
Tasks help project leaders deliver a project with greater precision. By using tasks, a large scope of work can be divided into smaller and more manageable constituent parts. Two important benefits of using tasks in Ruddr are:- Task-based budgeting - When setting up a budget for a project in Ruddr, you have the option of automatically creating the budget by aggregating all of the tasks for the project. This allows you to create a “bottoms up” budget that sums the hours and revenue across all tasks and project roles. For more information on creating a detailed budget from aggregated tasks, please see the Create a Project Budget article in the Ruddr Help Center.
- Task-based time tracking - When tasks have been defined for a project, team members can track time directly to specific tasks within the project. With time tracking at the task level, you can more easily identify trouble spots on projects that are taking too much time to deliver.
Create a Task
There are two ways to create a task on a project. You can create a new task “from scratch” or you can create tasks from task templates, which are managed in the Custom Data section of workspace settings. To add a new task, simply click on the Create a Task button at the top of the task list (Figure 1). This will open the new task window where you can provide information about the task.Task Categories
Task categories allow you to categorize tasks within projects. Time can be tracked directly to a standard task while a rollup task aggregates time from its child tasks. Workspace Admins can create Task Categories in the Custom Data section of workspace settings. Once Task Categories are created, you will be able to group tasks together under the projects. Once you click save, a drawer will open for you to input further information. You will only see the Create a Task button if you have the Edit project permission.Rollup Tasks
If you specify a rollup task category, the Edit Task drawer will be presented. Hours budget, revenue budget, dates, and status for rollup tasks will be read-only on this drawer (Figure 4), as they are computed automatically from the task’s descendants. You can configure the task name, parent task, task code, tags, notes, and impose budget caps. Rollup tasks do not have member or role assignments.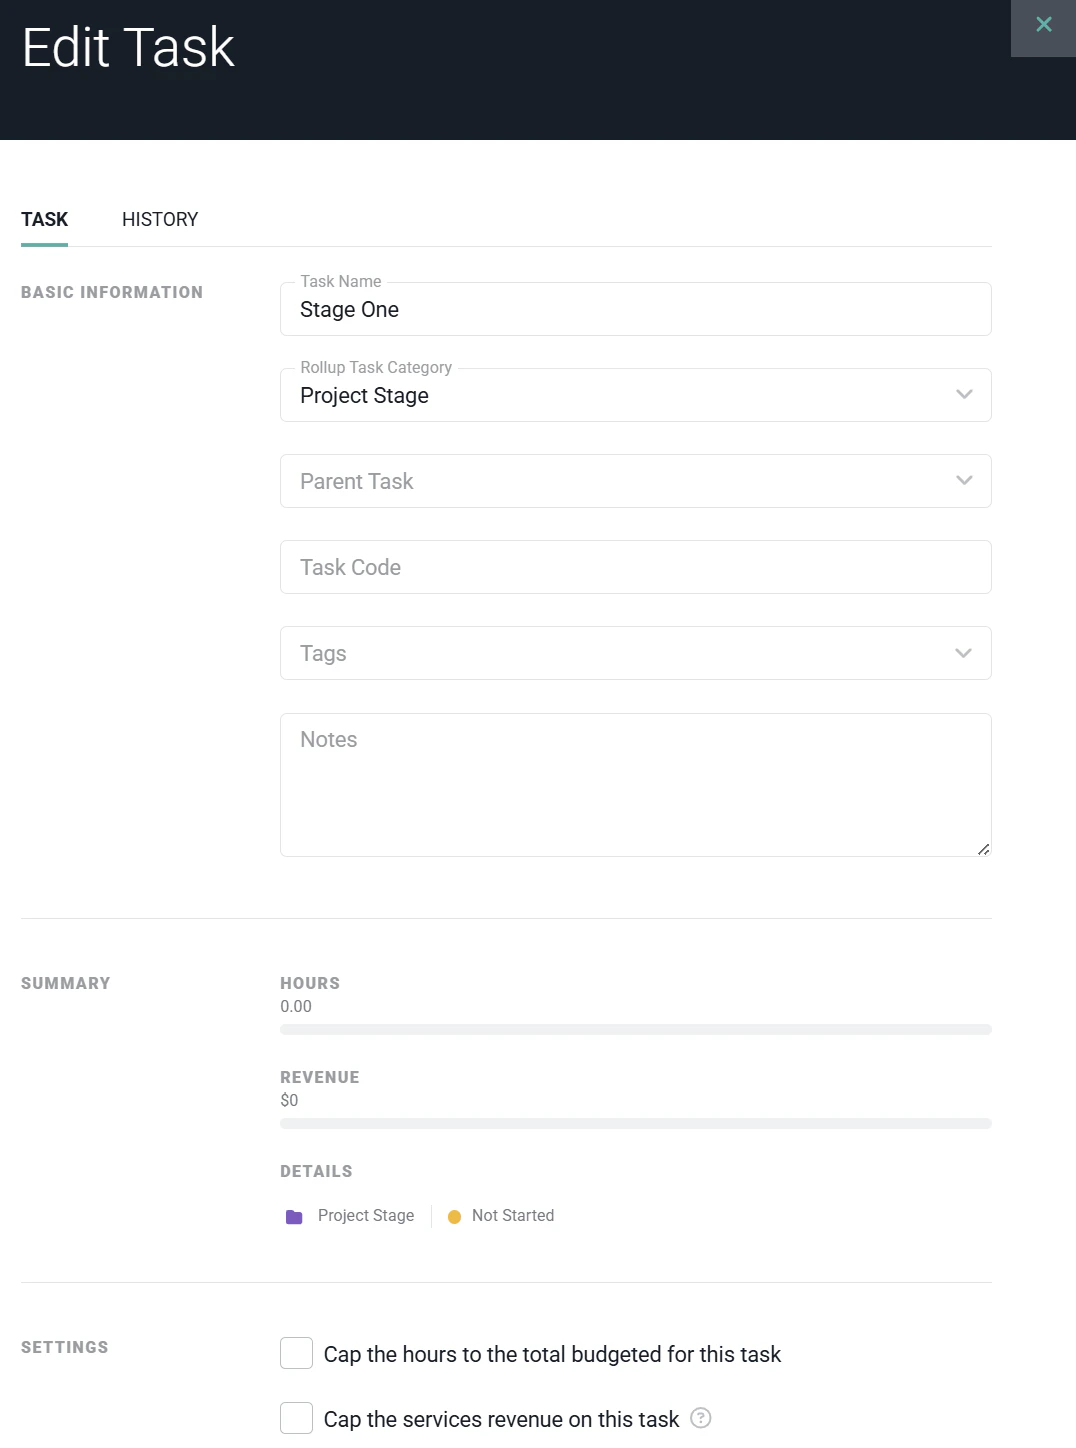
Rollup Behavior
When a task uses a rollup category, Ruddr automatically derives several fields from the tasks nested under it:- Hours (tracked) - Sum of tracked hours across all child tasks.
- Hours (budget) - Sum of budgeted hours across all child tasks.
- Revenue - Sum of revenue across all child tasks.
- Start date - The earliest start date among the child tasks.
- End date - The latest end date among the child tasks.
- Status - Derived from the child tasks. The rollup task will be set to Completed when every child tasks is completed, In Progress as soon as at least one child task has started (in progress or completed) but not all are completed, and Not Started when no child tasks has been started.
Optional Caps
A rollup task always displays its aggregated hours and revenue as progress against the budget rolls up from its descendants. Two optional settings turn that aggregated budget into a hard cap:- Cap the hours to the total budgeted for this task - When enabled, Ruddr blocks any time entry against a descendant task if that entry would push the rollup over the aggregated hours budget.
- Cap the services revenue on this task - When enabled (on Time and Materials projects), Ruddr blocks any time entry against a descendant task if that entry would push the rollup over the aggregated services revenue budget.
Billability
A rollup task does not have its own billable / non-billable setting and does not affect the billability of the tasks beneath it. Each child task keeps the billability it would have without the rollup in the hierarchy, determined by its own setting and the project. The same rollup can therefore contain both billable and non-billable child tasks.Time Tracking Restriction
Time cannot be tracked directly to a rollup task. In the time entry drawer, rollup tasks appear in the task list with their icon and color so you can see the hierarchy, but they are not selectable as a target for a time entry. To track time, choose one of the standard tasks beneath the rollup.Standard Tasks
If you specify a rollup task category, the Edit Task drawer (Figure 5) will be presented.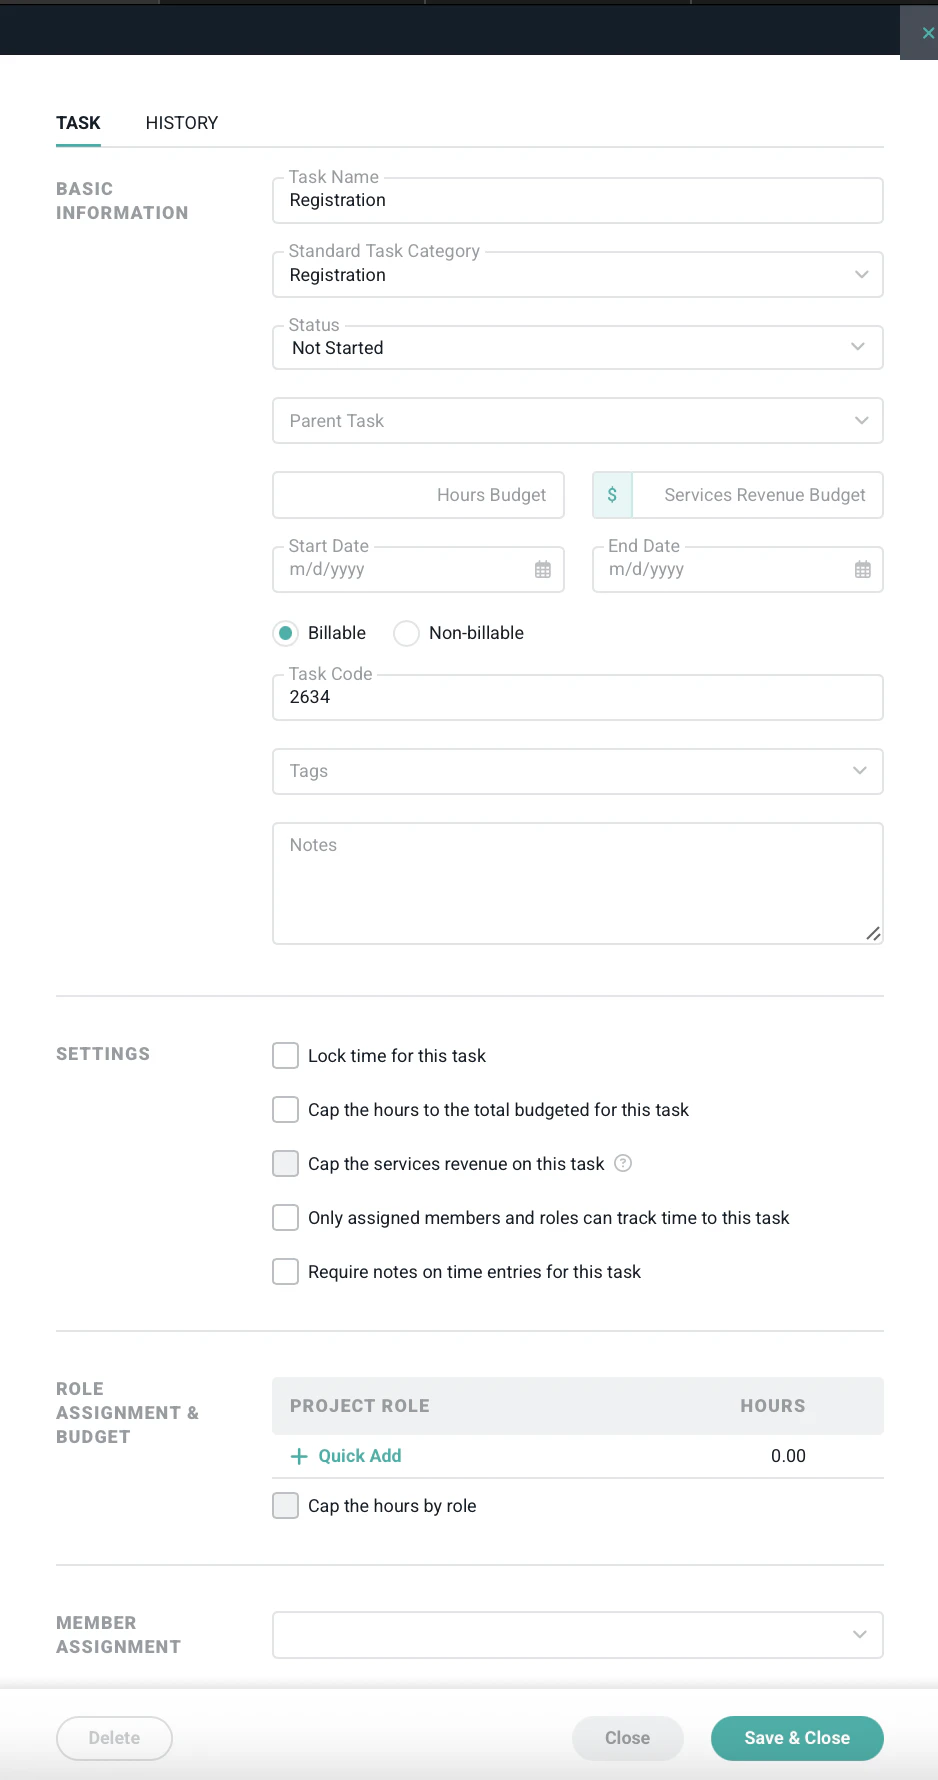
- Task Name - The name of the task.
- Task Category - This will represent a task category from Custom Data that has been set up as a Standard Task.
- Parent Task - If this task should be nested as a subtask under another, existing task, specify that parent task here.
- Status - The status of the task, which can be either Not Started, In Progress, or Completed.
- Start and End Dates - The planned start and end dates of the task.
- Billability - Whether or not the task is billable. If a project is set as non-billable, then this task billability option is not shown. If a project is billable, but a task is set to non-billable, any hours worked on the task will be non-billable regardless of the billability setting of the project role or member.
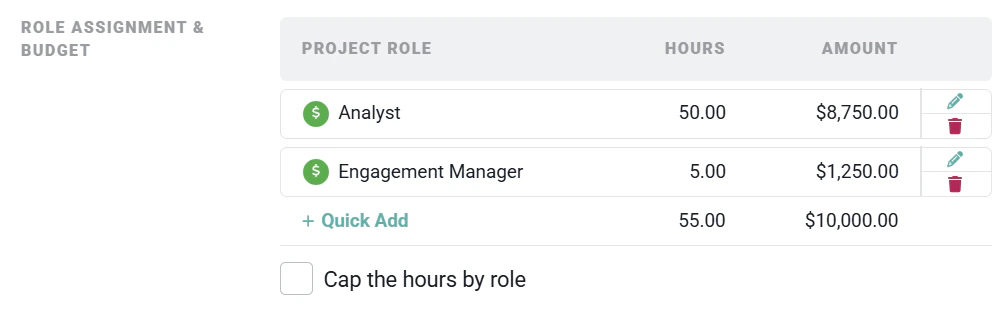
- Hours Budget - The number of hours the task is estimated to take. Note that when roles are assigned to a task, or when hours have been specified for member assignments, the total hours for the task becomes a read-only field that is calculated automatically from the role assignment and budget (Figure 3).
- Services Revenue Budget - The budgeted amount of fees associated with this task. Note that when roles are assigned to a task, the total revenue budget for the task becomes a read-only field that is automatically calculated from the role assignment and budget (Figure 5).
- Task Code - Any internal task identifier that your team may use for the task.
- Task Tags - Apply custom task attributes to the task. A Workspace Admin can set up any number of task tags for your workspace.
- Notes - Any brief notes about the task.
- Lock time for this task - When checked, time can no longer be created or edited for this task.
- Cap the hours on this task - When this option is selected, time entries against this task will be prevented if the amount of time being entered will put the task over the budgeted hours specified.
- Cap the services revenue on this task - on time and materials projects, this setting will be enabled. When checked, time entries will not be permitted against the task if those time entries will put the task over the Services Revenue Budget.
- Only assigned members and roles can track time to this task - Setting this option will prevent members from entering time against the task unless they, or their role, are assigned to that task.
- Require notes on time entries for this task - When checked, any time entries associated with this task must have notes provided.

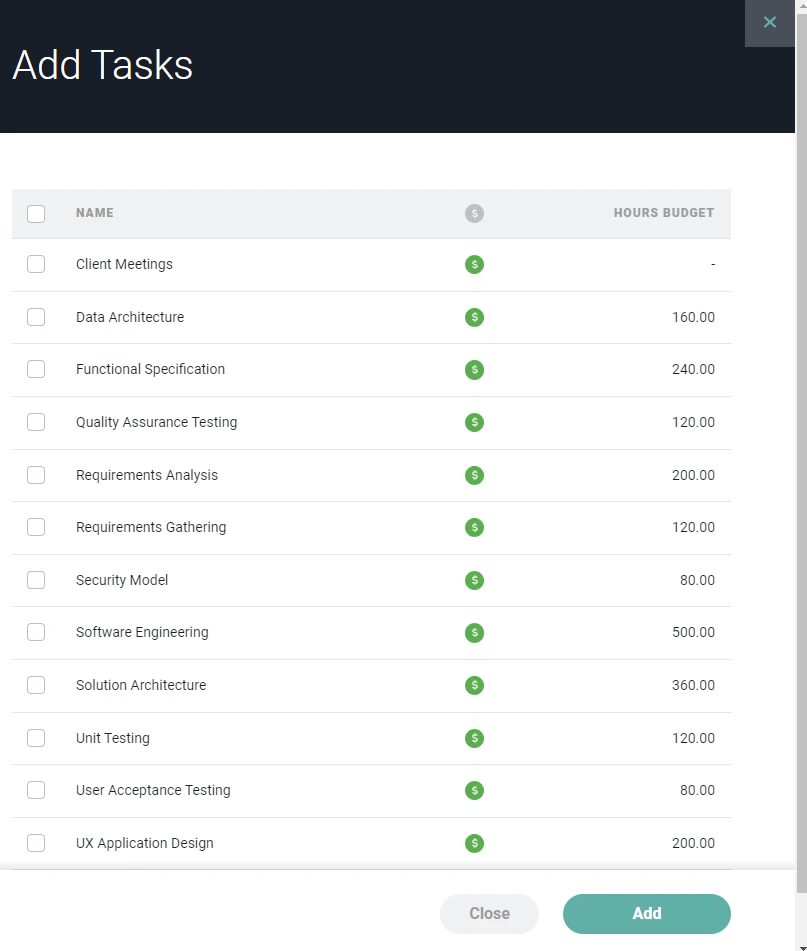
Create a Task from a Task Template
To leverage a task template, simply click the Add from Task Template action menu item (Figure 8) on the + button. This will open the Add Tasks drawer (Figure 9).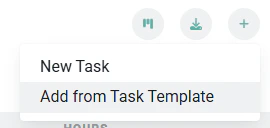
Edit a Task
To edit a task, you must have the Edit project permission. Simply click on the Edit menu option (Figure 10) in the action menu for the row that you want to edit. This will open up the same task drawer that is used to create a new task. Once you have made your edits, simply click the Save & Close button to save the task and return to the task list.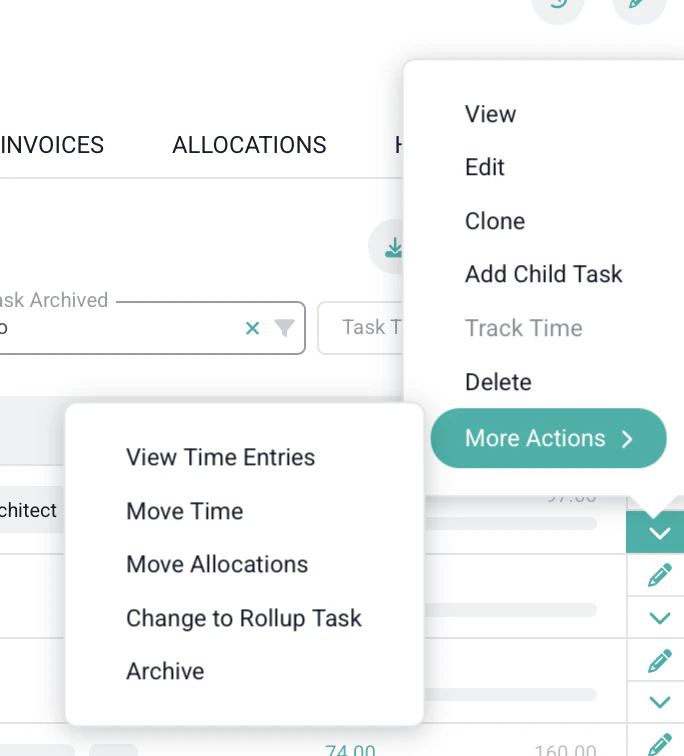
Task Actions
Clone a Task
Task cloning makes it easier to build out a large inventory of tasks quickly. To clone a task, you must have the Edit project permission. Simply click on the Clone menu option in the action menu (Figure 10) for the task that you want to clone. This will bring up a window (Figure 11) that will allow you to give the new task a name. You will have an option to include all the subtasks when cloning a tasks.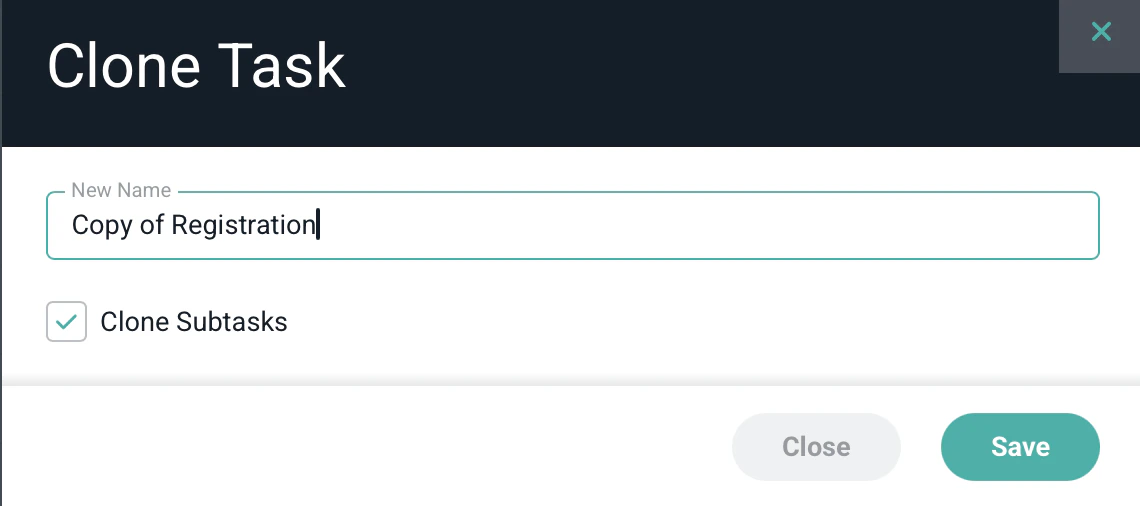
Add Child Task
To create a new child task, you must have the Edit project permission. Click the Add Child Task and you will be prompted to add a New Task where you will have the option to add to a Task Category.Delete a Task
To delete a task, you must have the Edit project permission. Simply click on the Delete menu option in the action menu (Figure 10) for the task that you want to delete. If a task has time entries associated with it, the Delete menu option will be disabled. A task cannot be deleted when there are any time entries associated with it. If you wish to remove a task from the task list, but can not, or do not, wish to delete it, you can archive the task.View Time Entries
To view time entries for a task, you must have project-level View time entries and expense items permissions. To view the time detail, click on the View Time Detail menu option in the action menu (Figure 10) for the respective task. This will bring up the Time Detail report for the specific and project and task.Tasks and Time Tracking
When a project uses tasks, the time entry drawer will show the list of tasks (Figure 12) associated with the project. This list is grouped by My Tasks and Other Tasks. The tasks shown in the My Tasks section are assigned to the member by direct member assignment or by project role assignment. The tasks shown in the Other Tasks section are not assigned to the member either directly or by role. Note that Ruddr does not restrict a project team member from recording time to a task in the Other Tasks section. When a member is associated with a task via a role assignment, the role is shown in a gray bubble to the right of the task name (as shown below). This can be particularly useful when a team member is assigned to multiple roles on the project team.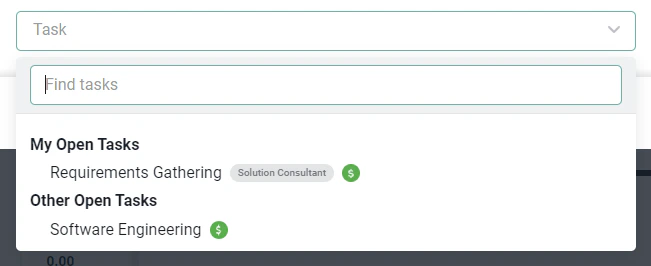
Move Time
The Move Time menu option in the task action menu (Figure 10) transfers every time entry from a task to another standard task in the same project. To move time, you must have the Edit project permission. The action is only available on standard tasks that have time entries — rollup tasks do not have their own time entries to move. The target task must be in the same project, must be a standard task, and must not have time locked. Use this when you want to consolidate tracked time onto a different task — for example, before converting a standard task into a rollup, since rollup tasks cannot hold their own time entries.Move Allocations
To move a task allocation, you must have the Edit project permission. Here you will be able to move the allocations for a parent and its child tasks from one task to another.Changing a Task’s Type
The Change to Standard Task or Change to Rollup Task menu option in the task action menu (Figure 10) switches a task’s type by assigning it a new category of the opposite type. To change a task’s type, you must have the Edit project permission. Changing a standard task to a rollup task is only allowed if the task has no time entries, no assigned members, no assigned roles, and no allocations of its own. If any of these exist, Ruddr will return an error explaining what to clear first — for example, use the Move Time action to relocate time entries, or remove member and role assignments before converting. Changing a task from a rollup task to a standard task is allowed at any time.Archive a Task
To archive a task, you must have the Edit project permission. Simply click on the Archive menu option in the action menu (Figure 10) for the task that you want to archive. When a task is archived, it will no longer be possible for a workspace member to track time against it. To view archived tasks on the Task tab, select “Yes” or “All” in the Task Archived filter dropdown (Figure 1).Managing the Task Hierarchy
Tasks can be nested under other tasks. To do this, you can either edit the task and specify a Parent Task or you can drag tasks in the Tasks list and place them under other tasks. In the Tasks list (Figure 1), there will be a handle (Figure 13) in each task row. You can use this handle to arrange tasks in the list. To associate one task with another, drag the task onto / under the task to which you want to associate the task.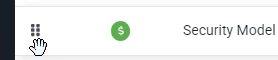

- A rollup task can contain other rollup tasks, producing a higher-level rollup that aggregates lower-level rollups.
- A rollup task can contain standard tasks — the typical case, where a rollup summarizes a set of standard work items.
- A standard task can contain a rollup task. The rollup aggregates only its own descendants.
- A standard task can contain other standard tasks (the classic Ruddr task hierarchy, with no rollup behavior).