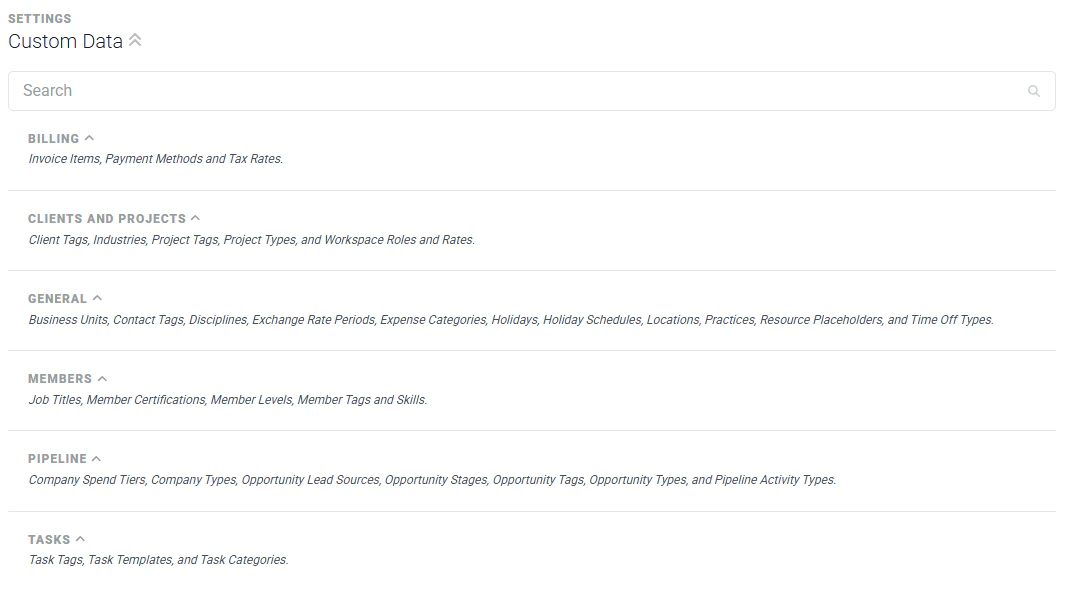
Managing Custom Data
Types of Custom Data
While the Custom Data screen groups entities by the area of Ruddr they relate to, it helps to understand the kinds of data you will encounter:- Lookup data is associated with an entity in Ruddr — for instance, a time entry may be assigned a “Time Entry Type” or a workspace member may be assigned a “Job Title”. Reports in Ruddr can be filtered by lookup data.
- Organizational data is unique to your organization but does not necessarily factor into the data or structure of Ruddr’s primary entities (projects, clients, members) — for example, Business Units or Holiday Schedules.
- Tags are metadata that let you define custom entity attributes you can use to search for the corresponding entities and to filter reports.
- Templates, such as Task Templates, let you define reusable baseline information that can be applied elsewhere in the workspace.
Tags
There are five types of tags supported in Ruddr, each managed on its own screen (Figure 7) within the category where the corresponding entity lives:- Client Tags can be assigned to each client in Ruddr.
- Member Tags can be assigned to each member in Ruddr.
- Project Tags can be assigned to each project in Ruddr.
- Opportunity Tags can be assigned to each opportunity in Ruddr, when the Pipeline feature is enabled.
- Contact Tags can be assigned to each contact in Ruddr. This allows you to define custom contact attributes, and you can then filter reports using contact tags.
Editing a Value
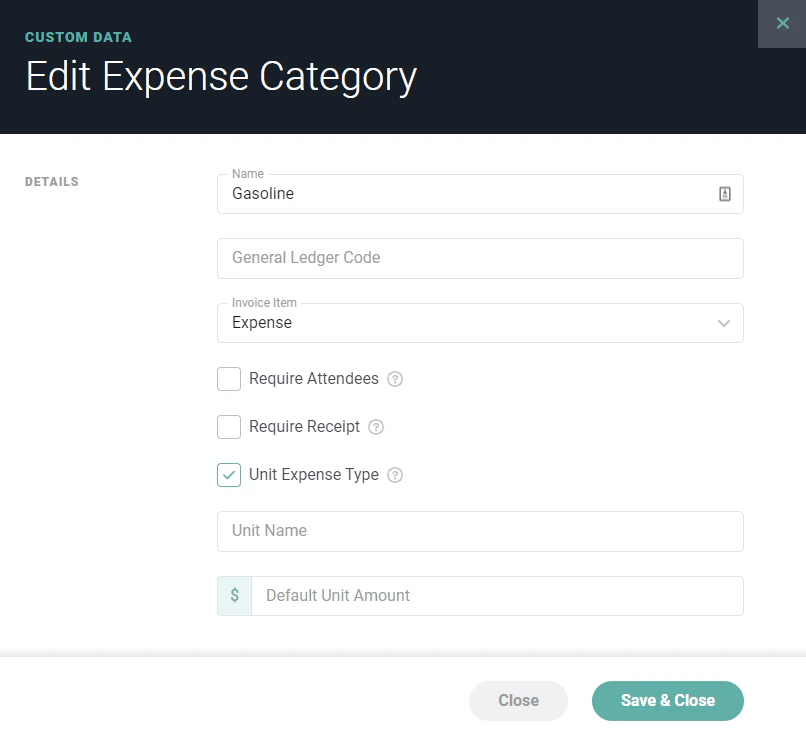
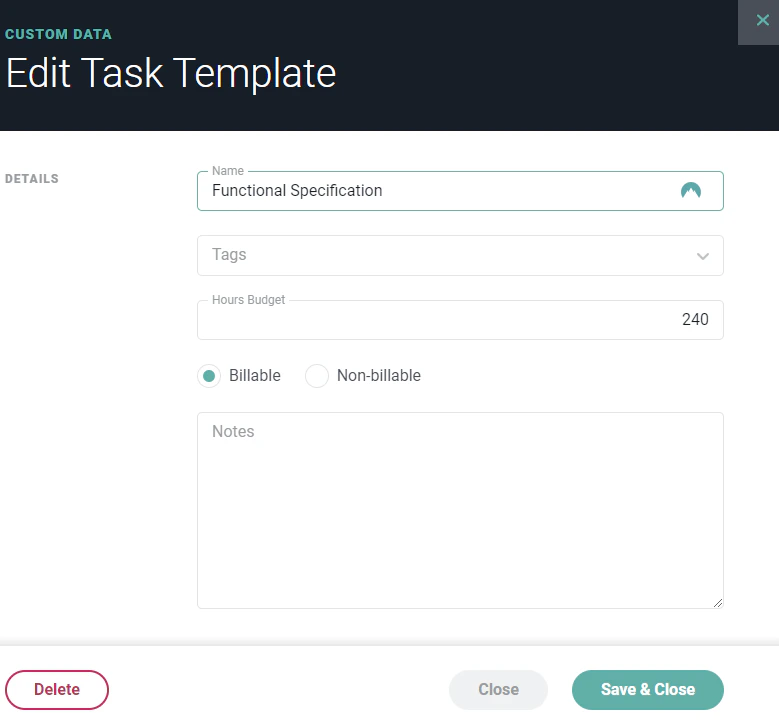
To edit a value, simply click the edit (pencil) icon on the row (Figure 3) that you wish to edit. This will open the edit drawer (Figure 4) for that custom data entity.
Adding a Value
Above each table is a **+**button (Figure 5) that allows you to add a new item to the table. For example, to add a new Discipline to the Discipline lookup, simply click the button shown below.
Deleting or Deactivating a Value
You can delete an item if it is not currently in use within Ruddr. If the item is in use, then the Delete option will be disabled and you can only Deactivate the item (Figure 6). When an item is deactivated, it can no longer be selected for new data entries in Ruddr but past entries will remain unchanged.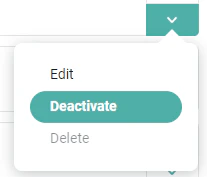
Billing
The Billing category contains the custom data entities related to invoicing and payments.- Invoice Items - Every line item on a Ruddr invoice must have an invoice item. The invoice item is the category of the charge to the customer, such as Service or Expense.
- Payment Methods - Every payment in Ruddr can be assigned a Payment Method.
- Payment Terms - Used to calculate the due date of an invoice and communicate the terms by which the due date is determined (see below).
- Tax Rates - Used to associate an invoice with a specific tax rate percentage (see below).
Tax Rates
Tax Rates are used to associate an invoice with a specific tax rate percentage. These tax rates can then be used to apply tax to line items on Ruddr invoices. Edit / add Custom Tax Rates inline on the Tax Rates screen (Figure 7).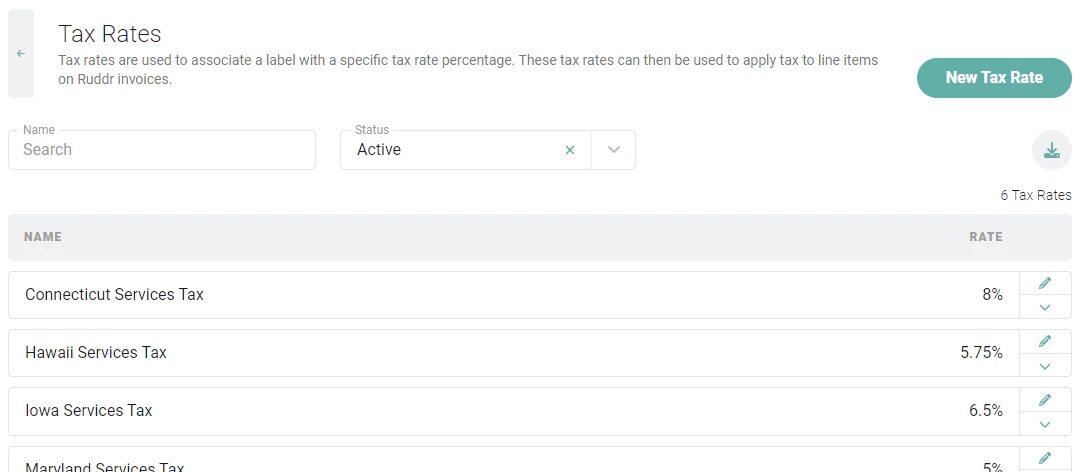
Payment Terms
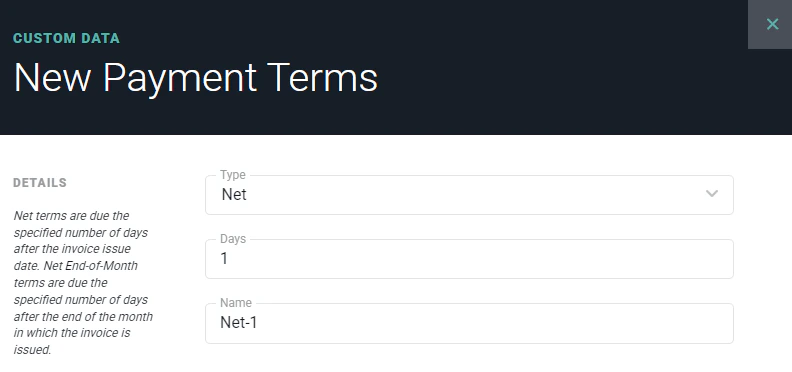
Payment Terms are used to calculate the due date of an invoice and communicate the terms by which the due date is determined. You can then specify a particular payment term when providing the invoice details on a client or a project. There are a number of “system” payment terms that are created with new workspaces. In addition to these, you can create / define any number of custom payment terms. When creating a new Payment Term, you will be prompted for a number of fields (Figure 8):- Type - choose from one of two types:
- Net - specify the number of days following the issue date to establish the due date of an invoice
- Net End-of-Month - specify the number of days after the end of the month in which the invoice is issued to establish the due date of that invoice
- Days
- Name
Clients and Projects
The Clients and Projects category contains the custom data entities related to your clients and the projects you deliver for them.- Client Tags - Client Tags can be assigned to each client in Ruddr. See Tags above for more information.
- Industries - Each client can be assigned a vertical industry.
- Project Tags - Project Tags can be assigned to each project in Ruddr. See Tags above for more information.
- Project Types - Every project in Ruddr can optionally be assigned a project type. Assigning a project type helps you analyze the performance of specific segments of your project portfolio.
- Workspace Roles and Rates - A standard rate card defined at the workspace level (see below).
Workspace Roles and Rates
Leveraging Workspace Roles and Rates in Ruddr allows you to define, at a workspace level, a standard rate card for your organization. You can link clients within your workspace to these roles and rates, and then add those roles and rates to projects where clients leverage them. The workspace administrator can establish this rate card in the Custom Data section (Figure 9) of Workspace Settings. Note that any changes to existing Workspace Roles and Rates in Custom Data will be reflected in all clients that link to these roles / rates.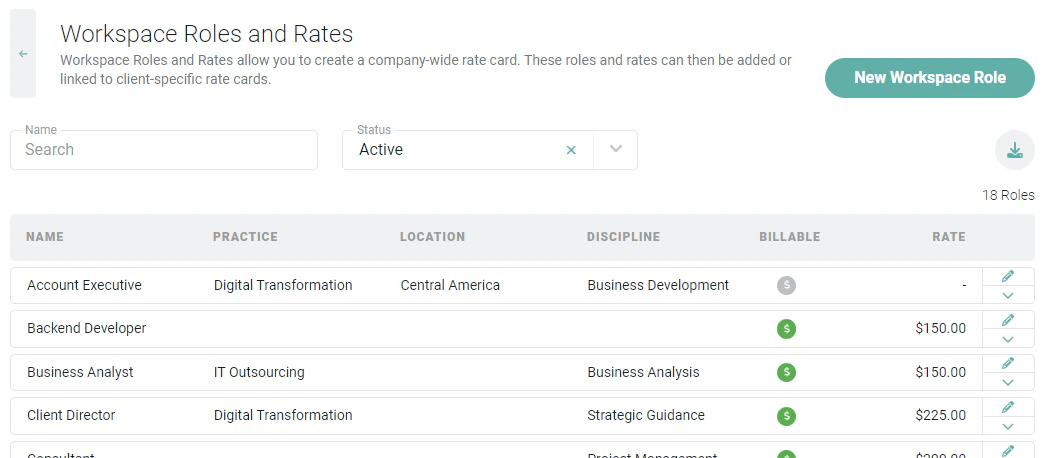
General
The General category contains custom data entities that apply broadly across your organization.- Business Units - Define entities within your organization and link them to clients, projects, and members (see below).
- Contact Tags - Contact Tags can be assigned to each contact in Ruddr. See Tags above for more information.
- Disciplines - Disciplines represent a general skill area that can be assigned to employees and project roles. For example, the employees in various project management job titles might be assigned to a single Project Management discipline.
- Exchange Rate Periods - Provide custom exchange rates for specific date ranges (see below).
- Expense Categories - Expense categories are used for the individual expense items on expense reports. Each expense item must be assigned an expense category. For more information on managing expense categories, see the separate expense category article.
- Holidays - Manage built-in and custom holidays for your workspace (see below).
- Holiday Schedules - Group holidays into schedules that can be assigned to members (see below).
- Locations - Each workspace member and client can be assigned a location.
- Practices - Larger professional services companies often organize service offerings and/or personnel into practices. You can assign a Practice to each member, client, and project in Ruddr.
- Resource Placeholders - Assign project hours to a placeholder role when the assigned team member is not yet known (see below).
- Time Off Types - When a workspace member creates a time off entry, the member must select a Time Off Type. A standard set of time off types are provided with each workspace but you can tailor these to your organization’s preferences. Time off types can be configured as paid or unpaid. Note that the “Holiday” time off type can be edited and deactivated, but not deleted. Ruddr uses this special time off type when automatically creating holiday time off entries.
Business Units
The Business Units feature in Ruddr enables this element in Custom Data. You can define various entities within your organization and link those business units to clients, projects, and members. Additionally, you can specify varying invoice details and settings for each business unit, allowing you to send invoices from different entities. A business unit is similar to a practice, and larger professional services firms often use both. For example, a member’s business unit might be a geographic such as North America while their practice might be a vertical industry such as Retail. You can assign a business unit to a member from the Organization section of the member profile, and you can scope security roles by business unit in the same way you can scope them by practice. With the Multiple Accounting Integrations feature enabled, each business unit can be associated with a specific accounting integration, allowing you to save that business unit’s project invoices to a specific accounting instance.Exchange Rate Periods
Workspaces that have enabled the Multicurrency feature in Ruddr will have the ability to provide a set of custom exchange rates for specific date ranges. Essentially, these exchange rate periods offer the ability to override the exchange rates used by Ruddr in converting financial data from one currency to another. For more on how Ruddr approaches this conversion, please refer to the Help Center article Currency Conversion Overview. When creating an exchange rate period (Figure 10), you provide the two currencies for which the exchange rate will be created and will then provide the rate of exchange for one currency to the other. Additionally, you will provide the Start and End Dates for the period during which this exchange rate will take effect.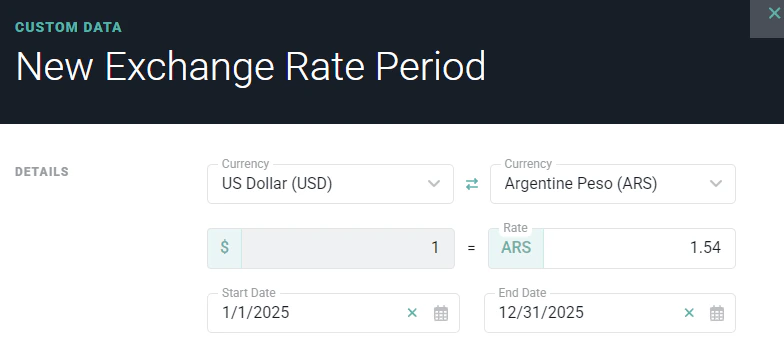
Holidays
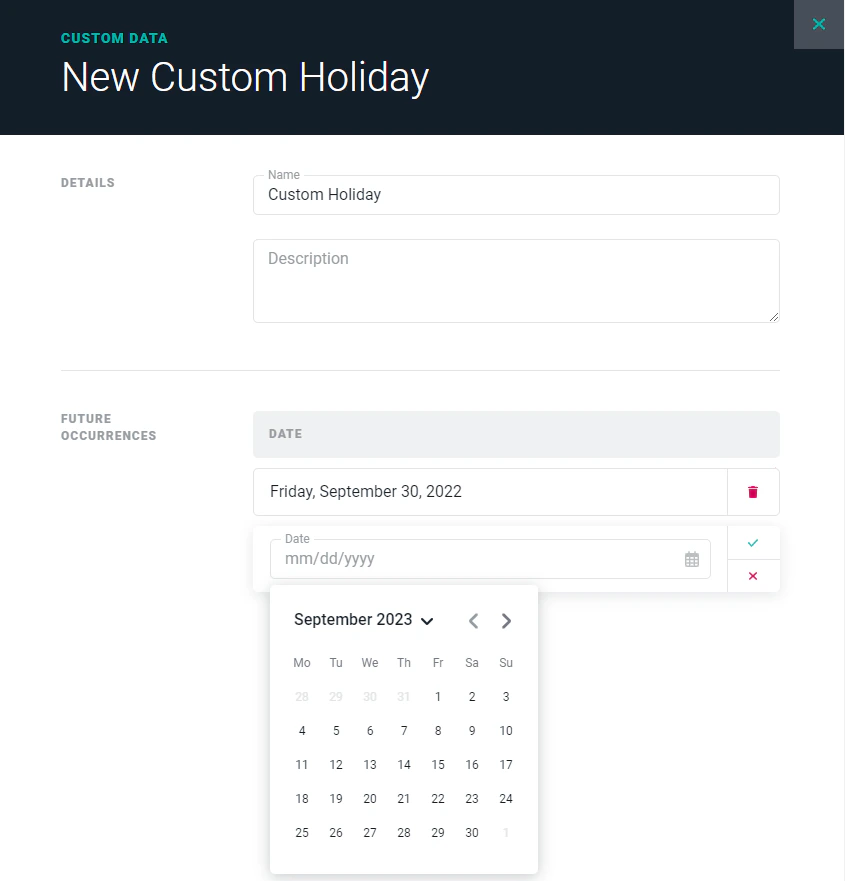
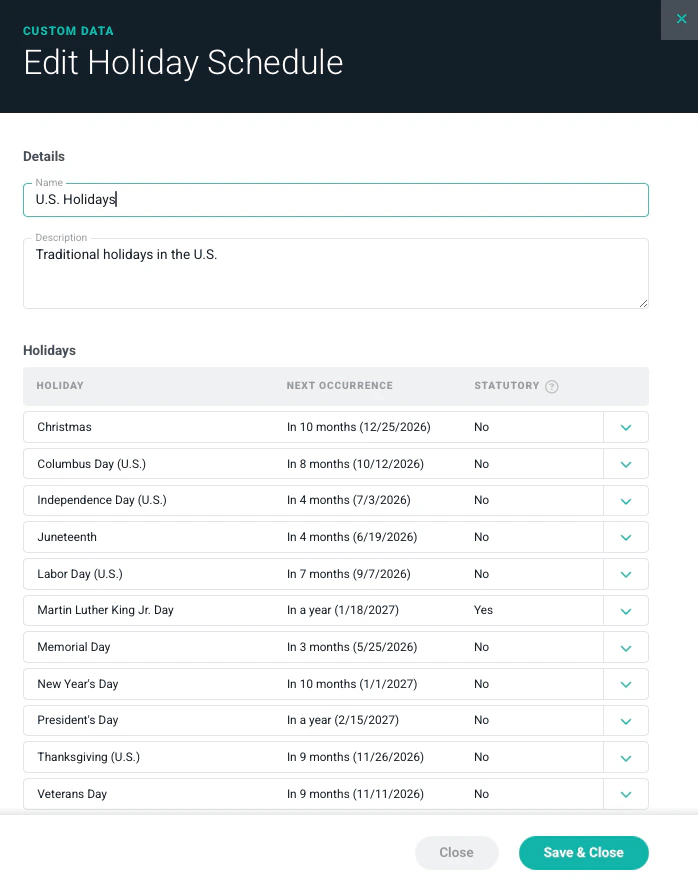
Ruddr has over 130 built-in, standard holidays, all of which can be managed within the Custom Data section (Figure 11). If your company observes a holiday that is not built-in, you can create a custom holiday (Figure 12). All holidays can be added to your holiday schedules. In the holidays list (Figure 11), you can filter the list of holidays by Holiday Schedule to see which holidays are associated with a particular schedule. Also, you can see the associated holiday schedule(s) for each holiday in the Holiday Schedule column of the list.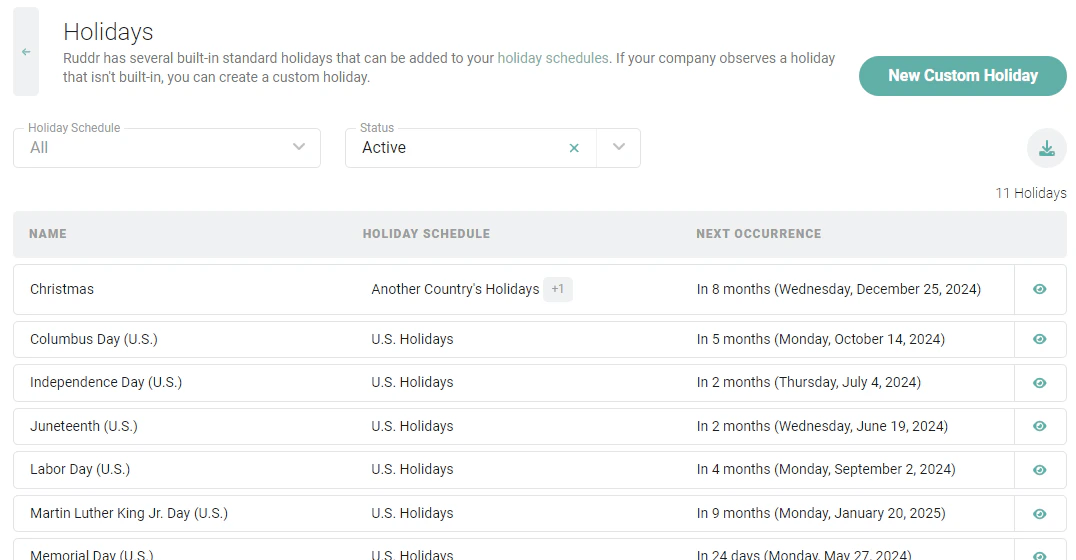
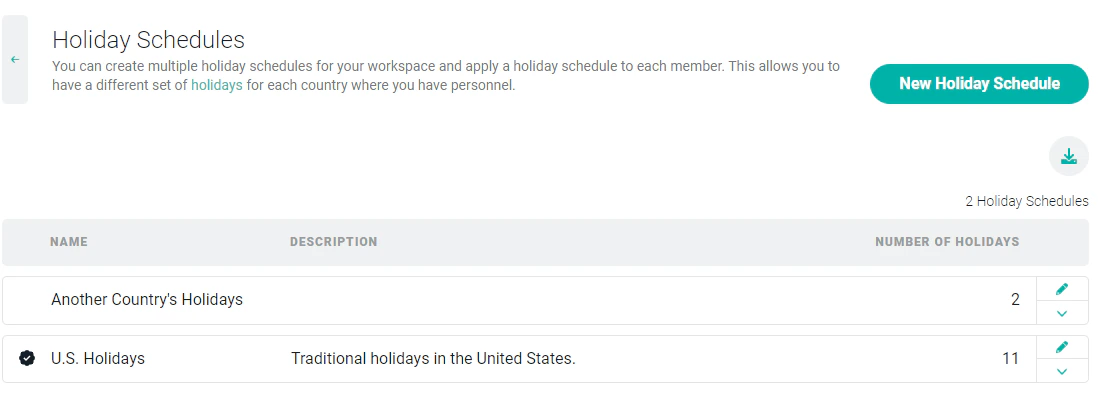
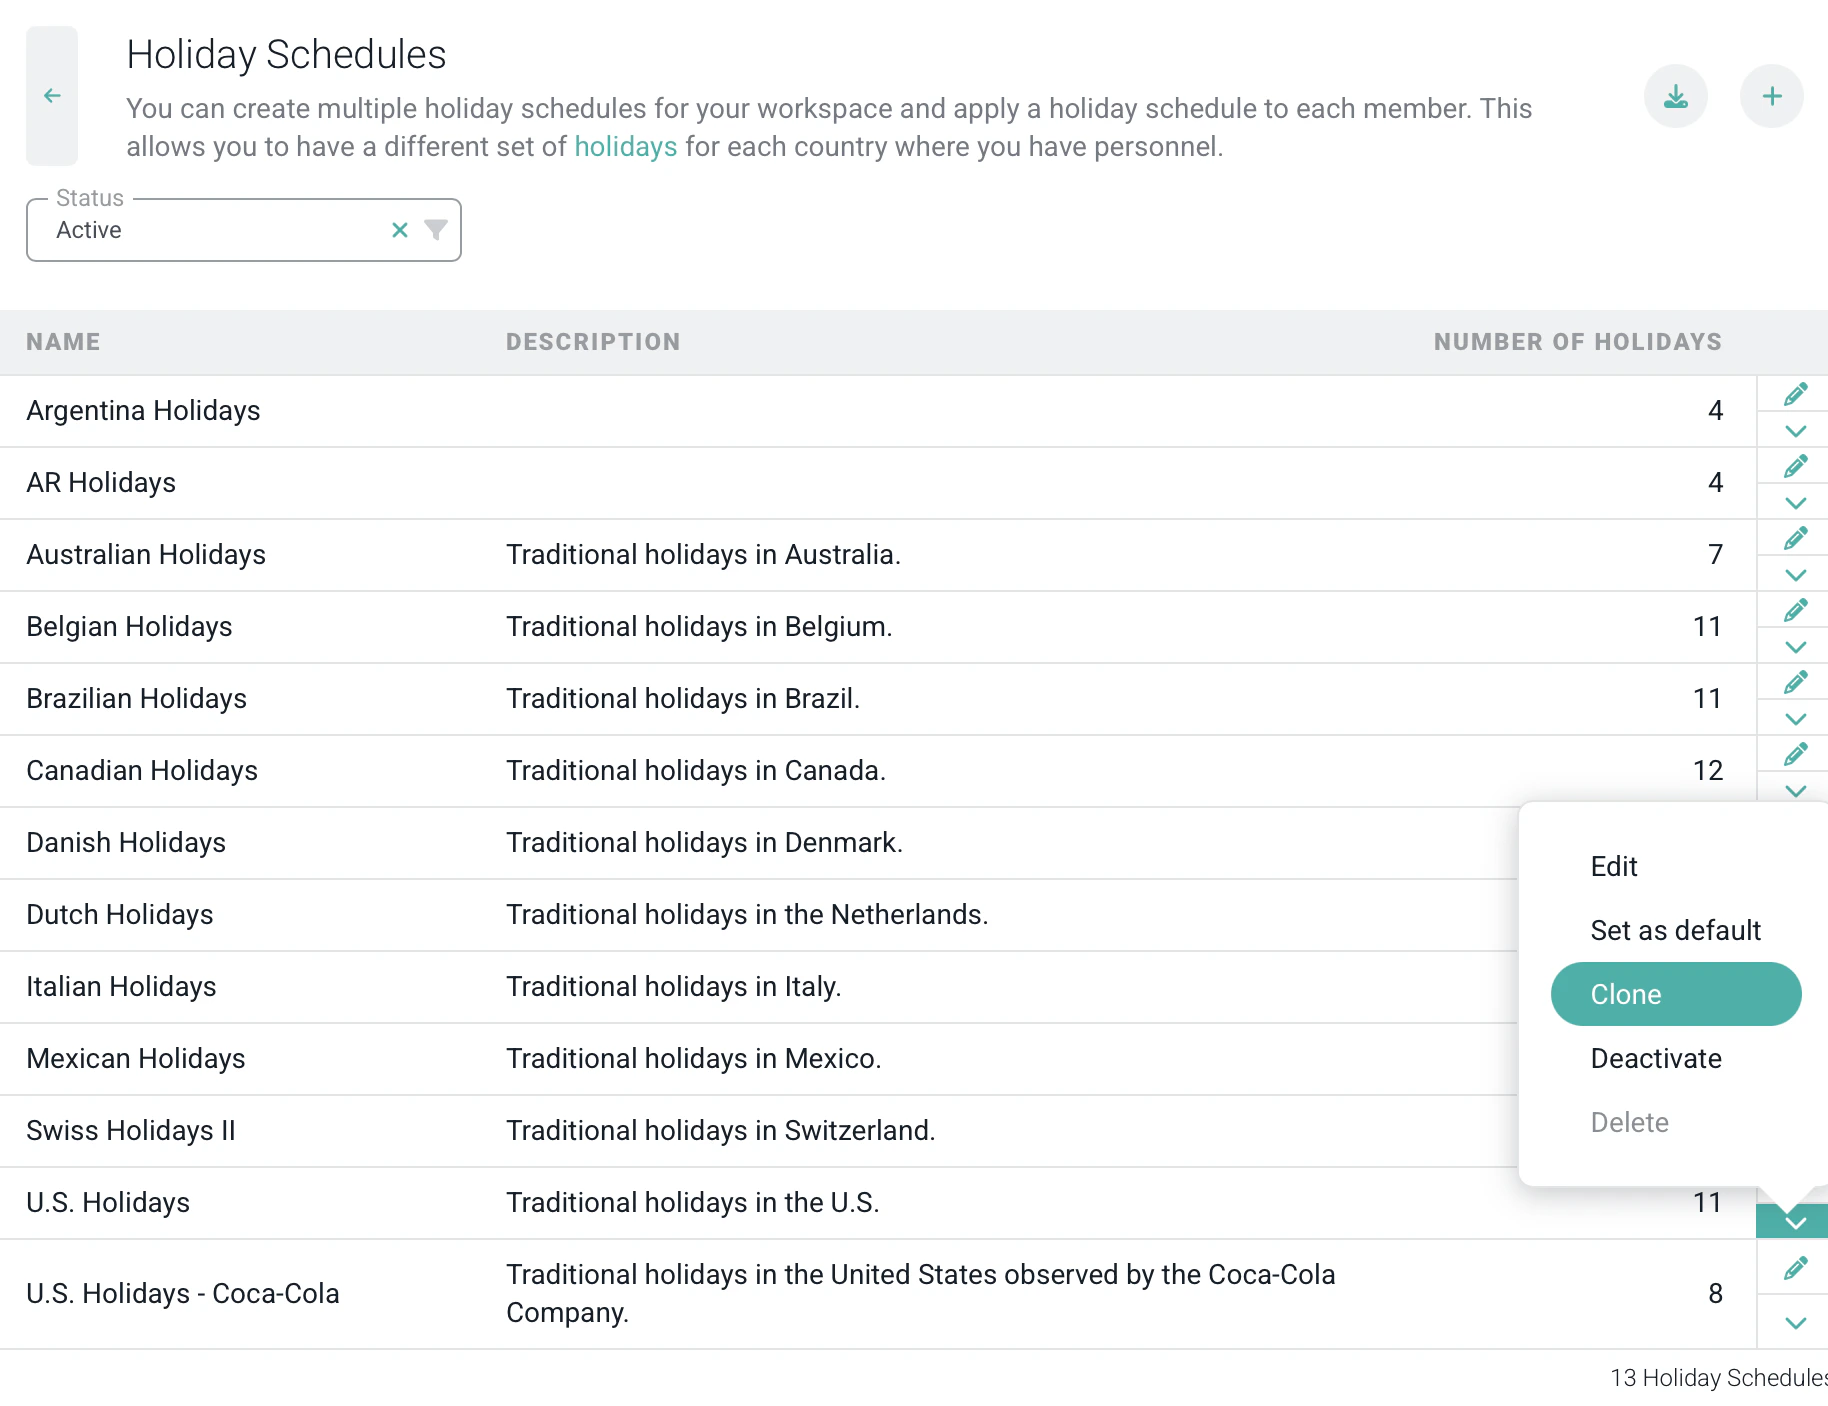
Holiday Schedules
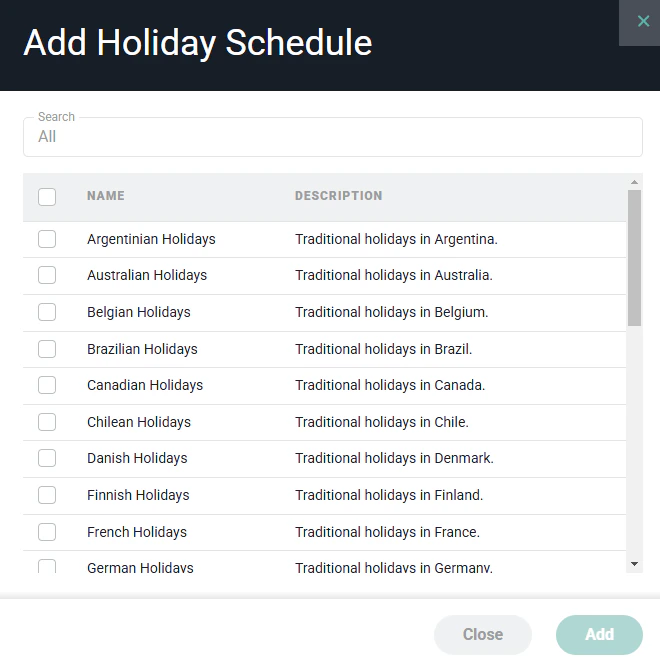
Ruddr offers a number of international holiday schedules for you to use or customize. To add one of these schedules, simply click the Add from Available Schedules action menu item (Figure 13) on the New Holiday Schedule button. A list (Figure 14) of Ruddr-provided holiday schedules will be presented from which you can add any number of schedules to your workspace.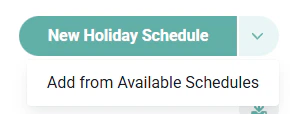
- Statutory holiday time off entries are always created automatically by Ruddr. Every weekend, Ruddr will create statutory holiday time off entries for the forward week.
- Statutory holiday time off entries are automatically approved by Ruddr upon creation. These time off entries do not have to be manually approved.
- Statutory holiday time off entries will be locked for all workspace members, other than Workspace Admins.
- Statutory holiday time off entries are created even if the member does not have permission to create time off entries or does not have permission to create holiday type time off entries.
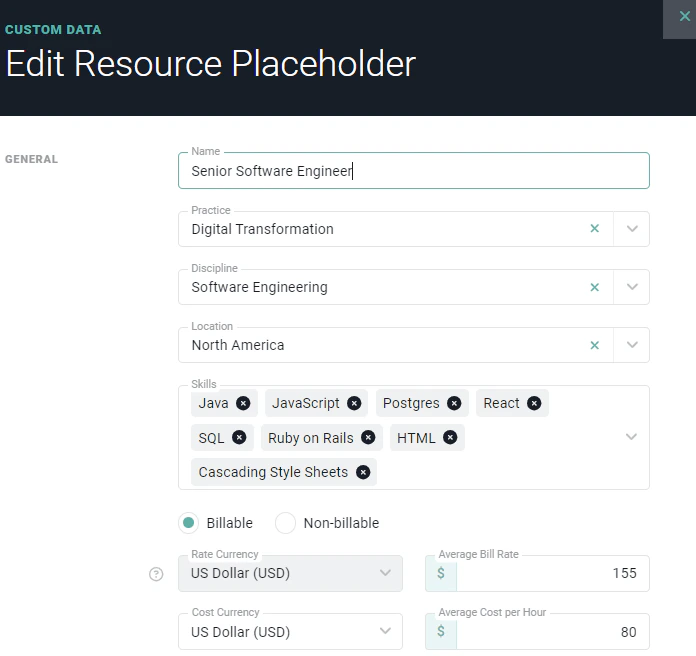
Resource Placeholders
Resource placeholders (Figure 18) should be used when you are not certain which team member should be assigned to a project but want to assign the hours of the project to a “placeholder” role. Creating a resource placeholder (Figure 19) allows for the assignment of a practice and a discipline to the record. Assigning these values to a placeholder provides you with the ability to track resource needs at a more granular level across your organization and workspace.
Members
The Members category contains the custom data entities that describe your workspace members.- Job Titles - Each workspace member can be assigned a job title.
- Member Certifications - One or more certifications can be assigned to each workspace member.
- Member Levels - Each workspace member can be assigned a member level (such as Associate, Senior, or Lead).
- Member Tags - Member Tags can be assigned to each member in Ruddr. See Tags above for more information.
- Member Templates - Define reusable presets for the settings applied to new workspace members. For more information, see the separate Member Templates article.
- Skills - One or more skills can be associated with each workspace member.
- Timesheet Attestations - Certification statements that members must sign when submitting their timesheets (see below).
Timesheet Attestations
When the Timesheet Attestation feature is enabled, timesheet attestations can be assigned to members to display a certification statement that they must sign before submitting their timesheet. Each timesheet attestation consists of a Name and the Attestation Text that will be presented to the member. Ruddr provides a statement named “Default”, and you can create additional statements to satisfy the requirements of different jurisdictions. For more on creating attestation statements, assigning them to members, and the member’s submission experience, please refer to the Timesheet Attestation article in the Ruddr Help Center.Pipeline
When the Pipeline feature is enabled, the Pipeline category provides the following custom data entities:- Company Spend Tiers - Categorize companies based on their annual spend.
- Company Types - Categorize companies within the pipeline.
- Opportunity Lead Sources - Track how you generated an opportunity.
- Opportunity Pipelines - Leverage multiple opportunity pipelines to track different sales processes via opportunity stages.
- Opportunity Stages - Track the progress of opportunities via stages with associated probabilities.
- Opportunity Tags - Can be assigned to each opportunity in Ruddr. See Tags above for more information.
- Opportunity Types - Categorize opportunities within the pipeline.
- Pipeline Activity Types - Track the various types of activities during the sales process.
Tasks
When utilizing tasks on projects, the Tasks category provides the following custom data entities:- Task Categories - Allows you to define multiple categories of tasks to be used in projects (see below).
- Task Tags - Can be assigned to each task within a project. This allows you to define custom task attributes. See Tags above for more information.
- Task Templates - Allow standard tasks to be easily added to projects (see below).
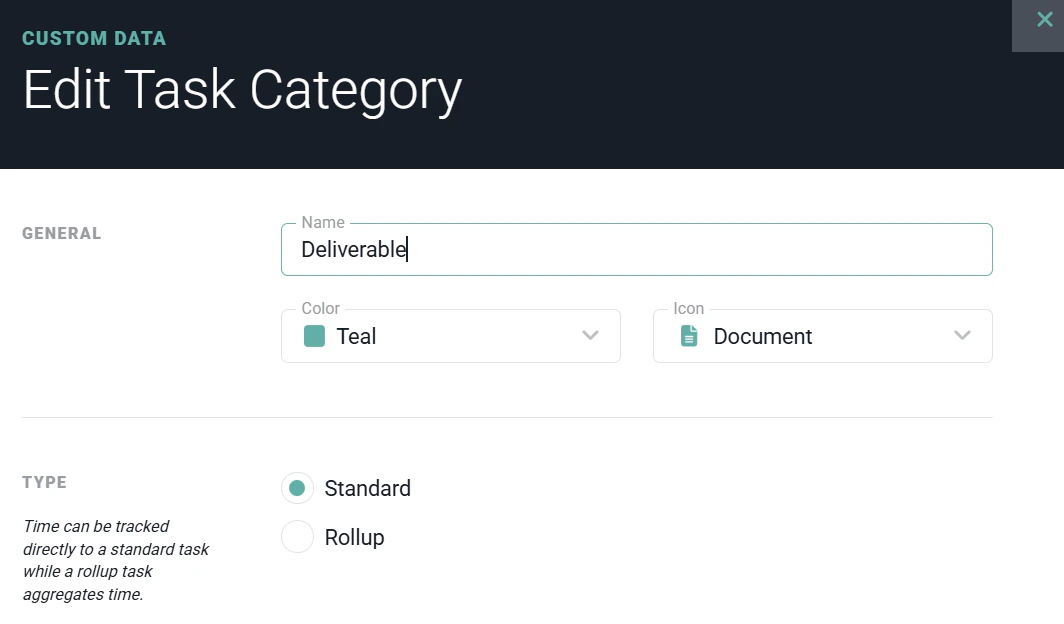
Task Categories
Each Task Category can be created as either a Standard or Rollup category type. Time can be tracked directly to a standard task while a rollup task aggregates time from its child tasks. The Task Categories list (Figure 20) shows each category’s icon, color, name, type, and active status. From this screen, you can create a new category, edit or delete an existing one, set a category as the workspace default, and activate or deactivate a category.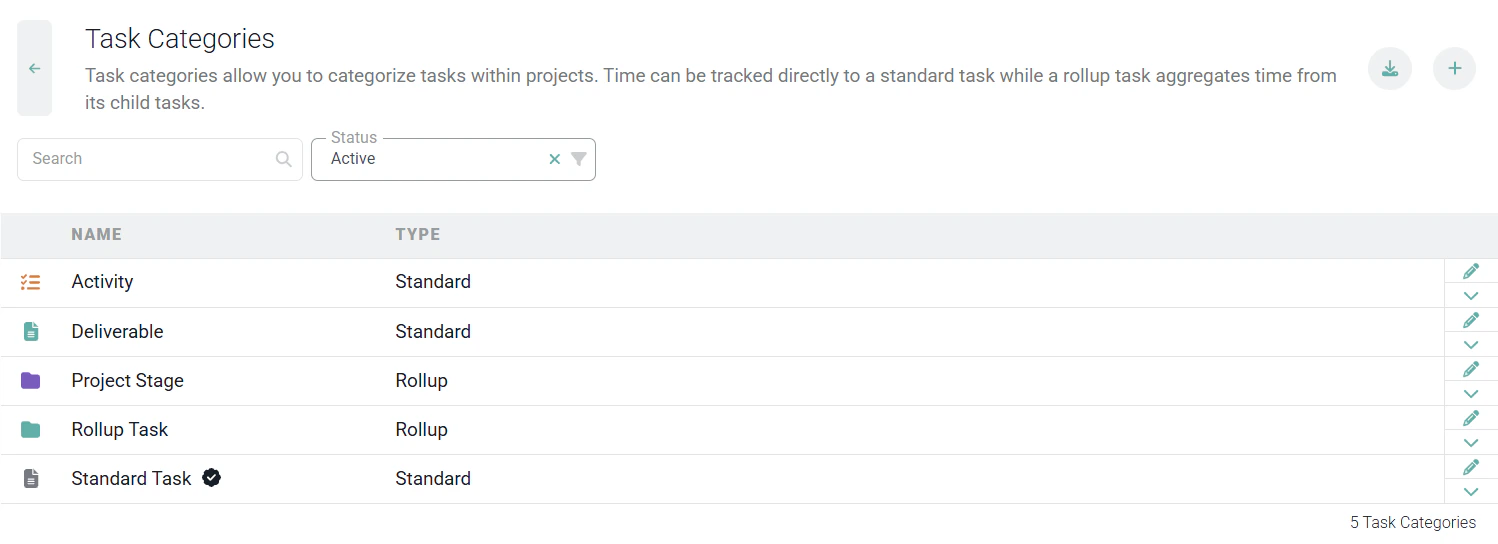
- Name - The display name of the category.
- Color - The color used to render the category’s icon throughout Ruddr.
- Icon - The icon shown next to the task name wherever the task appears.
- Type - Either Standard or Rollup, as described above. The type is required when creating a new category.
Task Templates
Task Templates for project tasks (Figure 22) can be created and managed in the Custom Data section of Ruddr. Once created, these task templates can be added as tasks to projects in the workspace.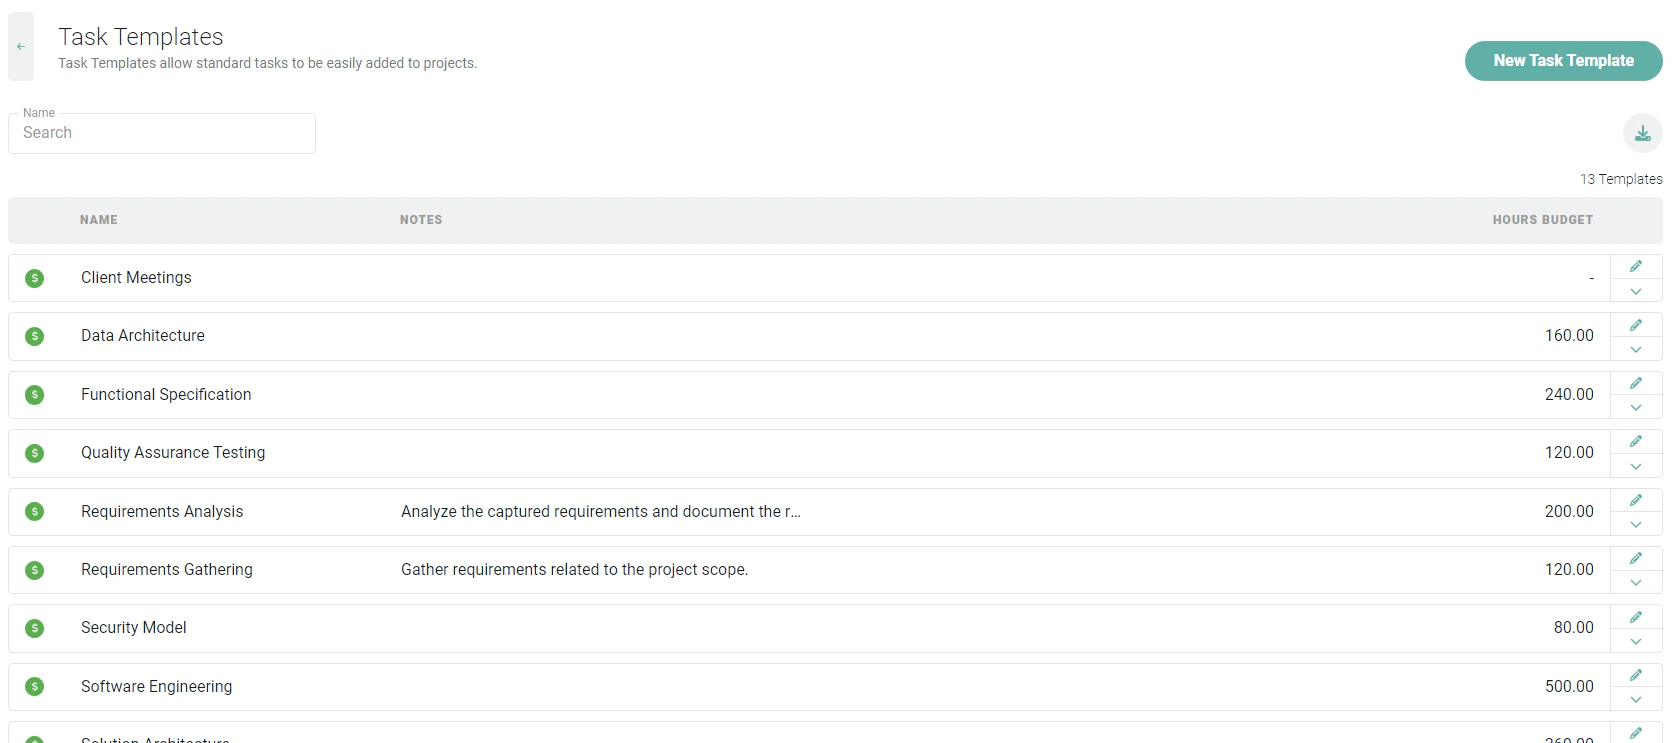
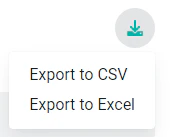
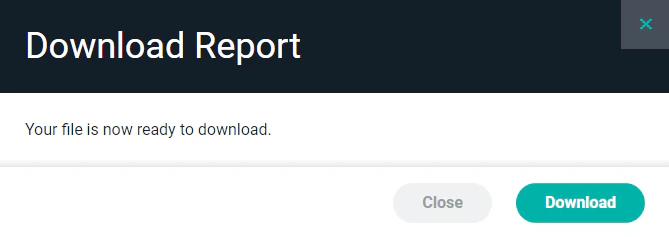
Exporting Custom Data
All Custom Data can be exported to multiple formats: Microsoft Excel or Comma-Separated Values (CSV). To export any custom data values, navigate to the data screen by clicking on any of the boxes on the Custom Data Section (Figure 2). Then, click on the download icon (Figure 24) at the top-right of the screen. This will drop down a list of formats (Figure 25). Select the desired format for the data and then click the Download button (Figure 26) to download.