- Workspace Identification
- Company Information
- Member Settings
- Regional Settings
- Default Time Format
- Time and Expense Settings
- Time and Expense Notifications and Reminders
- Timesheet Settings
- Client Settings
- Project Settings
- Allocation Settings
- Utilization Settings
- Task Settings
Workspace Identification
The first section within Workspace is Workspace Identification (Figure 2). This section allows you to set the name of the workspace, upload a logo, and specify the unique workspace identifier. Note that the identifier must be unique across all Ruddr workspaces. Also note that changing the unique workspace identifier will break existing links to the workspace.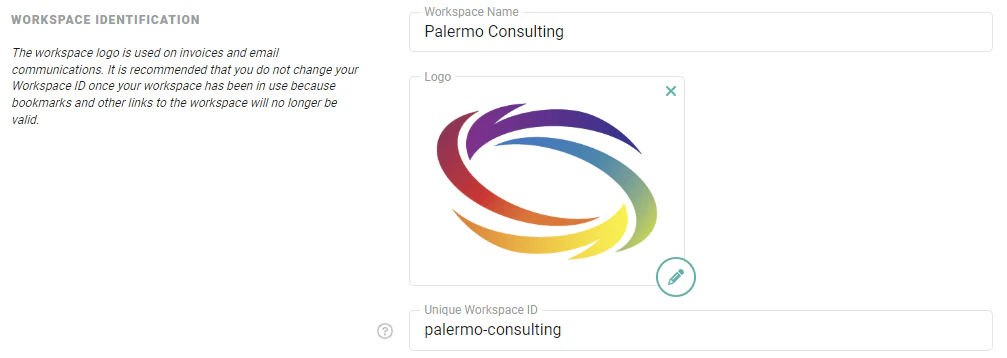
Company Information
The Company Information section (Figure 3) allows you to manage your company name and also provide a workspace contact for your members’ general inquiries. The Company Name is leveraged on any invoices that you create in Ruddr.
Member Settings
The Member Settings section (Figure 4) allows you to specify whether or not you will allow members to manage their name and profile image in their User Profile section. Additionally, you can set your company’s standard business days. This defaults to Monday through Friday but you can change this as needed. When you add new members to your workspace, their default capacity will be the number of Capacity Hours Per Day for each of the standard business days that you set in this section. Note that by setting the capacity and standard business days, you are not restricting your members from entering time and expense on non-business days, nor are you restricting them from entering more hours than specified for their capacity.
Regional Settings
The Regional Settings section (Figure 5) provides you with the ability to set default settings for time zone, currency, and regional format. The regional format affects date, time, number, and currency format. By specifying these defaults, you are establishing the default settings for the workspace. Each member, however, has the ability to specify their own, preferred regional settings through the My Profile screen.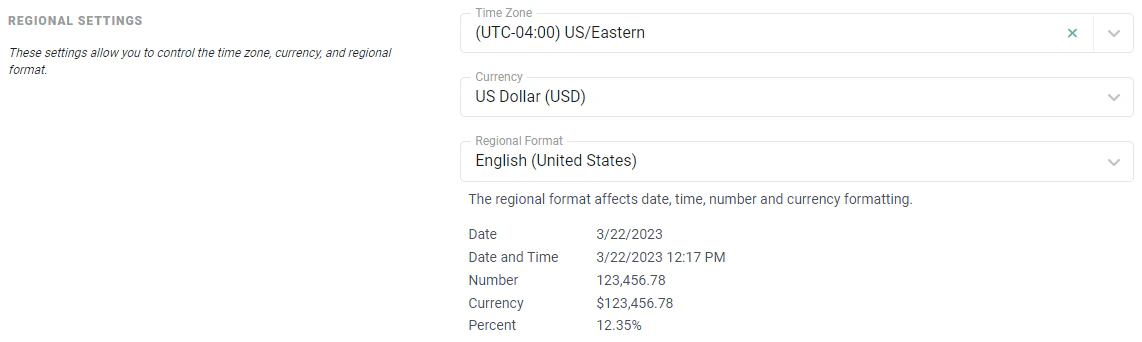
Default Time Format
The Default Time Format section (Figure 6) allows you to specify the default time display format that will be used for new workspace members. You can select either clock format (1:30) or decimal format (1.5). Note that here you are merely controlling the default setting; workspace members have the ability to set their own preferred format within the My Profile screen. Hours can be typed into Ruddr’s time screens in either clock or decimal format and will be automatically converted to the member’s preferred format. Reports and invoices in Ruddr always use decimal format.
Time and Expense Settings
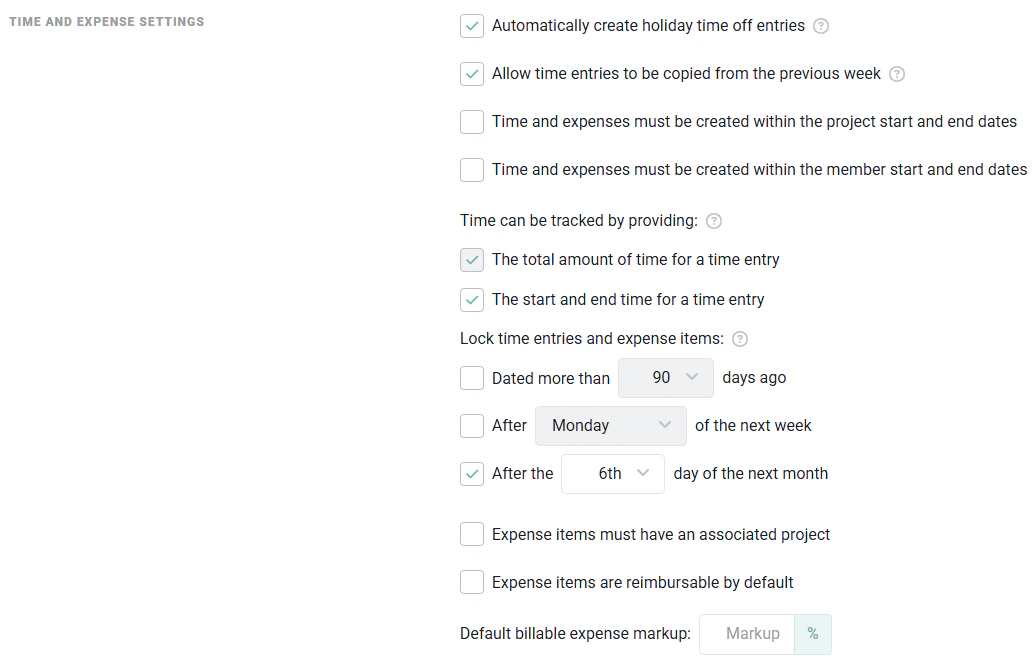
The Time and Expenses Settings section (Figure 7) allows you to adjust settings related to:- Acceptable time and expense dates
- Holiday time entry creation
- Expense project requirements
- Permit members to copy time entries from the previous week
- Time and expense locking
- If the project does not have either date specified, a time and / or expense entry can be created for any date.
- If the project only has a start date, then Ruddr will only ensure that the entries are created for dates after the start date.
- If the project only has an end date, then Ruddr will ensure that entries are created for dates before that end date.
- When both dates are specified on a project, Ruddr will ensure that the entries are created for dates within the start and end date range.
Time and Expense Notifications and Reminders
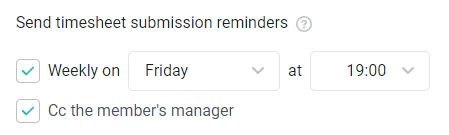
The Time and Expense Notifications and Reminders section (Figure 8) of Workspace Settings provides a number of options for reminding workspace members to enter, submit, and / or approve time and expense at a determined interval. There are three classifications of reminders that can be configured: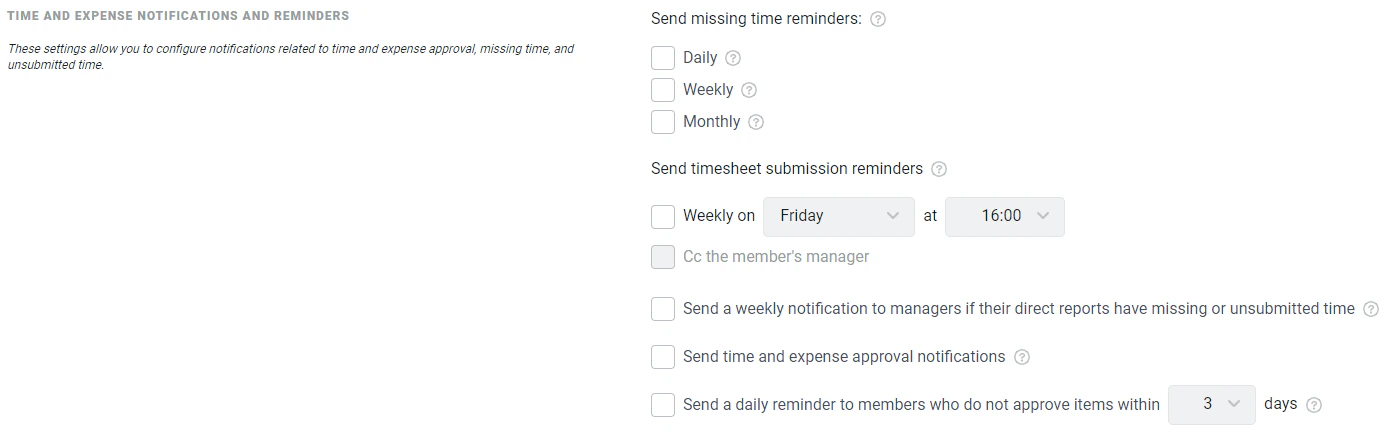
Missing Time Reminders
Missing Time reminders (Figure 10) notify members that they are missing time for a specific period. As stated above, this is a capacity-driven calculation, meaning that a member’s capacity is evaluated to determine if they have entered enough hours for a period.
- Daily: these are sent at 9 pm in the user’s time zone
- Weekly: sent on Monday mornings at 3 am in the user’s time zone
- Monthly: sent on the 1st of the month at 3 am in the user’s time zone
Unsubmitted Time / Timesheet Reminders
For workspaces that are do not have the Timesheets feature enabled, Workspace Admins can elect to send member reminders that they have unsubmitted hours for the period. Similar to the Missing Time reminders (Figure 10), these Unsubmitted Time reminders (Figure 11) can be sent daily, weekly, and / or monthly.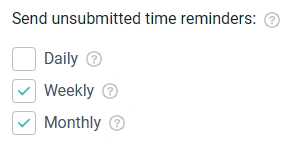
- Daily: these are sent at 9 pm in the user’s time zone
- Weekly: sent on Monday mornings at 3 am in the user’s time zone
- Monthly: sent on the 1st of the month at 3 am in the user’s time zone
Manager and Approver Notifications
For Workspace Admins that are looking to delegate the responsibility of tracking down missing time, Ruddr can send weekly notifications to all managers in the workspace that have direct reports with missing or unsubmitted time. To enable this, check the corresponding box (Figure 9) in Time and Expense Settings. Approver notifications (Figure 9) send emails to members to notify them that they have items in their approval queue. Manager notifications provide managers with insights into any of their direct reports that have missing time or unsubmitted time. For workspaces that leverage Multi-Step Approval Workflow, it is important to note the following with regards to time and expense notifications / reminders (Figure 9). These notifications / reminders will be sent to any / all approvers listed for the current step in the approval workflow. For example, if an approval workflow is currently in Step 2 of 3, and there are three approvers listed for Step 2, all three approvers will receive a notification and will also receive an approval reminder if either of these options (Figure 9) are enabled.
- Weekly manager notifications are sent once a week, on Monday mornings at 3 am in the user’s time zone.
- Time and Expense approval notifications are sent immediately when a time entry or expense item needs approval.
- Daily approval reminders are sent at 9 am in the user’s time zone.
Timesheet Settings
For workspaces that leverage the Timesheets feature, the Timesheets Settings section (Figure 13) will be available. In this section, Workspace Administrators can configure timesheet splitting, automatic timesheet submission and timesheet unsubmission rules.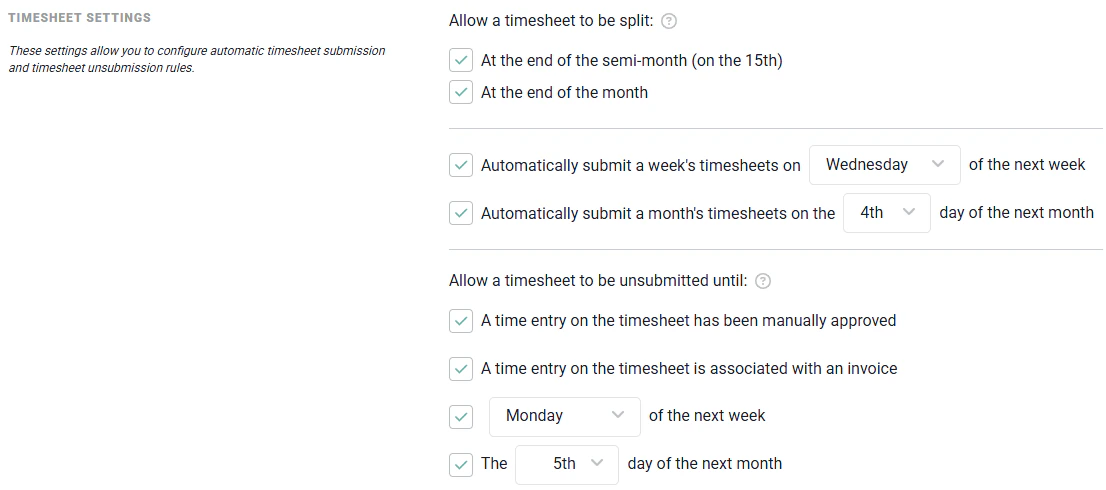
Splitting Timesheets
Your workspace can allow for members to submit multiple timesheets in cases where a week spans multiple billing periods. In the Timesheet Settings area of workspace settings, you can specify whether or not you want to enable the ability for timesheets to be split across these periods. If you wish to enable this, you can choose from either / both of the following options:- At the end of the semi-month (on the 15th)
- At the end of the month
Automatic Timesheet Submission
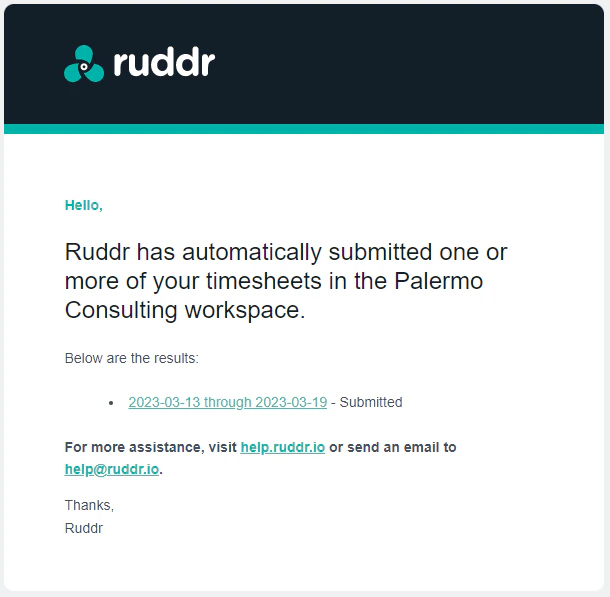
In some circumstances, you may want to automatically submit timesheets on behalf of members that have yet to submit them in an appropriate timeframe. There are two options available (Figure 14) in Timesheet Settings to have Ruddr automatically submit timesheets for members.- You can submit timesheets for the previous week on a given day of the next week.
- You can also submit all timesheets for the previous month on a given day of the new month.

Timesheet Unsubmission Rules
When a workspace member submits a timesheet, that member may later realize they need to make a correction. In that scenario, the member needs to unsubmit the timesheet, make the correction, and then resubmit the timesheet. In many cases, a workspace may wish to allow members to unsubmit their timesheet for some period of time, as it reduces the administrative burden that would otherwise fall on senior-level personnel. Ruddr provides workspace settings (Figure 16) that allow the Workspace Admin to identify the scenarios in which timesheet unsubmission will be prohibited.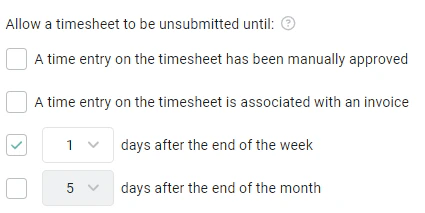
Client Settings
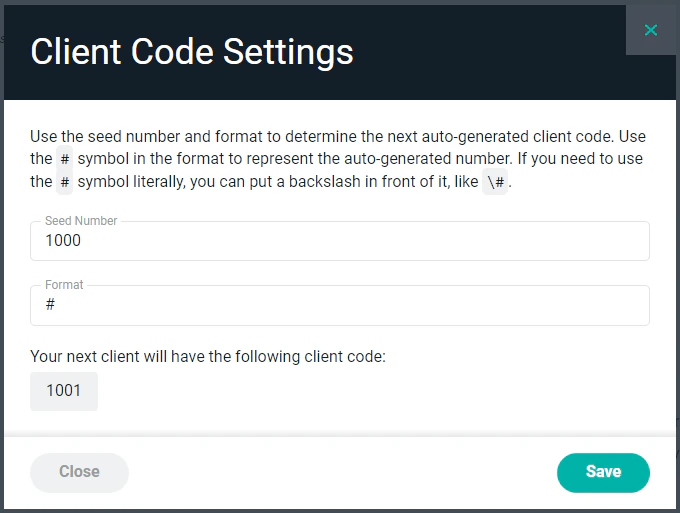
The Client Settings section (Figure 17) allows you to specify the default payment terms for clients in the workspace. These payment terms will be set by default when you initially create a client. These settings also allow workspaces to turn on automatic client codes, similar to the what is available in Project Settings. With automatic client codes, you can specify a format for the code (Figure 18) and each new client created in the workspace will be assigned a client code with that format. Additionally, you can specify whether you want to require unique client codes throughout the workspace. When this setting is checked, a client’s settings can not be saved if the client code already exists on another client within the workspace.
Project Settings
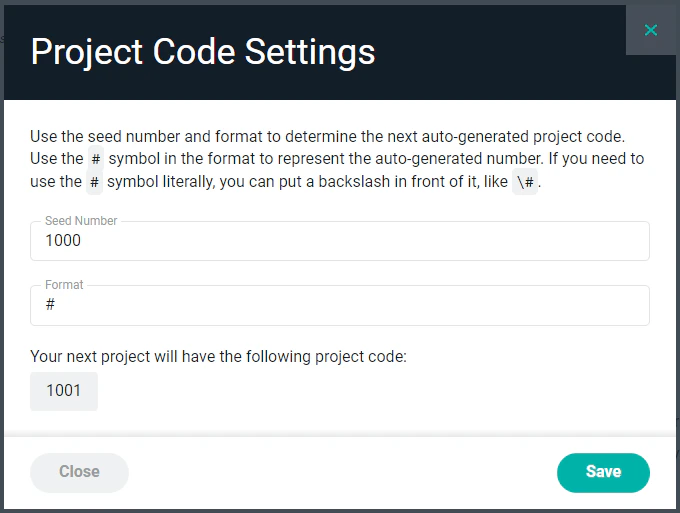
The Project Settings section (Figure 19) allows you to configure project defaults for every new project that gets created in the workspace. For more information about project settings, see the create a new project article. You can also turn on automatic project codes in this section. With automatic project codes, you can specify a format for the code (Figure 20) and each new project created in the workspace will be assigned a project code with that format. Additionally, you can specify whether you want to require unique project codes throughout the workspace. When this setting is checked, a project’s settings can not be saved if the project code already exists on another project within the workspace. Lastly, if the Multi-Step Approval Workflow feature is turned on in your workspace, you can manage the default approval workflow for time and expense.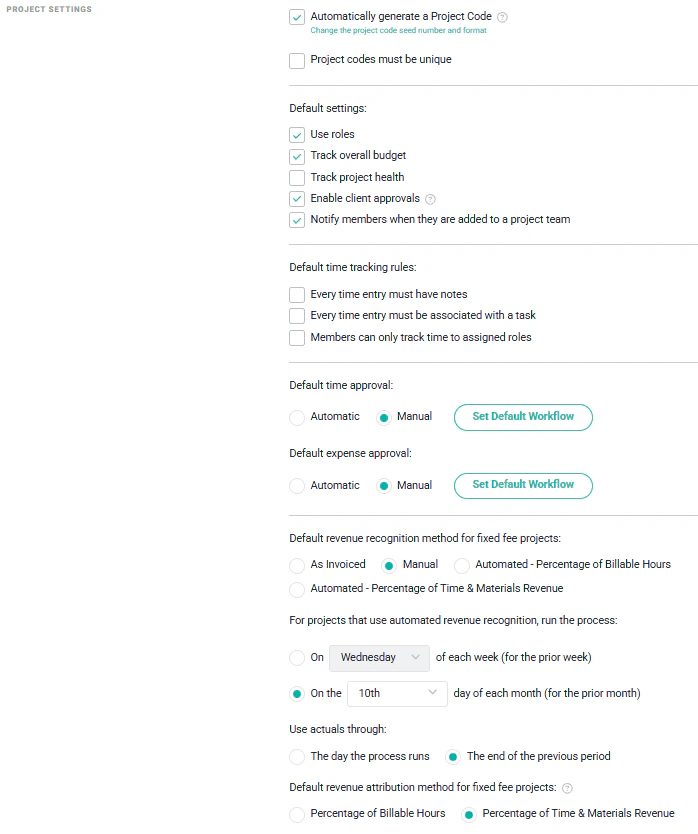
Allocation Settings
For workspaces that leverage the Resource Allocations feature in Ruddr, the Allocation Settings section (Figure 21) give you the ability to set defaults related to resource allocations. When creating an allocation, you can specify a number of allocated hours for each resource. You can allocate by day / week / month, apply a total number of hours, or allocation based on a percentage of a member’s capacity. Here, you can specify the default allocation method setting for the workspace. Additionally, you can default whether or not new allocations will override a member’s time off.
Utilization Settings
The Utilization Settings section (Figure 22) allows you to manage how utilization may be displayed or tracked in the workspace. By checking the Default utilization values to adjust for Time Off, each screen and or report that allows you to view utilization and Adjust for Time Off will default to this setting being turned on. When any Adjust for Time Off setting is applied when viewing utilization, the capacity being leveraged in utilization calculations is reduced by the number of time off hours taken during the period.
Task Settings
The Task Settings section (Figure 23) allows you to turn on automatic task codes, similar to the what is available in both Client Settings and Project Settings. With automatic task codes, you can specify a format for the code (Figure 24) and each new task created in the workspace will be assigned a task code with that format. Additionally, you can specify whether you want to require unique task codes throughout the workspace. When this setting is checked, a task’s settings can not be saved if the task code already exists on another task within the workspace.
