
Documentation Index

Fetch the complete documentation index at: https://help.ruddr.io/llms.txt

Use this file to discover all available pages before exploring further.

The Integrations section (Figure 1) of the Settings area allows Workspace Admin to setup and configure third-party integrations within Ruddr. There is also a CSV Import function available within this section. Figure 1 - Integrations Section of the Settings Area

Third-party Application Integration

For additional information on the nature of the third-party integrations and how to set those up, please refer to the Integrations help center.

CSV Import

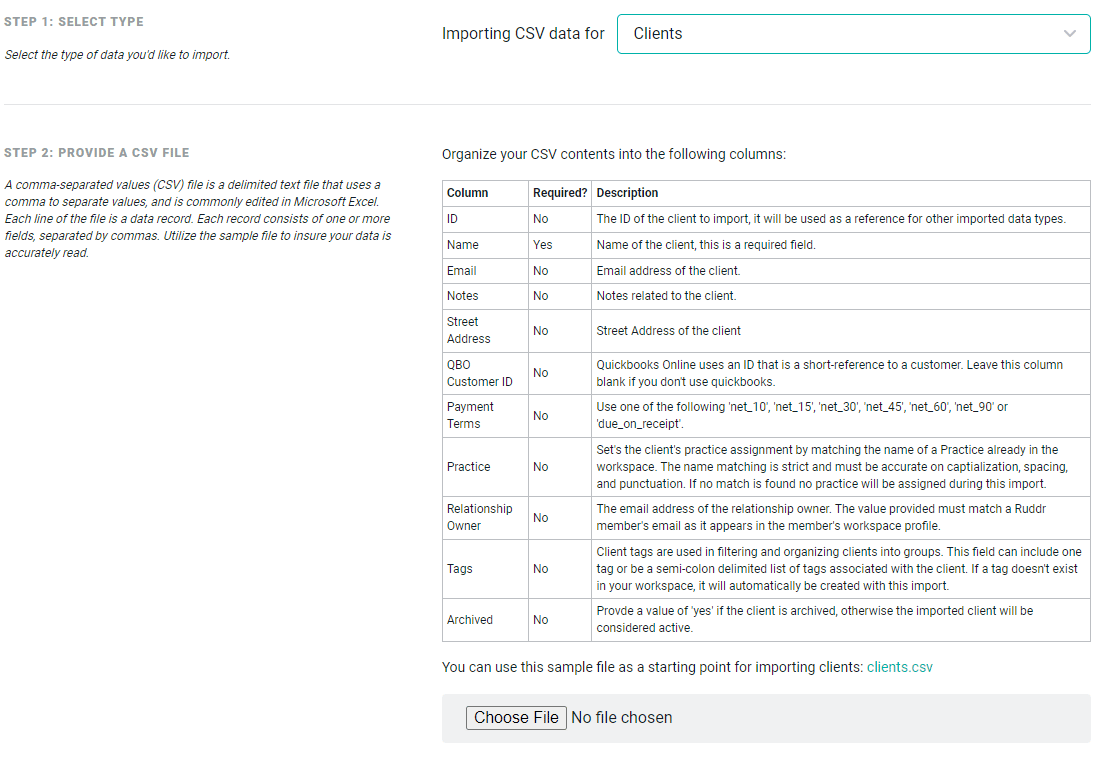
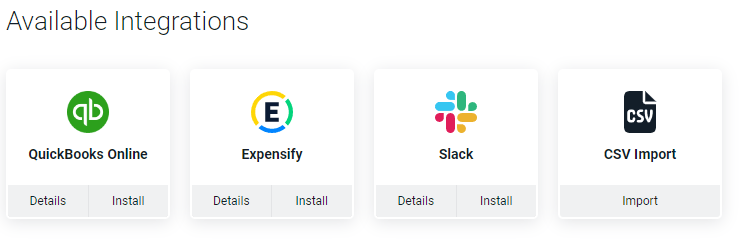
The Integrations section (Figure 1) also provides a mechanism for Workspace Admins to import CSV files to populate certain Ruddr data entities:
  • Workspace Members
  • Clients
  • Contacts
  • Projects
  • Time Entries
  • Expenses
  • Project Ledgers
    • Fixed Fee Billing Schedule
    • Fixed Revenue Recognition Ledger
    • Other Items to Bill
    • Project Expenses Ledger Items
  • Allocations
  • Project Tasks
NOTE: Entities must be imported in the sequence above (Members > Clients > Contacts > Projects > Time Entries). This is because:
  • Members are required for fields in Clients / Projects / Time Entries
  • Clients are required for Contacts / Projects / Time Entries
  • Projects are required for Time Entries
For example, attempting to import Projects before Clients are created will result in -0- Projects being imported. In the Integration section (Figure 1), click on the CSV Import tile to navigate to the CSV Import admin screen (Figure 3). Figure 3 - Importing CSV Data for a Selected Data Type / Entity As a first step, specify the type of data you would like to import, using the supplied drop-down. Once you select a data type, you will see a second step, where you can upload a CSV file with your data. Note that Ruddr supplies you with a sample CSV file for each data type. Click on the link to open the sample file and use it as a starting point for creating your CSV. NOTE: Your CSV must adhere to the format provided on the screen and all required data must be provided. Please be sure to review the requirements for each field. Once your CSV file has been created, click the Choose File button to upload your CSV to Ruddr. Once uploaded, you will see the name of the file listed. Click Submit for Import (Figure 4) to initiate the import. Figure 4 - Upload Your CSV File and Submit for Import Once uploaded, you will see a confirmation of records added (Figure 5). Figure 5 - Import Confirmation

Cloud Storage Integration

In addition to the integrations shown in the Integrations section (Figure 1), users can also connect any Ruddr project to a cloud folder from any of the major cloud storage providers, integrating Ruddr with Google Drive, OneDrive, Microsoft Teams, SharePoint, Box, Dropbox, and more. For more information on this integration, please refer to the Cloud Storage Integration help article.