

Registering Ruddr as an OAuth Client
Copilot asks for an OAuth client ID and secret of your own, so you register one for your organization. Ruddr has no screen for this. Run the following command once, from any terminal.Claude and ChatGPT register themselves with Ruddr automatically when you add Ruddr, through a standard called dynamic client registration. Microsoft 365 Copilot does not support it yet, which is why this one-time command is needed. Once Microsoft adds support, this step and the Developer Portal registration below will no longer be necessary.
client_id and a client_secret. The secret is shown this one time only, so copy both somewhere safe before you close the terminal — you will need them in the next step.
NOTE: Copilot connectors are read-only. Copilot does not expose Ruddr’s write tools, such as time tracking, even when the write scope is granted — asking for mcp:write only makes the consent page promise something Copilot cannot do.
Creating the OAuth Client Registration
The client ID and secret do not go into Copilot directly. They go into an OAuth client registration in the Teams Developer Portal, which hands back a registration ID that Copilot asks for as the Reference ID.- Go to the Developer Portal’s OAuth client registration tool and select Register client.
- Enter a Registration name —
Ruddris a good choice — andhttps://www.ruddr.ioas the Base URL. - Set Restrict usage by org to My organization only, and Restrict usage by app to Any Teams app.
- Enter the Client ID and Client secret from the previous step.
- Enter
https://www.ruddr.io/api/oauth/authorizeas the Authorization endpoint, andhttps://www.ruddr.io/api/oauth/tokenas both the Token endpoint and the Refresh endpoint. Ruddr uses the same address for the last two. - Enter
mcp:readas the Scope. The field takes a comma-separated list, so that single value is the whole entry. - Turn on the Enable Proof Key for Code Exchange (PKCE) switch, and leave Client password authentication method on Request body parameters (default).
- Save the registration (Figure 1).
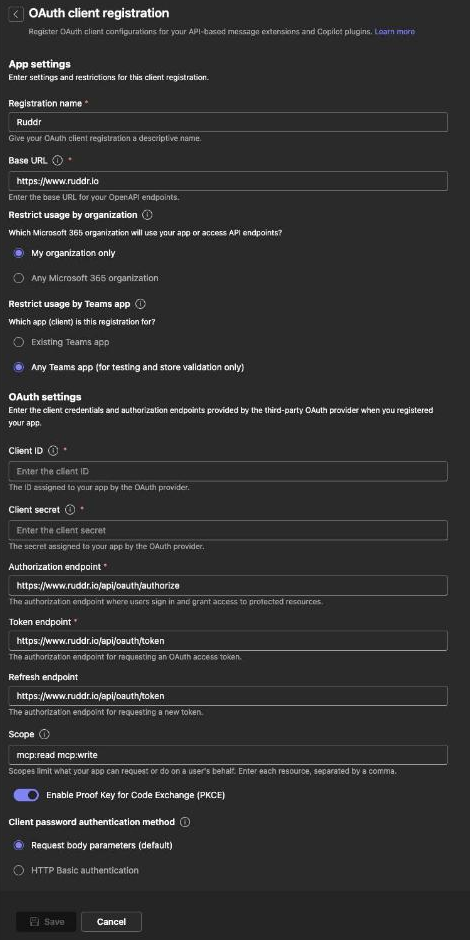
Figure 1 - Register an OAuth Client in the Teams Developer Portal
invalid_request, with The code_challenge parameter is required in the address bar, and turning it on afterwards is not picked up right away — Microsoft says changes take up to 15 minutes.
Microsoft documents this form in Configure OAuth in Developer Portal.
Creating the Connector in the Microsoft 365 Admin Center
- In the Microsoft 365 admin center, go to Copilot > Connectors and open the Gallery tab.
- Under Created by your org, select the Create a new connector tile (Figure 2), then select Add.
- In the Custom connector dialog, under Connect to MCP server, select Add.

Figure 2 - The Create a New Connector Tile in the Gallery
- Enter
Ruddras the Display name, and a short Description — the description is required. - Enter the Ruddr server address as the MCP endpoint URL.
- Enter
Ruddras the Developer name,https://www.ruddr.comas the Website URL,https://www.ruddr.com/privacy-policyas the Privacy policy URL, andhttps://www.ruddr.com/master-subscription-agreementas the Terms of use URL. - Choose OAuth 2.0 as the Authentication type. None would leave the server unauthenticated, and Entra SSO does not apply, because Ruddr is not protected by Microsoft Entra.
- Paste the OAuth client registration ID into the Reference ID field, which appears once OAuth 2.0 is chosen, and select Authorize beneath it (Figure 3).
- Approve the connection in the popup that opens (Figure 4). The popup closes on success and a green check appears beside the Reference ID.
- Tick the Notice checkbox to consent to Microsoft’s connector terms, then select Create. A Success screen reports “Created connection” and “Linking data source”.
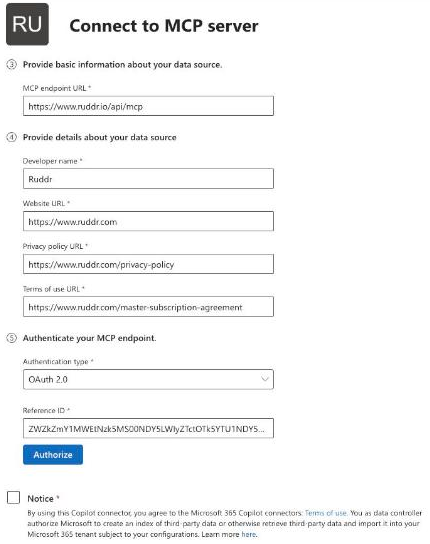
Figure 3 - Enter the OAuth Client Registration ID as the Reference ID
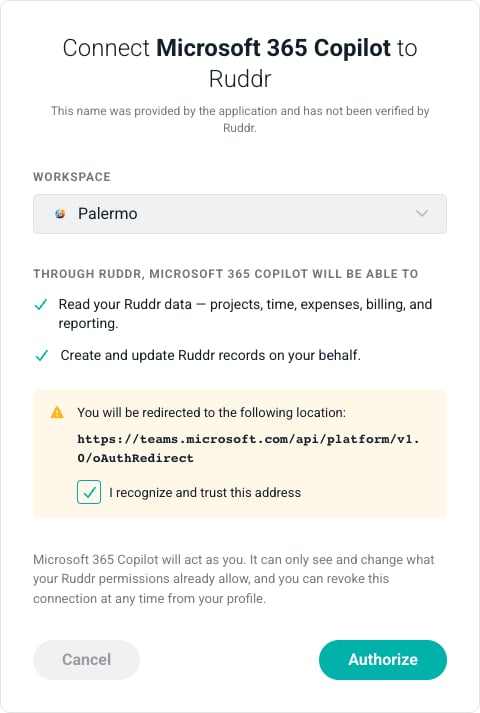
Figure 4 - Approve a Connection Request from Microsoft 365 Copilot
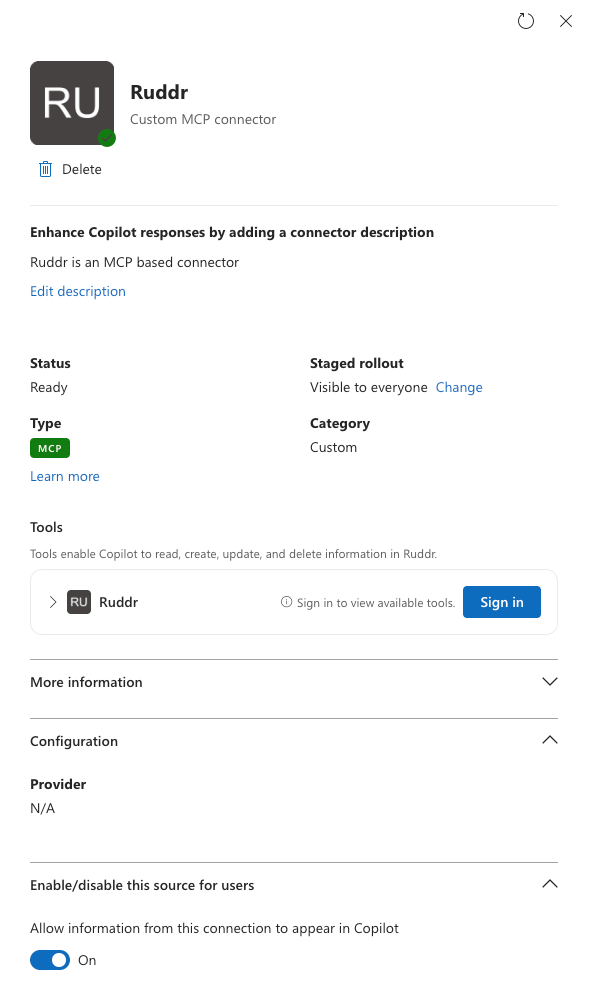
Figure 5 - The Ruddr Connector Ready in Your Connections
Connecting
Your Authorize in the admin center only confirms that the setup works. It does not connect anyone else. Each member connects once for themselves, from a Copilot chat on the web, in Teams or in Outlook.- Select the + (Add content) button in the message box, then Change data sources.
- Find Ruddr in the Select sources dialog and select Connect (Figure 6).
- In the Connect Ruddr dialog — “Let Copilot securely read your content from Ruddr” — select Continue to Ruddr (Figure 7).
- Approve the connection on Ruddr’s consent page, the same screen the administrator saw in Figure 4 — see Connecting an Application for what it is asking.
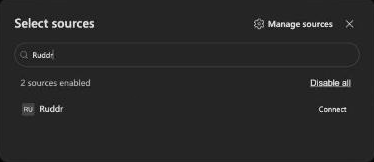
Figure 6 - Connect Ruddr from the Select Sources Dialog
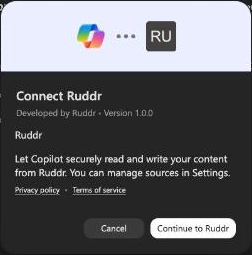
Figure 7 - Continue to Ruddr from the Connect Ruddr Dialog
-developer on in the chat, ask the question again, and open Agent debug info — Executed actions lists each call with the connector’s id.