> ## Documentation Index
> Fetch the complete documentation index at: https://help.ruddr.io/llms.txt
> Use this file to discover all available pages before exploring further.
# Slack Integration Setup
Integrating Slack with Ruddr provides numerous benefits as outlined in the [Slack Integration Overview](/integrations/slack-integration-overview) article. To install the Slack integration, simply follow the steps below. Note that you must be a Ruddr Workspace Admin to install integrations in Ruddr. There are five steps to follow:
1. [Find the Slack Integration](#step-1-find-the-slack-integration)
2. [Authorize the Integration](#step-2-authorize-the-integration)
3. [Specify Notifications for your Workspace](#step-3-specify-the-notifications-for-your-workspace)
4. [Associate Members with Slack Account](#step-4-associate-ruddr-workspace-members-with-their-slack-account)
5. [Test the Integration](#step-5-test-the-integration)
#### Step 1: Find the Slack Integration
To get to the Integrations area of Ruddr, simply click on the **Settings** main nav bar option and then select the **Integrations** menu option (see [Integrations](/workspace-administration/integrations) for more information). The Integrations tab is separated into two sections which are Active Integrations and Available Integrations. If you have not previously set up the Slack integration, it will be listed in the Available Integrations section. Simply click on the **Install** button at the bottom of the integration widget (Figure 1).
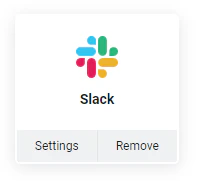 Figure 1 - Click Install to Begin the Slack Integration in Ruddr
#### Step 2: Authorize the Integration
Once you click on the Install button, you will be taken to an authorization screen (Figure 2). This screen shows a high-level overview of the types of information and functionality related to your Slack workspace that will be available to Ruddr via the integration.
Figure 1 - Click Install to Begin the Slack Integration in Ruddr
#### Step 2: Authorize the Integration
Once you click on the Install button, you will be taken to an authorization screen (Figure 2). This screen shows a high-level overview of the types of information and functionality related to your Slack workspace that will be available to Ruddr via the integration.
 Figure 2 - Approve the Ruddr / Slack Integration
If you are comfortable with providing these privileges to the Ruddr integration, simply click on the **Allow** button.
#### Step 3: Specify the Notifications for your Workspace
With the integration authorized, you can now specify which notifications you want to enable for the workspace. To do this, click on the **Settings** button at the bottom of the Slack integration widget (Figure 1) to bring up the Integration Settings drawer (Figure 3).
Figure 2 - Approve the Ruddr / Slack Integration
If you are comfortable with providing these privileges to the Ruddr integration, simply click on the **Allow** button.
#### Step 3: Specify the Notifications for your Workspace
With the integration authorized, you can now specify which notifications you want to enable for the workspace. To do this, click on the **Settings** button at the bottom of the Slack integration widget (Figure 1) to bring up the Integration Settings drawer (Figure 3).
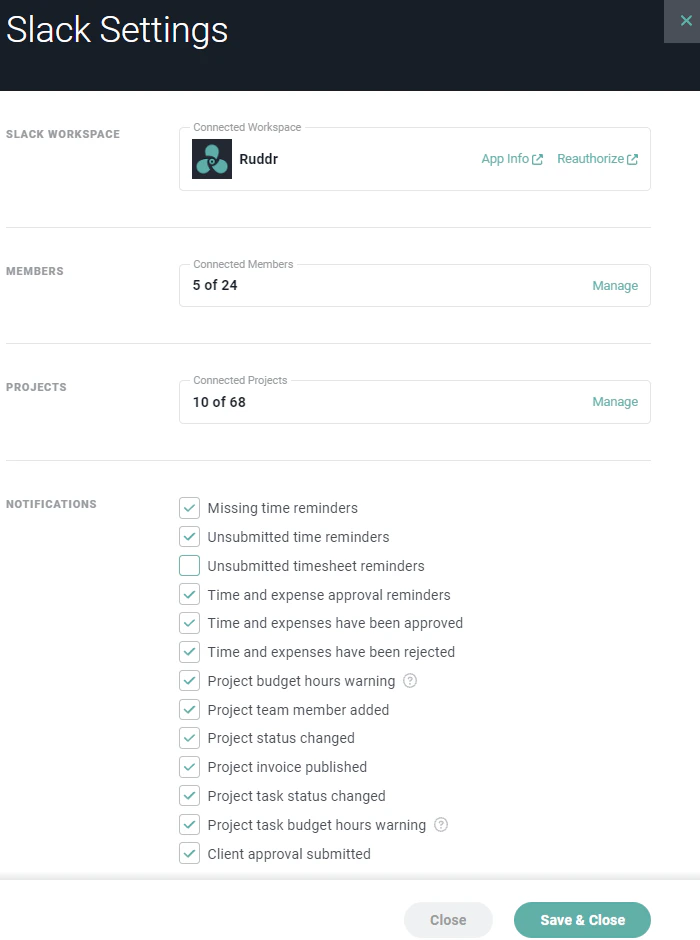 Figure 3 - Slack Integration Settings Drawer will Allow you to Enable/Disable Specific Notifications in the Workspace
In the **Notifications** section of the settings drawer (Figure 3), Workspace Admins can specify which notifications are to be sent to members and project channels. Checking the box next to a notification will enable it. Once the notifications have been selected, click the **Save & Close** button on the drawer to apply the settings.
#### Step 4: Associate Ruddr Workspace Members with their Slack Account
Now that you have the Slack integration installed and configured, you need to associate each Ruddr workspace member with their Slack account. To do this, click on the **Members** area within the **Settings** area (Figure 4) to access the Members in the workspace. (For more information view the [Member Profile section](/workspace-administration/member-profile) of the Ruddr Help Center).
Figure 3 - Slack Integration Settings Drawer will Allow you to Enable/Disable Specific Notifications in the Workspace
In the **Notifications** section of the settings drawer (Figure 3), Workspace Admins can specify which notifications are to be sent to members and project channels. Checking the box next to a notification will enable it. Once the notifications have been selected, click the **Save & Close** button on the drawer to apply the settings.
#### Step 4: Associate Ruddr Workspace Members with their Slack Account
Now that you have the Slack integration installed and configured, you need to associate each Ruddr workspace member with their Slack account. To do this, click on the **Members** area within the **Settings** area (Figure 4) to access the Members in the workspace. (For more information view the [Member Profile section](/workspace-administration/member-profile) of the Ruddr Help Center).
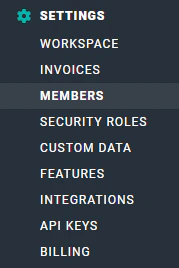 Figure 4 - Access the Member Profile to Associate a Member's Slack Account
In the **Members** area, you will notice that a small Slack icon is now displayed at the top-right of their member card (Figure 5). The icon will be shown in gray if the member is not associated with a Slack account.
Figure 4 - Access the Member Profile to Associate a Member's Slack Account
In the **Members** area, you will notice that a small Slack icon is now displayed at the top-right of their member card (Figure 5). The icon will be shown in gray if the member is not associated with a Slack account.
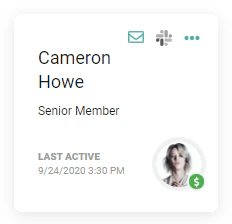 Figure 5 - Slack is Configured for the Workspace, but this Member is not Associated with a Slack Account
To associate the member with a Slack account, simply click on the member card to get to the member detail. On the **General** tab, select the appropriate Slack user identity in the **Slack Identity** section (Figure 6) and then click the **Save** button at the bottom of the screen.
Figure 5 - Slack is Configured for the Workspace, but this Member is not Associated with a Slack Account
To associate the member with a Slack account, simply click on the member card to get to the member detail. On the **General** tab, select the appropriate Slack user identity in the **Slack Identity** section (Figure 6) and then click the **Save** button at the bottom of the screen.
 Figure 6 - Associate a Ruddr Member with their Organizational Slack Identity
Once the workspace member has been associated with their Slack account, the Slack logo on the member card will now show up in color (Figure 7).
Figure 6 - Associate a Ruddr Member with their Organizational Slack Identity
Once the workspace member has been associated with their Slack account, the Slack logo on the member card will now show up in color (Figure 7).
 Figure 7 - Member is Associated with a Slack Account
You will need to complete this Slack identity association for each member of the Ruddr workspace. Additionally, as new members are added to the Ruddr workspace, you will need to associate those members with their Slack identity.
#### Step 5: Test the Integration
Once you have the Slack integration installed and your Ruddr member account associated with your Slack identity, you are ready to do a quick test. To test that the integration is working, simply type in the following slash command in the Slack new message box.
```
/ruddr time
```
This command will bring up any time entries that you have for the current day (Figure 8).
Figure 7 - Member is Associated with a Slack Account
You will need to complete this Slack identity association for each member of the Ruddr workspace. Additionally, as new members are added to the Ruddr workspace, you will need to associate those members with their Slack identity.
#### Step 5: Test the Integration
Once you have the Slack integration installed and your Ruddr member account associated with your Slack identity, you are ready to do a quick test. To test that the integration is working, simply type in the following slash command in the Slack new message box.
```
/ruddr time
```
This command will bring up any time entries that you have for the current day (Figure 8).
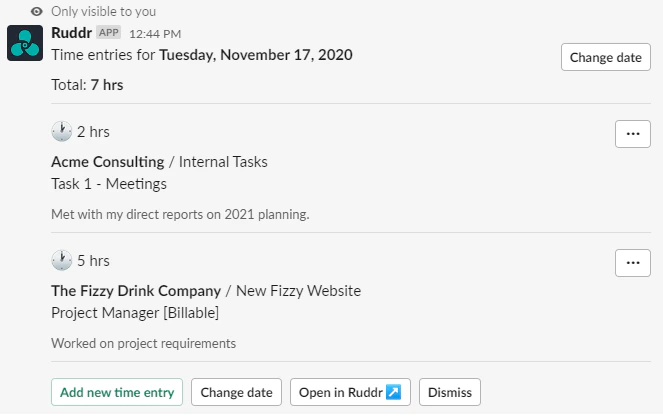 Figure 8 - Listing Ruddr Time Entries in Slack
To create a new time entry, simply click on the **Add new time entry** button and follow the steps. For more information about the Ruddr integration for Slack, see the [Slack Integration Overview](/integrations/slack-integration-overview) article.
Figure 8 - Listing Ruddr Time Entries in Slack
To create a new time entry, simply click on the **Add new time entry** button and follow the steps. For more information about the Ruddr integration for Slack, see the [Slack Integration Overview](/integrations/slack-integration-overview) article.