> ## Documentation Index
> Fetch the complete documentation index at: https://help.ruddr.io/llms.txt
> Use this file to discover all available pages before exploring further.
# Sage Intacct Integration Setup
Integrating Sage Intacct with Ruddr connects your accounting and professional services platforms so that invoices, payments, credit notes, and reimbursable expenses stay in sync. For Ruddr customers that leverage our onboarding services, your Ruddr onboarding lead will guide you through the process outlined below.
To install the Sage Intacct integration, follow the steps below. Note that you must be a Ruddr Workspace Admin to install integrations in Ruddr.
**Step 1: Prepare your Data**
Before you install the Sage Intacct integration, you should prepare your data in Sage Intacct and Ruddr, as follows:
* **Client names** - Your client names in Ruddr should use the exact same spelling as your customer names in Sage Intacct. If the spelling is identical, Ruddr will automatically map Ruddr clients to Sage Intacct customers during the integration setup process. If the spelling is not identical, you will be able to manually map Ruddr clients to Sage Intacct customers.
* **Invoice items** - Your Invoice Items in Ruddr will be mapped to Sage Intacct income accounts or to Sage Intacct items, depending on the Sync Method you choose in Step 7. Any invoice item that is not mapped will use the default from the Configuration. You can manage your Invoice Items in Ruddr by clicking on **Settings** in the main nav bar, selecting the **Lookups** tab, and choosing **Invoice Items** from the drop-down list on the right side of the screen.
* **Tax rates** - Your Tax Rates in Ruddr can be mapped to Sage Intacct tax details. These mappings are only used with the **Direct** sync method (Step 7). With the **Documents** sync method, Sage Intacct works out the tax itself from the item and the customer, and the mappings are ignored. If you do not charge sales tax, do not use custom tax rates, or plan to use the Documents sync method, then you do not need to configure this area. You can manage your Tax Rates in Ruddr by clicking on **Settings** in the main nav bar, selecting the **Lookups** tab, and choosing **Tax Rates** from the drop-down list on the right side of the screen.
**Step 2: Prepare Sage Intacct for Ruddr**
You need an admin in your Sage Intacct company to subscribe to Web Services, authorize Ruddr's Sender ID and Client ID, and create a Web Services User with the permissions Ruddr needs. Ruddr will connect to your company through the Sage Intacct REST API as that Web Services User, and all of the steps below are required.
**Subscribe to Web Services**
1. Go to the **Company** tab, then **Admin**, then **Subscriptions**.
2. Find **Web Services** and click it to subscribe.
3. Ignore any warning about additional charges.
While you are in Subscriptions, confirm that the company is subscribed to the applications Ruddr posts to: **Cash Management**, **General Ledger**, **Accounts Payable**, and **Accounts Receivable**. If you plan to use the **Documents** sync method (Step 7), then **Order Entry**, **Purchasing**, and **Inventory Control** are required as well.
**Authorize Ruddr in your company's security settings**
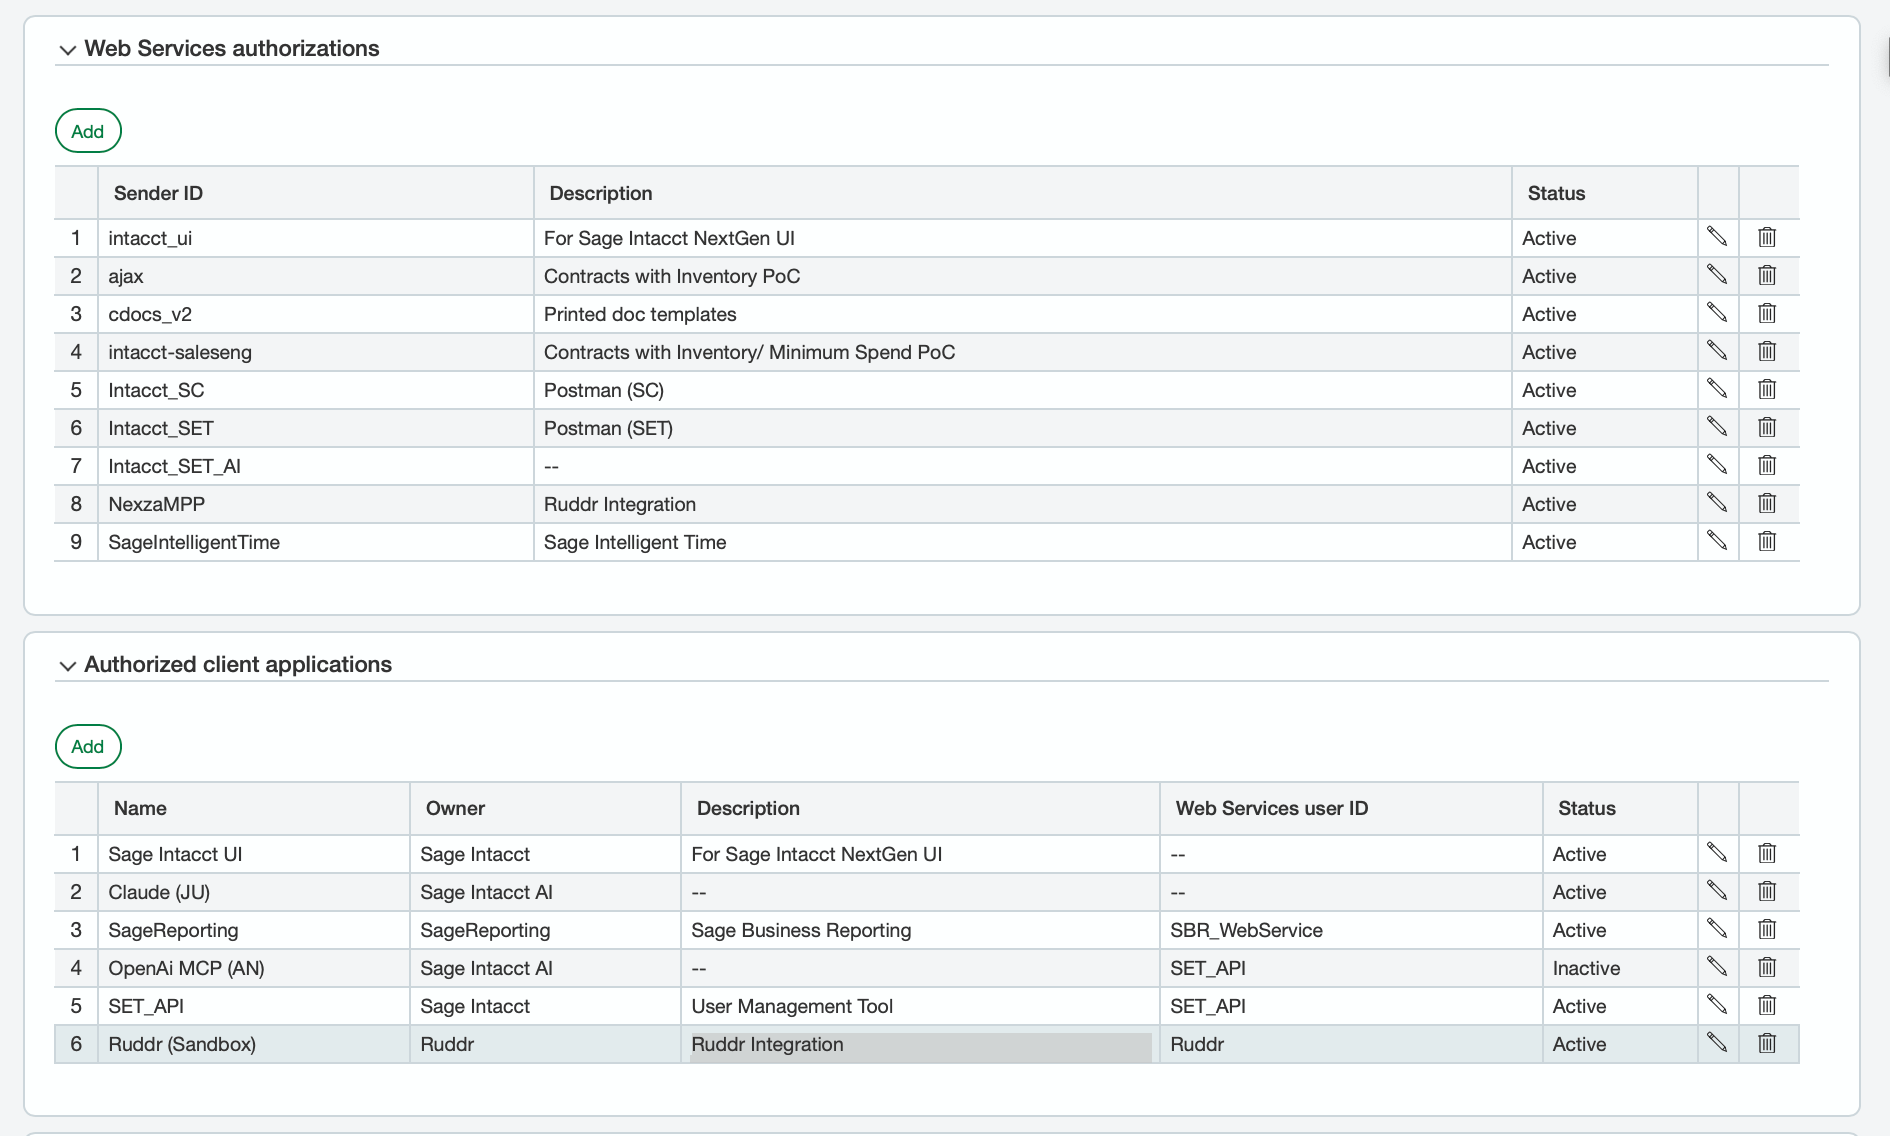
Both authorizations Ruddr needs exist on the same screen. Go to the **Company** tab, then **Setup**, then **Company**, click **Edit**, and open the **Security** tab (Figure 1).
1. In the **Web Services authorizations** section, click **Add** and enter Ruddr's Sender ID, **NexzaMPP**, so that Ruddr can make web services calls into your company.
2. In the **Authorized client applications** section, click **Add** and enter Ruddr's Client ID, **52da3050dd539d6209d1.app.sage.com**, along with the Web Services User ID you create below. The Web Services User ID field is case-sensitive, so enter it exactly as it was created.
 **Create the Web Services User**
1. Go to the **Company** tab, then **Admin**, then **Web Services Users**, and click **New**.
2. Enter a **User ID**, **Last name**, **First name**, and **Email address**.
3. Set the **User type** to **Business User**.
4. Click **Save** and ignore any warning about a charge for creating the user.
Keep track of the **Web Services User ID** you assign. You need it in the Authorized Client Applications entry above and again when you connect the integration in Ruddr.
**Grant the Web Services User its permissions**
How you grant permissions depends on whether your company uses role-based or user-based security:
* **Role-based security** - Go to the **Company** tab, then **Admin**, then **Roles**, and click **Add**. Name the role (we recommend creating a role specifically for Ruddr so that you control exactly which permissions the integration is given), and click **Save**. Subscribe the role to the applications listed below, click **Permissions** next to each application and grant the rows in the table, then open the Web Services User's **Roles information** tab and assign the role.
* **User-based security** - Return to the Web Services Users list, find the user you created, and click **Subscriptions**. Subscribe the user to the applications listed below, click **Permissions** next to each application, and grant the same rows.
Without these permissions, Ruddr will not be able to read or post the records it needs, either during setup or when publishing.
Subscribe the role to these applications (Figure 2): **Company**, **Cash Management**, **General Ledger**, **Accounts Payable**, **Accounts Receivable**, **Inventory Control**, **Order Entry**, and **Purchasing**. Leave the remaining applications unsubscribed.
**Create the Web Services User**
1. Go to the **Company** tab, then **Admin**, then **Web Services Users**, and click **New**.
2. Enter a **User ID**, **Last name**, **First name**, and **Email address**.
3. Set the **User type** to **Business User**.
4. Click **Save** and ignore any warning about a charge for creating the user.
Keep track of the **Web Services User ID** you assign. You need it in the Authorized Client Applications entry above and again when you connect the integration in Ruddr.
**Grant the Web Services User its permissions**
How you grant permissions depends on whether your company uses role-based or user-based security:
* **Role-based security** - Go to the **Company** tab, then **Admin**, then **Roles**, and click **Add**. Name the role (we recommend creating a role specifically for Ruddr so that you control exactly which permissions the integration is given), and click **Save**. Subscribe the role to the applications listed below, click **Permissions** next to each application and grant the rows in the table, then open the Web Services User's **Roles information** tab and assign the role.
* **User-based security** - Return to the Web Services Users list, find the user you created, and click **Subscriptions**. Subscribe the user to the applications listed below, click **Permissions** next to each application, and grant the same rows.
Without these permissions, Ruddr will not be able to read or post the records it needs, either during setup or when publishing.
Subscribe the role to these applications (Figure 2): **Company**, **Cash Management**, **General Ledger**, **Accounts Payable**, **Accounts Receivable**, **Inventory Control**, **Order Entry**, and **Purchasing**. Leave the remaining applications unsubscribed.
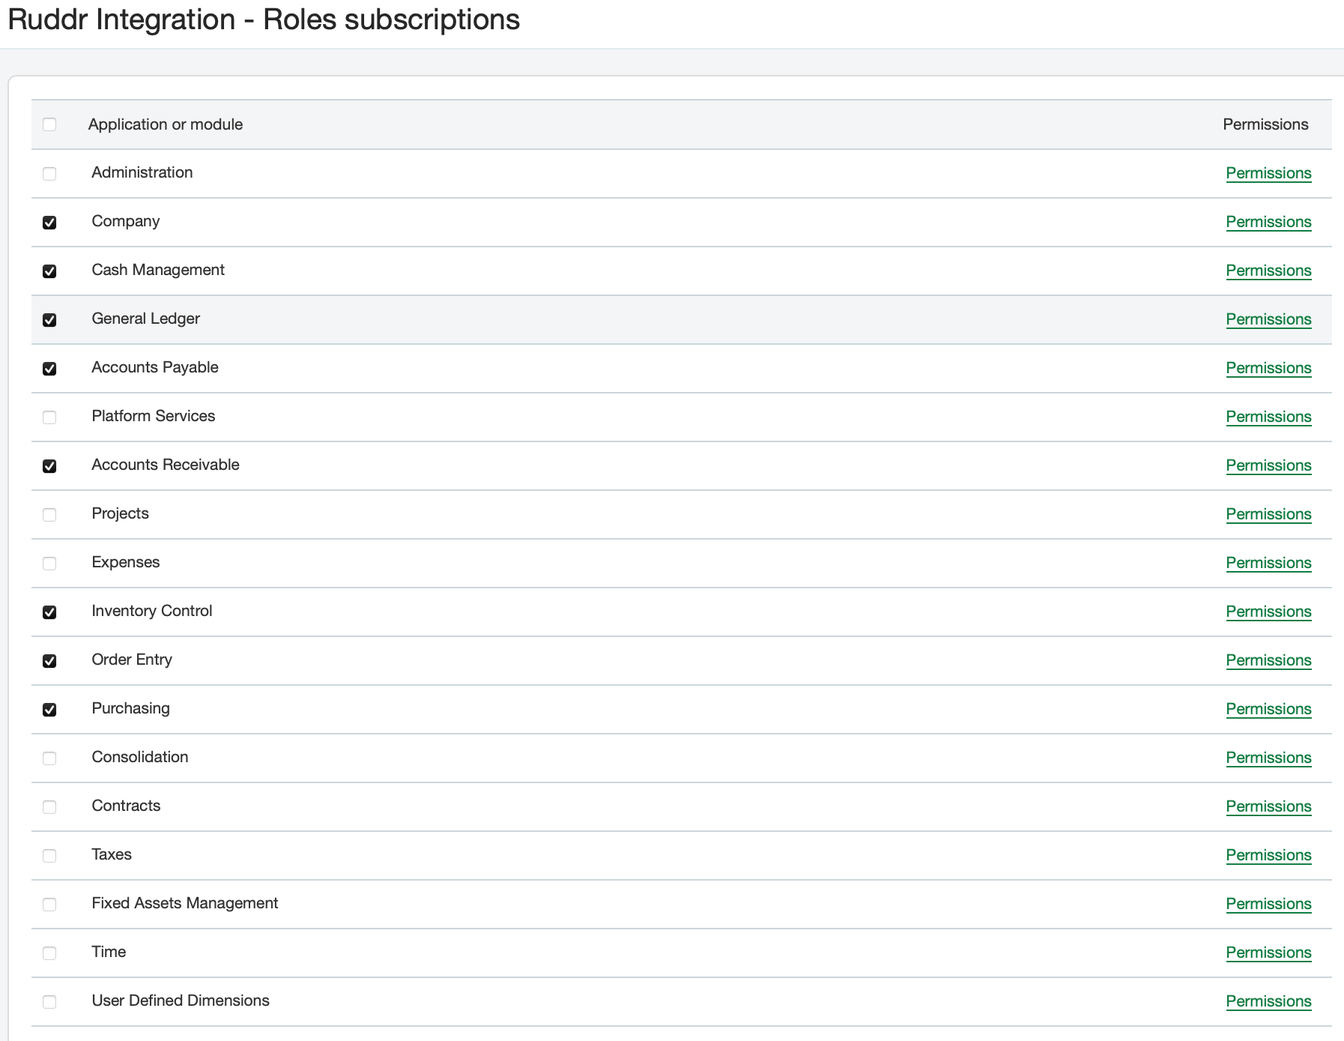 Next, click **Permissions** next to each application and check the rows below. The table lists exactly what Ruddr needs.
| Application | Activity or list | Permissions |
| ------------------- | ------------------------- | ----------------------------- |
| Company | Departments | List, View |
| Company | Entities | List, View |
| Cash Management | Checking accounts | List, View |
| General Ledger | Accounts | List |
| General Ledger | Multi-currency processing | Enable |
| Accounts Payable | Vendors | List, View, Add |
| Accounts Payable | Bills | List, View, Add |
| Accounts Payable | Posted payments | View |
| Accounts Receivable | Manage payments | List, View, Add, Delete |
| Accounts Receivable | Customers | List, View, Add |
| Accounts Receivable | Invoices | List, View, Add, Edit, Delete |
| Accounts Receivable | Adjustments | View, Add, Delete |
| Accounts Receivable | Posted payments | Edit reversal |
| Accounts Receivable | Tax detail | List, View |
| Inventory Control | Items | List |
| Inventory Control | Units of measure | List, View |
| Order Entry | Order Entry transactions | View, Add, Edit, Delete |
| Order Entry | Transaction definitions | List, View |
| Order Entry | Subtotal templates | View |
| Purchasing | Purchasing transactions | View, Add |
A few notes on these permissions:
* The **Delete** permissions allow you to remove a published invoice, credit note, or payment from Sage Intacct by unpublishing it in Ruddr.
* The **General Ledger > Multi-currency processing** row is only needed if your Sage Intacct company is multi-currency.
* **Inventory Control**, **Order Entry**, and **Purchasing** are only needed for the **Documents** sync method (Step 7). Granting them keeps both sync methods available if you change your mind later.
* If your company has **vendor approval** enabled, also grant the **Accounts Payable > Approve vendors** permissions. Ruddr will try to approve each vendor it creates, and will fall back to leaving the vendor unapproved if Sage Intacct refuses (see Step 3).
* If your company uses **entities**, confirm that the Web Services User has access to the entity you plan to connect. Without that access, the mapping lists in Ruddr will be empty even when every permission above has been granted.
* If you adjust these permissions after connecting, reconnect the integration in Ruddr so that the new permissions take effect. To reconnect, open the integration settings screen and click the wrench icon on the **Company** row.
**Step 3: Configure the Sage Intacct Modules Ruddr Posts To**
Ruddr relies on a few specific settings inside the Sage Intacct modules that it will post to. Review the settings below before you connect, as several of them will be read once, at connect time.
**All companies**
* **Dimensions on accounts** - Department is the only dimension Ruddr will send. If an income, expense, or AR account requires another dimension, such as a location, project, or class, make that dimension optional on the accounts Ruddr posts to.
* **Entity access** - The Web Services User must have access to the entity you connect, or the mapping lists in Ruddr will be empty.
* **Checking accounts** - The bank account you map for a currency on the Deposit Accounts row must belong to the connected entity and be denominated in that currency. For your base currency you can map an undeposited-funds GL account instead of a bank account. Other currencies must use a bank account.
* **Multi-currency** - If you invoice in a currency other than the entity's base currency, subscribe to the Multi-currency module and keep your exchange rates up to date. Sage Intacct will apply its own rate to each transaction.
* **Vendor approval** - If vendor approval is enabled in Accounts Payable, Ruddr will try to approve each vendor it creates for reimbursable expenses. Sage Intacct does not allow the same user to approve a vendor it created, so if your company enforces that rule, the vendor will remain unapproved and a second approver will need to approve it before bills can post against it.
**Documents sync method**
These settings apply if you choose the **Documents** sync method in the Configuration (Step 7):
* **Transaction definitions** - Ruddr will post to the standard Sage Intacct transaction definitions: **Sales Invoice** and **Credit Memo** in Order Entry, and **Vendor Invoice** in Purchasing. If your company has renamed or customized these definitions, let us know before you connect.
* **Discounts** - If you apply discounts on Ruddr invoices, allow discounts on extended price in the transaction definition. Where discounts are not allowed, Ruddr will post the discounted amount as the line price instead.
* **Items** - Ruddr will only list active non-inventory items: Non-Inventory and Sales-only Non-Inventory items for invoices and credit notes, and Non-Inventory and Purchase-only Non-Inventory items for expense bills. Each of those items must belong to a unit-of-measure group.
Ruddr will read these settings when the connection is established. If you change any of them later, reconnect the integration in Ruddr, using the wrench icon on the **Company** row of the integration settings screen, so that the new settings take effect.
**Step 4: Find the Sage Intacct Integration**
To get to the integrations area of Ruddr, click on the **Settings** main nav bar option and then select the **Integrations** tab (see [Integrations](/workspace-administration/integrations) for more information). The Integrations tab is separated into two sections which are Active Integrations and Available Integrations. If you have not previously set up the Sage Intacct integration, it will be listed in the Available Integrations section. Click on the **Install** button at the bottom of the integration widget (Figure 3).
Next, click **Permissions** next to each application and check the rows below. The table lists exactly what Ruddr needs.
| Application | Activity or list | Permissions |
| ------------------- | ------------------------- | ----------------------------- |
| Company | Departments | List, View |
| Company | Entities | List, View |
| Cash Management | Checking accounts | List, View |
| General Ledger | Accounts | List |
| General Ledger | Multi-currency processing | Enable |
| Accounts Payable | Vendors | List, View, Add |
| Accounts Payable | Bills | List, View, Add |
| Accounts Payable | Posted payments | View |
| Accounts Receivable | Manage payments | List, View, Add, Delete |
| Accounts Receivable | Customers | List, View, Add |
| Accounts Receivable | Invoices | List, View, Add, Edit, Delete |
| Accounts Receivable | Adjustments | View, Add, Delete |
| Accounts Receivable | Posted payments | Edit reversal |
| Accounts Receivable | Tax detail | List, View |
| Inventory Control | Items | List |
| Inventory Control | Units of measure | List, View |
| Order Entry | Order Entry transactions | View, Add, Edit, Delete |
| Order Entry | Transaction definitions | List, View |
| Order Entry | Subtotal templates | View |
| Purchasing | Purchasing transactions | View, Add |
A few notes on these permissions:
* The **Delete** permissions allow you to remove a published invoice, credit note, or payment from Sage Intacct by unpublishing it in Ruddr.
* The **General Ledger > Multi-currency processing** row is only needed if your Sage Intacct company is multi-currency.
* **Inventory Control**, **Order Entry**, and **Purchasing** are only needed for the **Documents** sync method (Step 7). Granting them keeps both sync methods available if you change your mind later.
* If your company has **vendor approval** enabled, also grant the **Accounts Payable > Approve vendors** permissions. Ruddr will try to approve each vendor it creates, and will fall back to leaving the vendor unapproved if Sage Intacct refuses (see Step 3).
* If your company uses **entities**, confirm that the Web Services User has access to the entity you plan to connect. Without that access, the mapping lists in Ruddr will be empty even when every permission above has been granted.
* If you adjust these permissions after connecting, reconnect the integration in Ruddr so that the new permissions take effect. To reconnect, open the integration settings screen and click the wrench icon on the **Company** row.
**Step 3: Configure the Sage Intacct Modules Ruddr Posts To**
Ruddr relies on a few specific settings inside the Sage Intacct modules that it will post to. Review the settings below before you connect, as several of them will be read once, at connect time.
**All companies**
* **Dimensions on accounts** - Department is the only dimension Ruddr will send. If an income, expense, or AR account requires another dimension, such as a location, project, or class, make that dimension optional on the accounts Ruddr posts to.
* **Entity access** - The Web Services User must have access to the entity you connect, or the mapping lists in Ruddr will be empty.
* **Checking accounts** - The bank account you map for a currency on the Deposit Accounts row must belong to the connected entity and be denominated in that currency. For your base currency you can map an undeposited-funds GL account instead of a bank account. Other currencies must use a bank account.
* **Multi-currency** - If you invoice in a currency other than the entity's base currency, subscribe to the Multi-currency module and keep your exchange rates up to date. Sage Intacct will apply its own rate to each transaction.
* **Vendor approval** - If vendor approval is enabled in Accounts Payable, Ruddr will try to approve each vendor it creates for reimbursable expenses. Sage Intacct does not allow the same user to approve a vendor it created, so if your company enforces that rule, the vendor will remain unapproved and a second approver will need to approve it before bills can post against it.
**Documents sync method**
These settings apply if you choose the **Documents** sync method in the Configuration (Step 7):
* **Transaction definitions** - Ruddr will post to the standard Sage Intacct transaction definitions: **Sales Invoice** and **Credit Memo** in Order Entry, and **Vendor Invoice** in Purchasing. If your company has renamed or customized these definitions, let us know before you connect.
* **Discounts** - If you apply discounts on Ruddr invoices, allow discounts on extended price in the transaction definition. Where discounts are not allowed, Ruddr will post the discounted amount as the line price instead.
* **Items** - Ruddr will only list active non-inventory items: Non-Inventory and Sales-only Non-Inventory items for invoices and credit notes, and Non-Inventory and Purchase-only Non-Inventory items for expense bills. Each of those items must belong to a unit-of-measure group.
Ruddr will read these settings when the connection is established. If you change any of them later, reconnect the integration in Ruddr, using the wrench icon on the **Company** row of the integration settings screen, so that the new settings take effect.
**Step 4: Find the Sage Intacct Integration**
To get to the integrations area of Ruddr, click on the **Settings** main nav bar option and then select the **Integrations** tab (see [Integrations](/workspace-administration/integrations) for more information). The Integrations tab is separated into two sections which are Active Integrations and Available Integrations. If you have not previously set up the Sage Intacct integration, it will be listed in the Available Integrations section. Click on the **Install** button at the bottom of the integration widget (Figure 3).
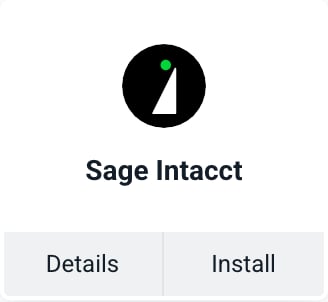 Note that Ruddr allows only one accounting integration per workspace by default. If you already have QuickBooks Online or Xero installed, the **Install** button will be disabled until you remove the other accounting integration (see [Using Multiple Accounting Integrations](/billing/using-multiple-accounting-integrations)).
**Step 5: Connect the Integration**
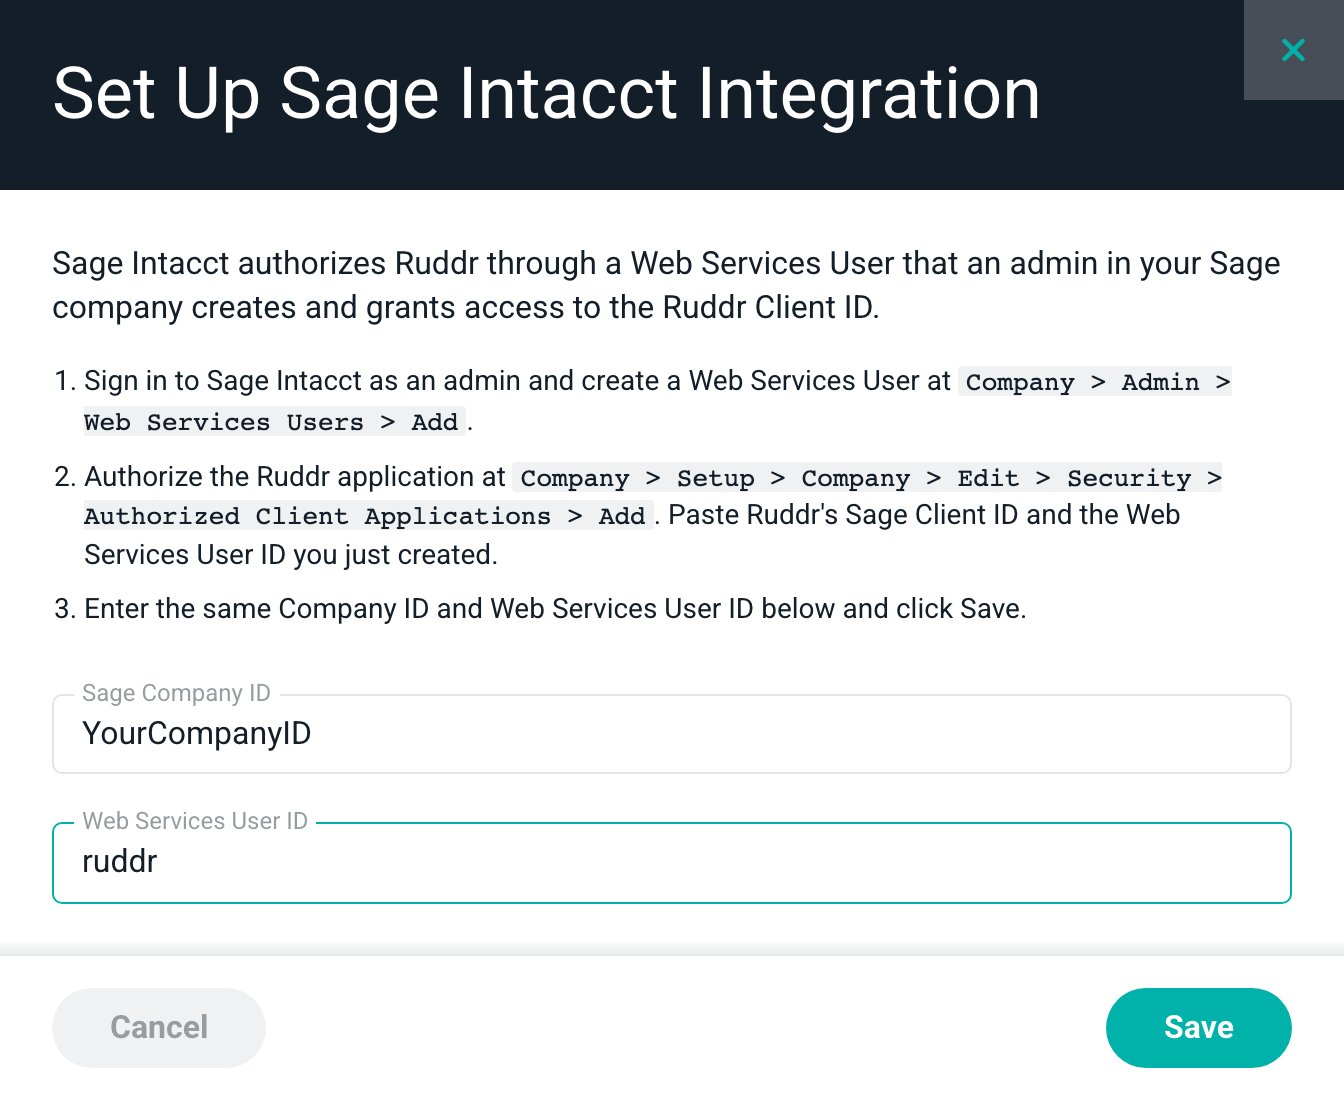
Once you click on the **Install** button, Ruddr will display the Set Up Sage Intacct Integration window (Figure 4). Enter the following values and click **Save**:
* **Sage Company ID** - The ID of your Sage Intacct company.
* **Web Services User ID** - The Web Services User ID you created in Step 2.
Note that Ruddr allows only one accounting integration per workspace by default. If you already have QuickBooks Online or Xero installed, the **Install** button will be disabled until you remove the other accounting integration (see [Using Multiple Accounting Integrations](/billing/using-multiple-accounting-integrations)).
**Step 5: Connect the Integration**
Once you click on the **Install** button, Ruddr will display the Set Up Sage Intacct Integration window (Figure 4). Enter the following values and click **Save**:
* **Sage Company ID** - The ID of your Sage Intacct company.
* **Web Services User ID** - The Web Services User ID you created in Step 2.
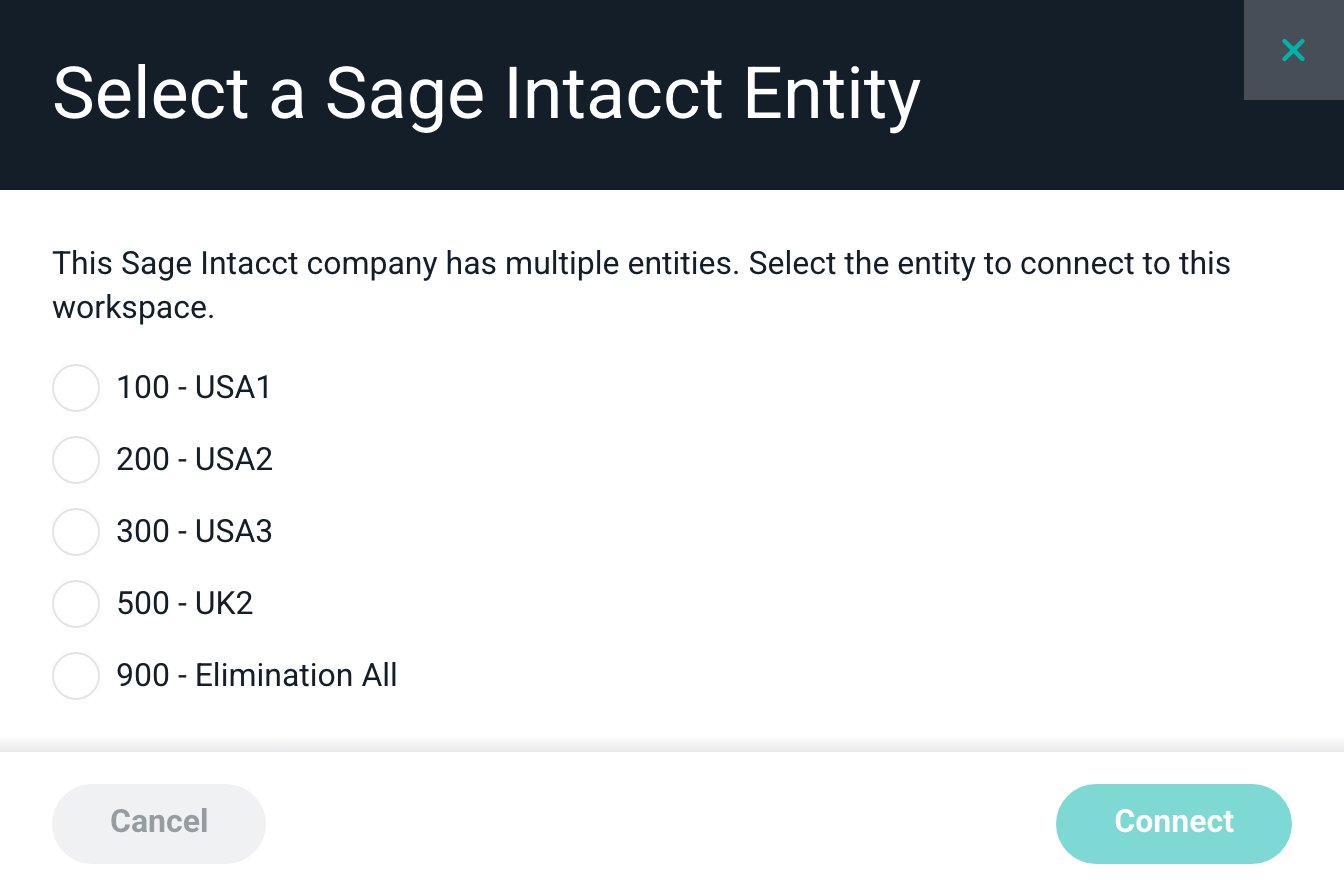
 Ruddr will then ask you to select the entity to connect to this workspace (Figure 5). Choose the entity and click **Connect**. Every Sage Intacct company has at least one entity, so this step will appear even if your company is not multi-entity. Any entity that is already connected to this Ruddr workspace will be marked as connected and cannot be selected again.
 **Step 6: Review the Automated Mappings**
Once the connection is established, Ruddr will automatically load records from Sage Intacct and attempt to map the correlated records shown below:
| Ruddr Record | Sage Intacct Record |
| ------------------ | ------------------------------------- |
| Clients | Customers |
| Invoice Items | Income Accounts or Items |
| Tax Rates | Tax Details |
| Deposit Accounts | Checking Accounts or Cash GL Accounts |
| Payment Methods | Payment Methods |
| Members | Vendors |
| Expense Categories | GL Accounts or Items |
In order for these items to automatically map, they must have the **same name in both platforms**. The comparison ignores differences in capitalization and accents. If the names do not match when the integration is set up, you can manually map the items, as detailed in the steps below.
Two categories are matched differently. Tax Rates will match a Sage Intacct tax detail whose ID or description matches the Ruddr tax rate name. Deposit Accounts are not matched by name at all: for each currency in your workspace, Ruddr will map the Sage Intacct checking account in that currency when the entity has exactly one.
Note that what Invoice Items and Expense Categories map to depends on the **Sync Method** you choose in the Configuration (see Step 7). With the **Direct** method they map to Sage Intacct GL accounts; with the **Documents** method they map to Sage Intacct items. The Tax Rate mappings are only used with the **Direct** method.
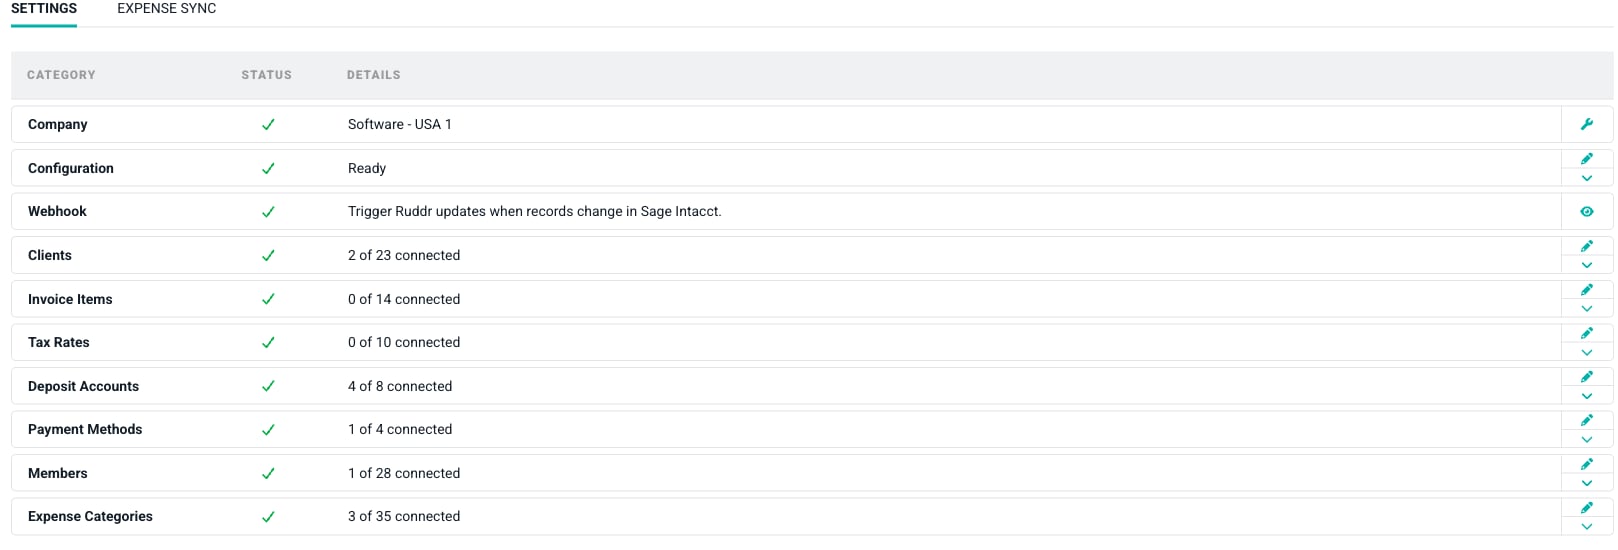
The Settings tab of the integration (Figure 6) shows each category with a status icon and a count of how many items are connected. A green check means the category is ready; a red icon indicates that something needs your attention.
**Step 6: Review the Automated Mappings**
Once the connection is established, Ruddr will automatically load records from Sage Intacct and attempt to map the correlated records shown below:
| Ruddr Record | Sage Intacct Record |
| ------------------ | ------------------------------------- |
| Clients | Customers |
| Invoice Items | Income Accounts or Items |
| Tax Rates | Tax Details |
| Deposit Accounts | Checking Accounts or Cash GL Accounts |
| Payment Methods | Payment Methods |
| Members | Vendors |
| Expense Categories | GL Accounts or Items |
In order for these items to automatically map, they must have the **same name in both platforms**. The comparison ignores differences in capitalization and accents. If the names do not match when the integration is set up, you can manually map the items, as detailed in the steps below.
Two categories are matched differently. Tax Rates will match a Sage Intacct tax detail whose ID or description matches the Ruddr tax rate name. Deposit Accounts are not matched by name at all: for each currency in your workspace, Ruddr will map the Sage Intacct checking account in that currency when the entity has exactly one.
Note that what Invoice Items and Expense Categories map to depends on the **Sync Method** you choose in the Configuration (see Step 7). With the **Direct** method they map to Sage Intacct GL accounts; with the **Documents** method they map to Sage Intacct items. The Tax Rate mappings are only used with the **Direct** method.
The Settings tab of the integration (Figure 6) shows each category with a status icon and a count of how many items are connected. A green check means the category is ready; a red icon indicates that something needs your attention.
 **Step 7: Set the Configuration Defaults**
Click the **Edit** icon on the Configuration row to set the default values that Ruddr uses when posting to Sage Intacct (Figure 7).
The most important choice here is the **Sync Method**, which determines how Ruddr will post invoices, credit notes, and reimbursable expenses to Sage Intacct:
* **Direct (GL accounts)** - Ruddr will post Accounts Receivable (AR) and Accounts Payable (AP) transactions directly against Sage Intacct General Ledger (GL) accounts. Choose this if you want Ruddr to control the accounting lines and you calculate any tax in Ruddr.
* **Documents (Order Entry & Purchasing)** - Ruddr will post Order Entry invoices and credit memos, and Purchasing bills, based on Sage Intacct items, and Sage Intacct will calculate the tax. Choose this if you use Sage Intacct's Order Entry and Purchasing modules.
If your Sage Intacct entity uses Advanced Tax or Simple Tax, choose **Documents**, which is the only method that supports them.
You can change the Sync Method later, but the two methods use different mappings, so your Invoice Items and Expense Categories will need to be mapped again. Reconnect the integration after switching to Documents, using the wrench icon on the **Company** row, so that Ruddr picks up your transaction definition settings.
The remaining settings adapt to the Sync Method you choose:
* **Integration Name** - The name used to reference this Sage Intacct integration within Ruddr.
* **Default Ruddr Invoice Item** - Used when updating a Ruddr invoice from Sage Intacct if the Sage line is not mapped to an Invoice Item in Ruddr.
* **Default Sage Department** - Used on transaction lines that are not mapped to a Sage Department.
* **Default Sage Income Account** (Direct) or **Default Sage Item** (Documents) - Used when publishing an invoice or credit note if a Ruddr Invoice Item is not mapped to a Sage income account or item.
* **Delete/Unpublish Default Behavior** - Controls whether the **Remove from Sage Intacct** checkbox is checked by default when you unpublish an invoice or credit note, or delete a payment, in Ruddr.
* **Default Payment Method** - Used when posting an AR payment if the Ruddr payment method is not mapped to a Sage payment method. A payment needs either a mapped payment method or this default, or it cannot be saved to Sage Intacct.
* **Default Taxable / Non-Taxable Tax Detail** - Shown only when your Sage Intacct company uses VAT, which requires a tax detail on every line. Ruddr will use these tax details for taxable and non-taxable invoice lines when a Ruddr tax rate is not mapped to a Sage tax detail.
* **Reimbursable Expenses Sync** - When enabled, approved reimbursable expenses will be exported to Sage Intacct as vendor bills.
* **Reimbursable Expenses Sync Start Date** - When the sync is enabled, reimbursable expenses dated before this date will not be synced. A start date is required when the sync is enabled.
* **Default Sage Expense Account** (Direct) or **Default Purchasing Item** (Documents) - Used when syncing an expense if its Expense Category is not mapped to a Sage account or item.
* **Default Non-Taxable Purchasing Tax Detail** - Shown only when your Sage Intacct company uses VAT. Ruddr will use this tax detail on reimbursable expense bills, which carry no tax.
**Step 7: Set the Configuration Defaults**
Click the **Edit** icon on the Configuration row to set the default values that Ruddr uses when posting to Sage Intacct (Figure 7).
The most important choice here is the **Sync Method**, which determines how Ruddr will post invoices, credit notes, and reimbursable expenses to Sage Intacct:
* **Direct (GL accounts)** - Ruddr will post Accounts Receivable (AR) and Accounts Payable (AP) transactions directly against Sage Intacct General Ledger (GL) accounts. Choose this if you want Ruddr to control the accounting lines and you calculate any tax in Ruddr.
* **Documents (Order Entry & Purchasing)** - Ruddr will post Order Entry invoices and credit memos, and Purchasing bills, based on Sage Intacct items, and Sage Intacct will calculate the tax. Choose this if you use Sage Intacct's Order Entry and Purchasing modules.
If your Sage Intacct entity uses Advanced Tax or Simple Tax, choose **Documents**, which is the only method that supports them.
You can change the Sync Method later, but the two methods use different mappings, so your Invoice Items and Expense Categories will need to be mapped again. Reconnect the integration after switching to Documents, using the wrench icon on the **Company** row, so that Ruddr picks up your transaction definition settings.
The remaining settings adapt to the Sync Method you choose:
* **Integration Name** - The name used to reference this Sage Intacct integration within Ruddr.
* **Default Ruddr Invoice Item** - Used when updating a Ruddr invoice from Sage Intacct if the Sage line is not mapped to an Invoice Item in Ruddr.
* **Default Sage Department** - Used on transaction lines that are not mapped to a Sage Department.
* **Default Sage Income Account** (Direct) or **Default Sage Item** (Documents) - Used when publishing an invoice or credit note if a Ruddr Invoice Item is not mapped to a Sage income account or item.
* **Delete/Unpublish Default Behavior** - Controls whether the **Remove from Sage Intacct** checkbox is checked by default when you unpublish an invoice or credit note, or delete a payment, in Ruddr.
* **Default Payment Method** - Used when posting an AR payment if the Ruddr payment method is not mapped to a Sage payment method. A payment needs either a mapped payment method or this default, or it cannot be saved to Sage Intacct.
* **Default Taxable / Non-Taxable Tax Detail** - Shown only when your Sage Intacct company uses VAT, which requires a tax detail on every line. Ruddr will use these tax details for taxable and non-taxable invoice lines when a Ruddr tax rate is not mapped to a Sage tax detail.
* **Reimbursable Expenses Sync** - When enabled, approved reimbursable expenses will be exported to Sage Intacct as vendor bills.
* **Reimbursable Expenses Sync Start Date** - When the sync is enabled, reimbursable expenses dated before this date will not be synced. A start date is required when the sync is enabled.
* **Default Sage Expense Account** (Direct) or **Default Purchasing Item** (Documents) - Used when syncing an expense if its Expense Category is not mapped to a Sage account or item.
* **Default Non-Taxable Purchasing Tax Detail** - Shown only when your Sage Intacct company uses VAT. Ruddr will use this tax detail on reimbursable expense bills, which carry no tax.
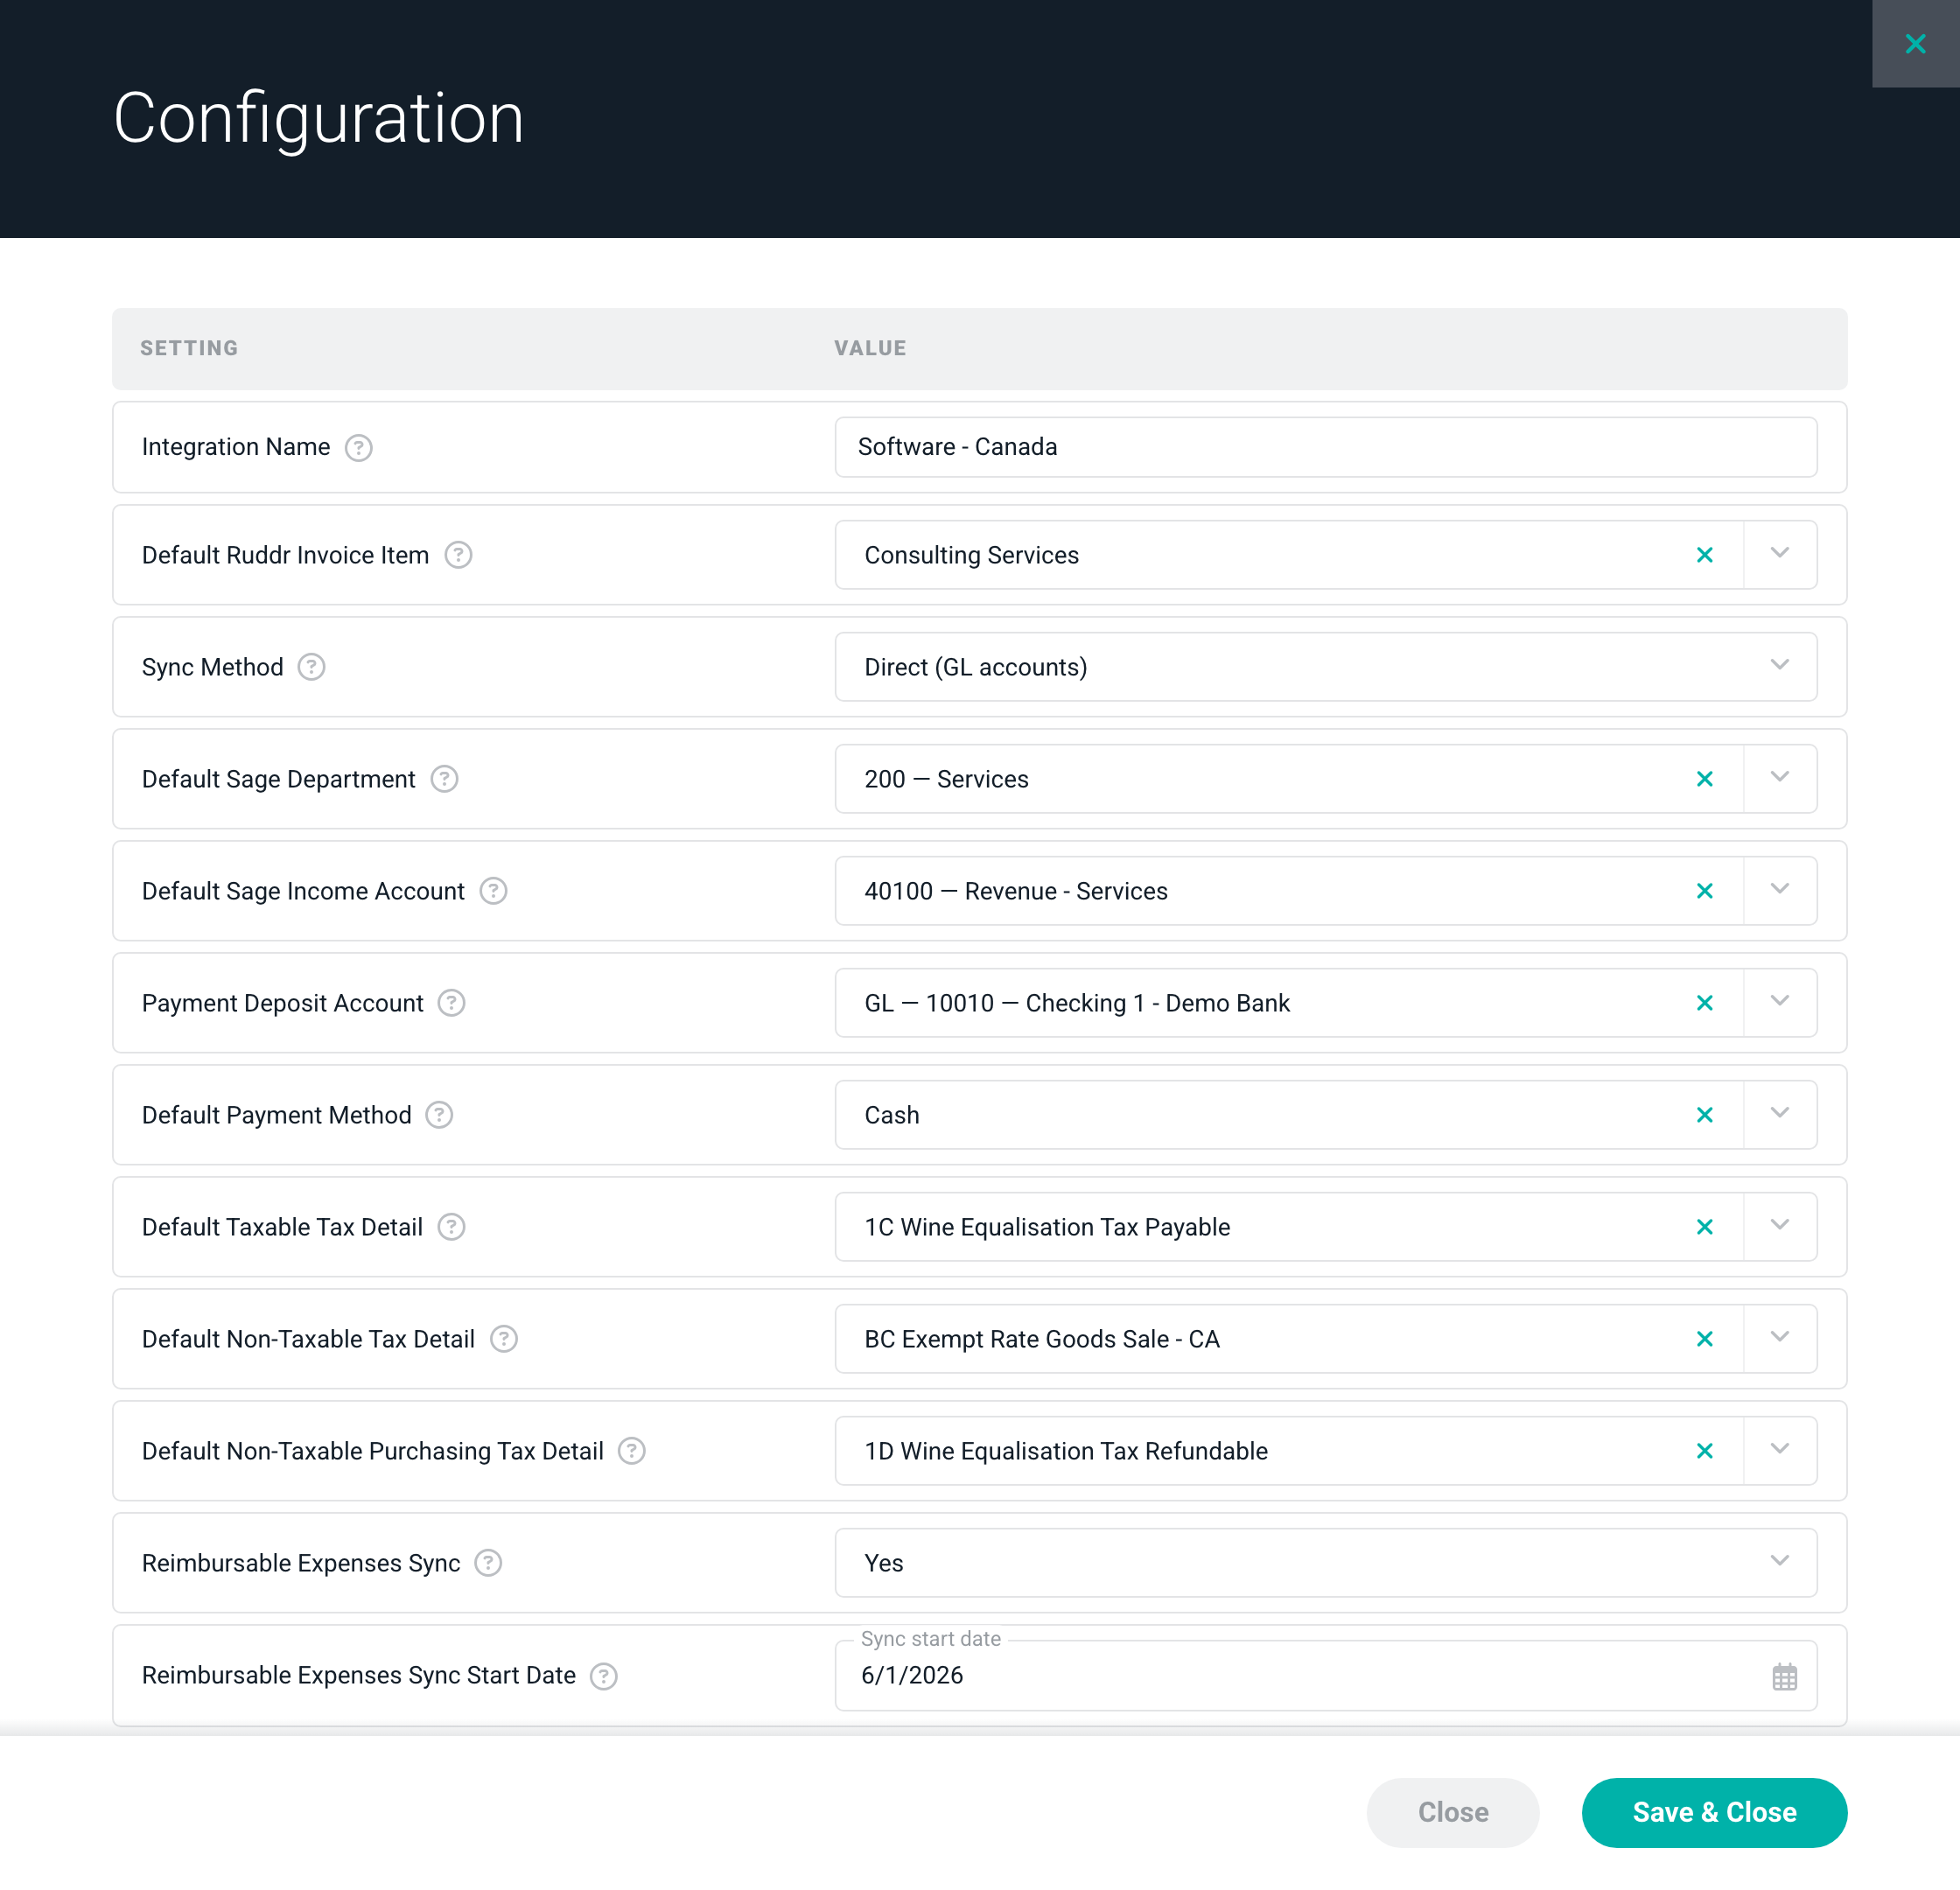 Once the Configuration is complete, its row on the settings screen will show a status of **Ready**. Until then, the row will list what is still missing, such as a deposit account for your base currency or a default income account.
**Step 8: Set Up the Webhook**
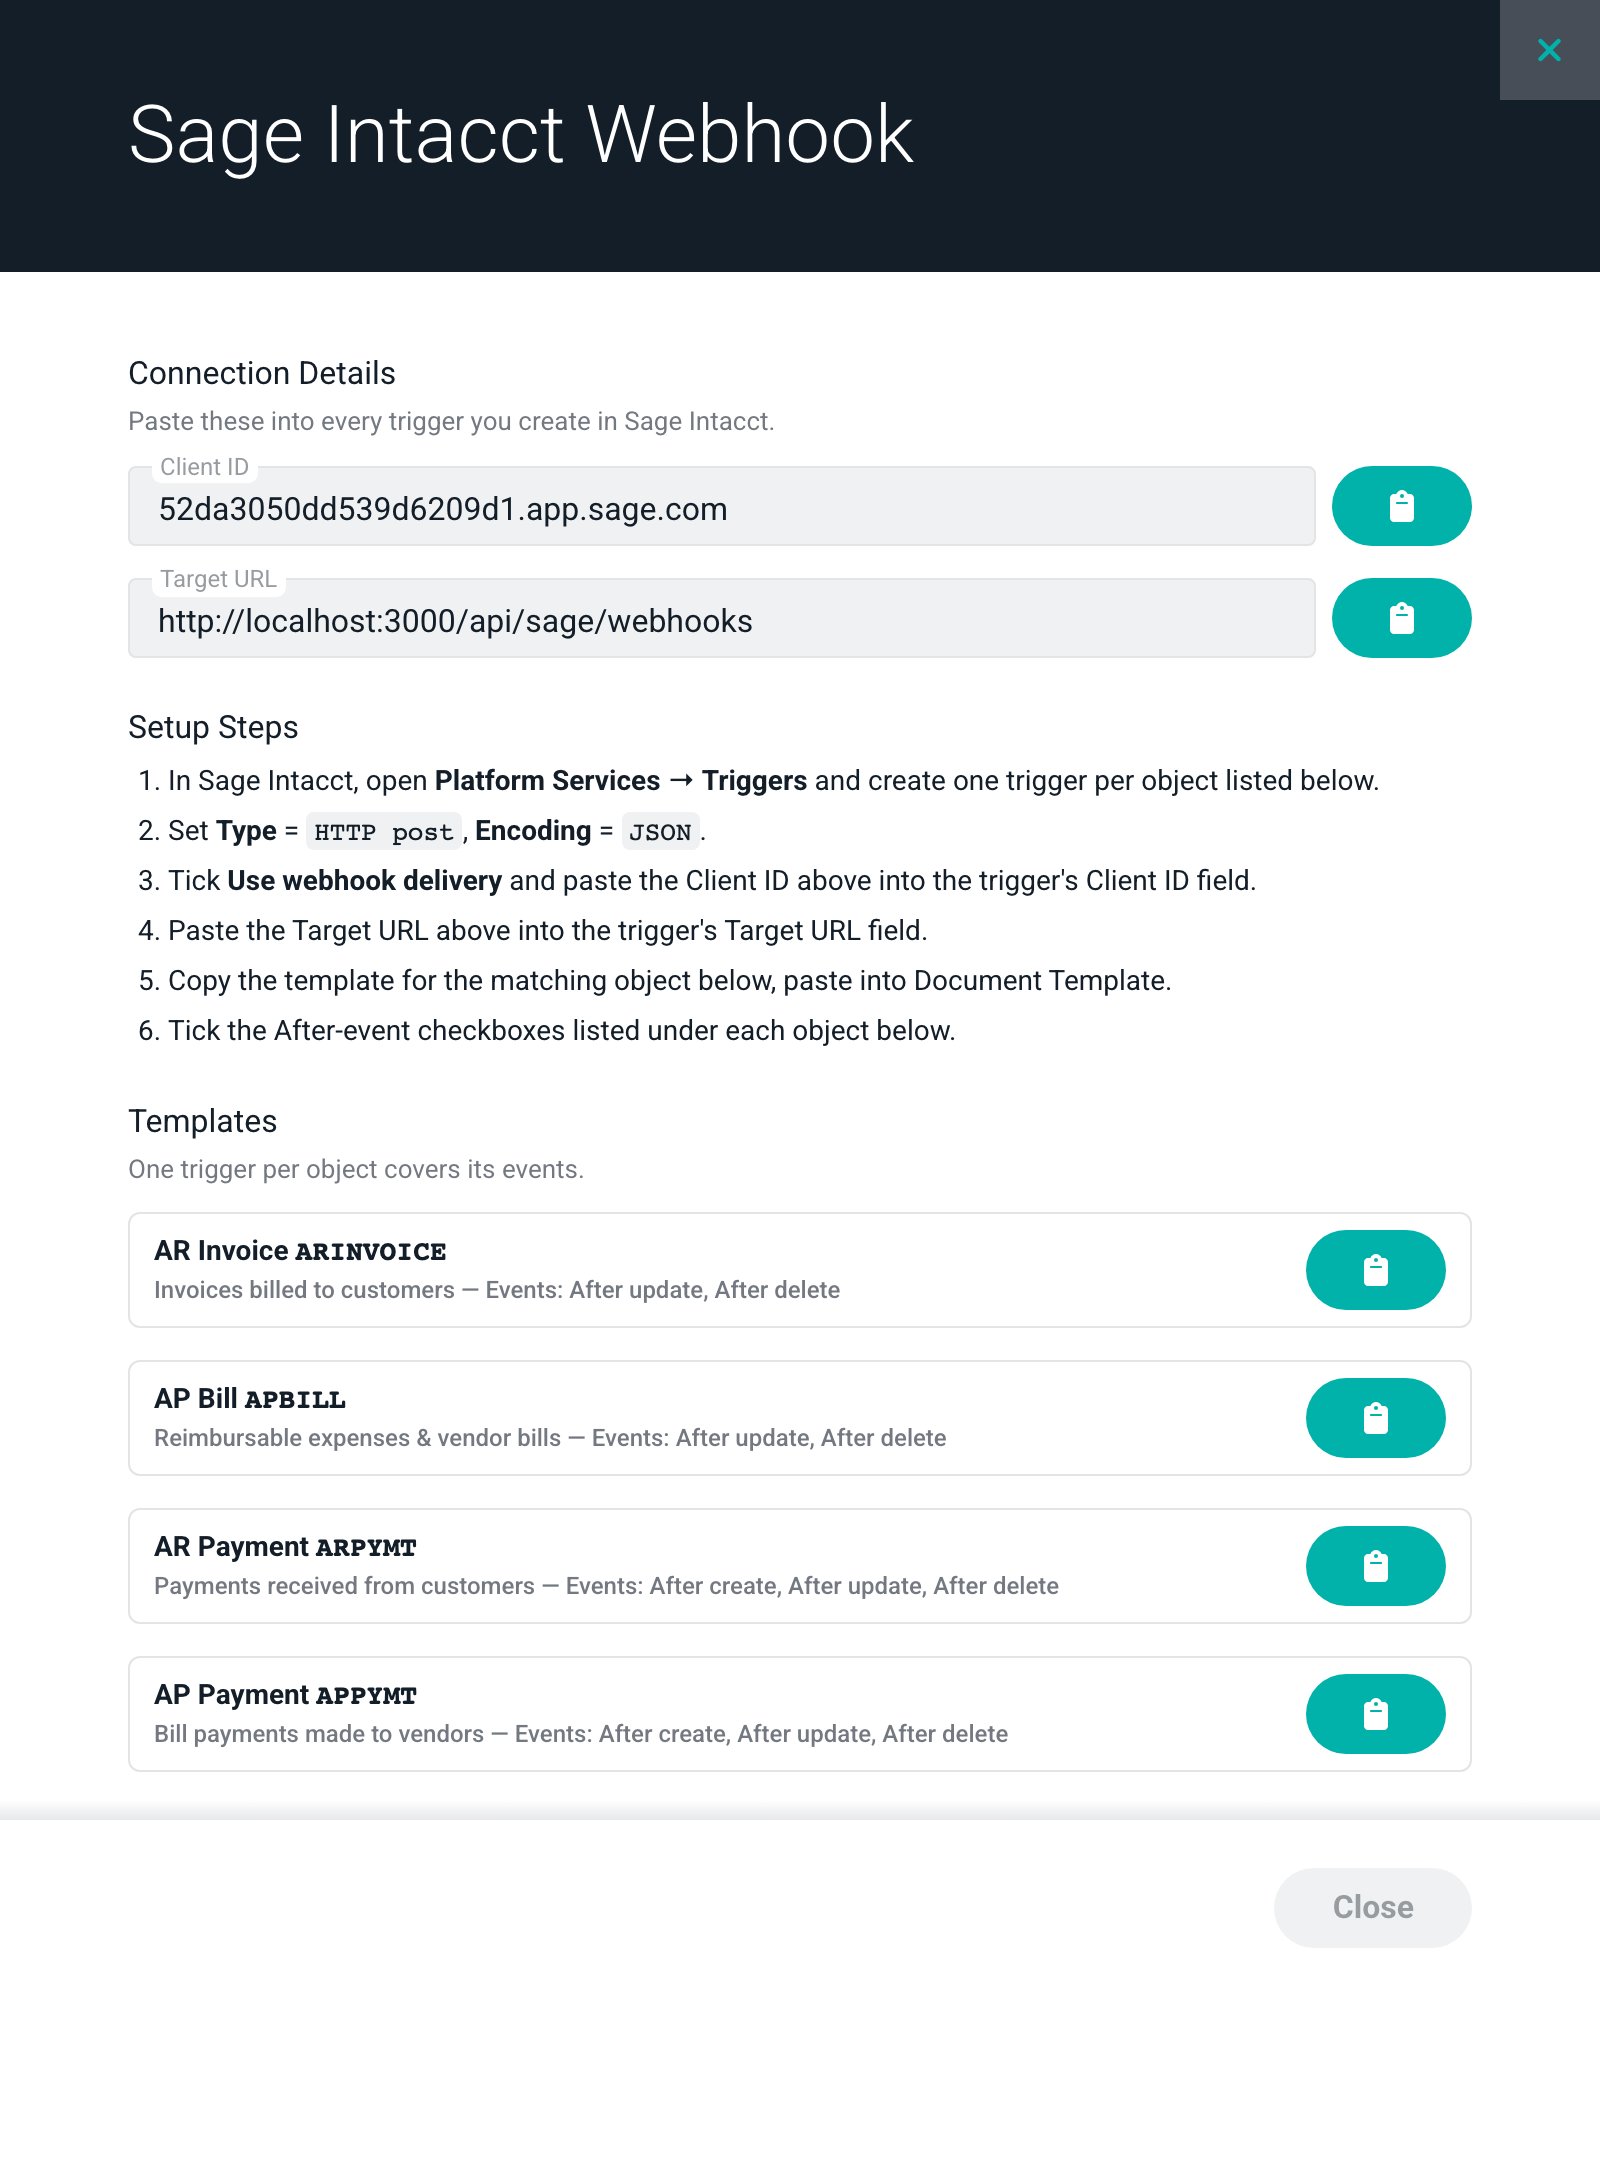
So that Ruddr stays up to date when records change in Sage Intacct, you will configure a set of triggers in Sage Intacct that notify Ruddr. Click the **Edit** icon on the Webhook row to open the Sage Intacct Webhook drawer (Figure 8), which provides the Client ID, Target URL, and document templates you will need.
In Sage Intacct, go to the **Platform Services** tab, then **Triggers**, and create one trigger per object listed in the drawer (AR Invoice, AP Bill, AR Payment, and AP Payment). For each trigger, set the **Type** to HTTP post and the **Encoding** to JSON, enable **Use webhook delivery**, and paste in the Client ID and Target URL from the drawer. Then copy the matching document template into the trigger's Document Template field and tick the after-event checkboxes listed for that object.
Once the Configuration is complete, its row on the settings screen will show a status of **Ready**. Until then, the row will list what is still missing, such as a deposit account for your base currency or a default income account.
**Step 8: Set Up the Webhook**
So that Ruddr stays up to date when records change in Sage Intacct, you will configure a set of triggers in Sage Intacct that notify Ruddr. Click the **Edit** icon on the Webhook row to open the Sage Intacct Webhook drawer (Figure 8), which provides the Client ID, Target URL, and document templates you will need.
In Sage Intacct, go to the **Platform Services** tab, then **Triggers**, and create one trigger per object listed in the drawer (AR Invoice, AP Bill, AR Payment, and AP Payment). For each trigger, set the **Type** to HTTP post and the **Encoding** to JSON, enable **Use webhook delivery**, and paste in the Client ID and Target URL from the drawer. Then copy the matching document template into the trigger's Document Template field and tick the after-event checkboxes listed for that object.
 **Step 9: Manually Map any Remaining Records**
If Ruddr is unable to automatically map some of your Clients, Invoice Items, Tax Rates, Deposit Accounts, Payment Methods, or Expense Categories, this will be apparent in the Details column of the integration settings (Figure 6). In the example above, Ruddr has automatically mapped 2 of 23 Clients, which means the remaining Clients will need to be mapped manually.
Note that each Ruddr client can only be mapped to one Sage Intacct customer. This is because payments that are created in Ruddr can only be applied to one Ruddr client.
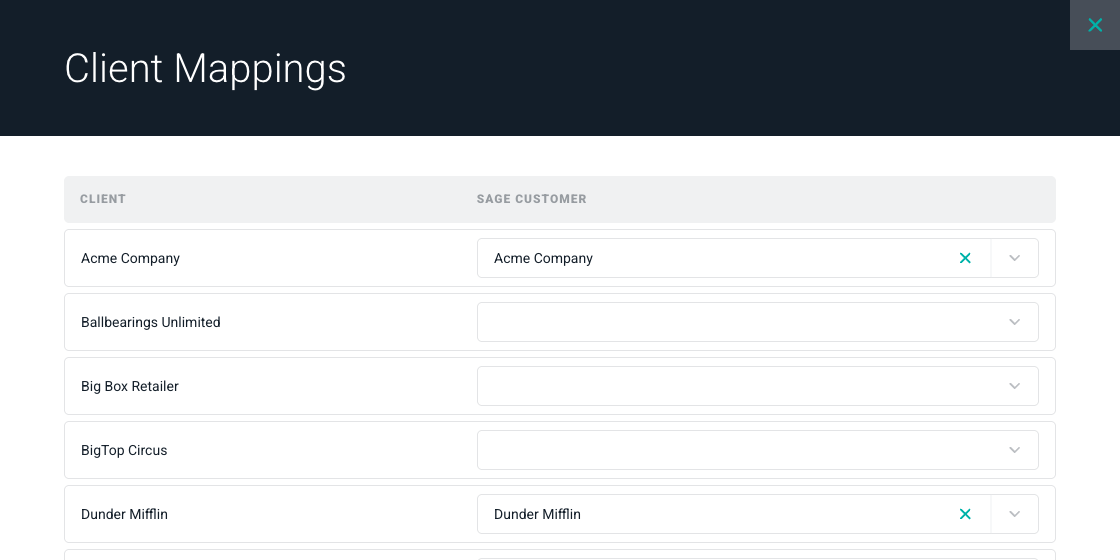
To manually map the remaining Clients to a Sage Intacct customer, simply click the **Edit** icon on the Clients row. This will open up the Client Mappings drawer (Figure 9), which will show the clients that have been automatically mapped and those that need manual mapping. The other categories work the same way.
**Step 9: Manually Map any Remaining Records**
If Ruddr is unable to automatically map some of your Clients, Invoice Items, Tax Rates, Deposit Accounts, Payment Methods, or Expense Categories, this will be apparent in the Details column of the integration settings (Figure 6). In the example above, Ruddr has automatically mapped 2 of 23 Clients, which means the remaining Clients will need to be mapped manually.
Note that each Ruddr client can only be mapped to one Sage Intacct customer. This is because payments that are created in Ruddr can only be applied to one Ruddr client.
To manually map the remaining Clients to a Sage Intacct customer, simply click the **Edit** icon on the Clients row. This will open up the Client Mappings drawer (Figure 9), which will show the clients that have been automatically mapped and those that need manual mapping. The other categories work the same way.
 You do not have to map every client before you start invoicing. If you publish an invoice for a client that is not yet mapped, Ruddr will match the client to a Sage Intacct customer of the same name, or create one, and save the mapping.
You can also reload the records for any category at any time by choosing **Load from Sage Intacct** from the row's menu. This is useful when you add new customers, accounts, or tax details in Sage Intacct after the initial setup.
**Step 10: Map Members for Reimbursable Expenses**
If you enabled the Reimbursable Expenses Sync option in the Configuration, you should map Ruddr members to Sage Intacct vendors. Ruddr will attempt to automatically map each member to a vendor with a matching name. Any members that are not automatically mapped can be mapped manually by clicking the **Edit** icon on the Members row. Once a member has approved reimbursable expenses, Ruddr will add them to a vendor bill in Sage Intacct for that member, and bill payments made in Sage Intacct will be reconciled back to Ruddr through the webhook.
The **Expense Sync** tab of the integration shows the result of each sync and lets you start one immediately rather than waiting for the next scheduled run.
### Need Some Help?
Properly configuring the Sage Intacct integration is critical and best executed alongside your Ruddr onboarding lead. If you are having difficulty with any of the steps above, reach out to our support team at [help@ruddr.io](mailto:help@ruddr.io) and we'll assist.
You do not have to map every client before you start invoicing. If you publish an invoice for a client that is not yet mapped, Ruddr will match the client to a Sage Intacct customer of the same name, or create one, and save the mapping.
You can also reload the records for any category at any time by choosing **Load from Sage Intacct** from the row's menu. This is useful when you add new customers, accounts, or tax details in Sage Intacct after the initial setup.
**Step 10: Map Members for Reimbursable Expenses**
If you enabled the Reimbursable Expenses Sync option in the Configuration, you should map Ruddr members to Sage Intacct vendors. Ruddr will attempt to automatically map each member to a vendor with a matching name. Any members that are not automatically mapped can be mapped manually by clicking the **Edit** icon on the Members row. Once a member has approved reimbursable expenses, Ruddr will add them to a vendor bill in Sage Intacct for that member, and bill payments made in Sage Intacct will be reconciled back to Ruddr through the webhook.
The **Expense Sync** tab of the integration shows the result of each sync and lets you start one immediately rather than waiting for the next scheduled run.
### Need Some Help?
Properly configuring the Sage Intacct integration is critical and best executed alongside your Ruddr onboarding lead. If you are having difficulty with any of the steps above, reach out to our support team at [help@ruddr.io](mailto:help@ruddr.io) and we'll assist.