> ## Documentation Index
> Fetch the complete documentation index at: https://help.ruddr.io/llms.txt
> Use this file to discover all available pages before exploring further.
# Using Multiple Accounting Integrations
Ruddr supports the ability to configure more than one accounting integration within a single workspace. This can be helpful for multinational companies that have a separate legal entity in each country where they operate. The [Business Units](/workspace-administration/features#business-units) feature in Ruddr is used to associate an accounting integration with each business unit.
The following key topics are related to using the Multiple Accounting Integrations feature:
* [Setting up multiple accounting integrations](#setting-up-multiple-accounting-integrations)
* [Selecting the accounting integration for the workspace and each business unit](#selecting-the-accounting-integration-for-the-workspace-and-each-business-unit)
* [Aligning business units to projects](#aligning-business-units-to-projects)
* [Understanding how invoices are associated with accounting integrations](#how-invoices-are-associated-with-accounting-integrations)
* [Credit notes and payments](#credit-notes-and-payments)
#### Setting up Multiple Accounting Integrations
In order to utilize multiple accounting integrations, you will need to enable the Multiple Accounting Integrations [feature](/workspace-administration/features) under Settings / Features. Once the feature is enabled, you can install any number of QuickBooks or Xero accounting integrations within your workspace.
* [Xero Integration Setup](/integrations/xero-integration-setup)
* [QuickBooks Online Integration Setup](/integrations/quickbooks-online-integration-setup)
When multiple accounting integrations are configured, you will see a tile for each installed integration (Figure 1) in the [Integrations](/workspace-administration/integrations) area of workspace settings.
 Figure 1 - Multiple Accounting Integrations
Each integration will have the name of the instance listed. You can click the **Settings** button to access the integration configuration as outlined in the setup documentation.
#### Selecting the Accounting Integration for the Workspace and each Business Unit
Once you have connected Ruddr to your various accounting instances, the next step is to set a default accounting integration for the workspace.
In the [Invoices](/workspace-administration/invoice-settings) section of workspace settings, you will find an **Accounting Integration** setting (Figure 2). Here, you will specify the default accounting integration to use for the workspace.
Figure 1 - Multiple Accounting Integrations
Each integration will have the name of the instance listed. You can click the **Settings** button to access the integration configuration as outlined in the setup documentation.
#### Selecting the Accounting Integration for the Workspace and each Business Unit
Once you have connected Ruddr to your various accounting instances, the next step is to set a default accounting integration for the workspace.
In the [Invoices](/workspace-administration/invoice-settings) section of workspace settings, you will find an **Accounting Integration** setting (Figure 2). Here, you will specify the default accounting integration to use for the workspace.
 Figure 2 - Set a Default Workspace Accounting Integration
The default workspace accounting integration will be used to save invoices for projects that are not associated with a specific business unit.
Each business unit in [Custom Data](/workspace-administration/custom-data) can be assigned an accounting integration. If an integration is not assigned, invoices for projects using that business unit will use the [workspace's default accounting integration](#h_01KD62N4B7HGCM2MYBYVKXVJX8).
The business unit's accounting integration can be specified on the Edit Business Unit drawer (Figure 3).
Figure 2 - Set a Default Workspace Accounting Integration
The default workspace accounting integration will be used to save invoices for projects that are not associated with a specific business unit.
Each business unit in [Custom Data](/workspace-administration/custom-data) can be assigned an accounting integration. If an integration is not assigned, invoices for projects using that business unit will use the [workspace's default accounting integration](#h_01KD62N4B7HGCM2MYBYVKXVJX8).
The business unit's accounting integration can be specified on the Edit Business Unit drawer (Figure 3).
 Figure 3 - Associate an Accounting Integration with a Business Unit
#### Aligning Business Units to Projects
As detailed in the [Create a New Project](/projects/create-a-new-project) article, each project has an optional business unit setting. By selecting a business unit, invoices for that project will be created within that business unit's accounting integration.
#### How Invoices are Associated with Accounting Integrations
When you select a project on the [Ready to Bill](/billing/ready-to-bill) screen, Ruddr will disable projects within that client that use a different accounting integration. A project's accounting integration is based on the project's business unit. If the project does not have a business unit, its invoices will be saved to the [workspace's default accounting integration](#h_01KD62N4B7HGCM2MYBYVKXVJX8). If the project has a business unit, its invoices will be saved to the accounting integration associated with that business unit.
Figure 3 - Associate an Accounting Integration with a Business Unit
#### Aligning Business Units to Projects
As detailed in the [Create a New Project](/projects/create-a-new-project) article, each project has an optional business unit setting. By selecting a business unit, invoices for that project will be created within that business unit's accounting integration.
#### How Invoices are Associated with Accounting Integrations
When you select a project on the [Ready to Bill](/billing/ready-to-bill) screen, Ruddr will disable projects within that client that use a different accounting integration. A project's accounting integration is based on the project's business unit. If the project does not have a business unit, its invoices will be saved to the [workspace's default accounting integration](#h_01KD62N4B7HGCM2MYBYVKXVJX8). If the project has a business unit, its invoices will be saved to the accounting integration associated with that business unit.
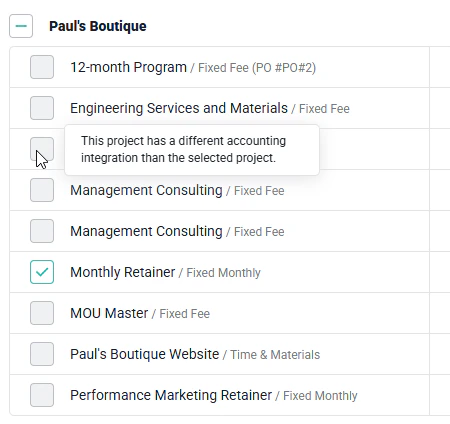 Figure 4 - The Ready to Bill Screen will only Allow Projects with the Same Accounting Integration to be Selected
Note that changing the accounting integration on a draft invoice (Figure 5) will disassociate all projects and transactions from the invoice.
Figure 4 - The Ready to Bill Screen will only Allow Projects with the Same Accounting Integration to be Selected
Note that changing the accounting integration on a draft invoice (Figure 5) will disassociate all projects and transactions from the invoice.
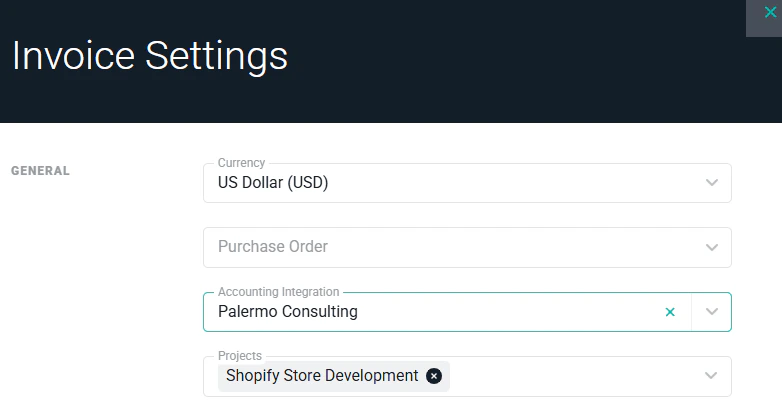 Figure 5 - Changing an Invoice's Accounting Integration Will Disassociate Projects and Transactions
When publishing an invoice, Ruddr will show the accounting integration that will receive the invoice (Figure 6).
Figure 5 - Changing an Invoice's Accounting Integration Will Disassociate Projects and Transactions
When publishing an invoice, Ruddr will show the accounting integration that will receive the invoice (Figure 6).
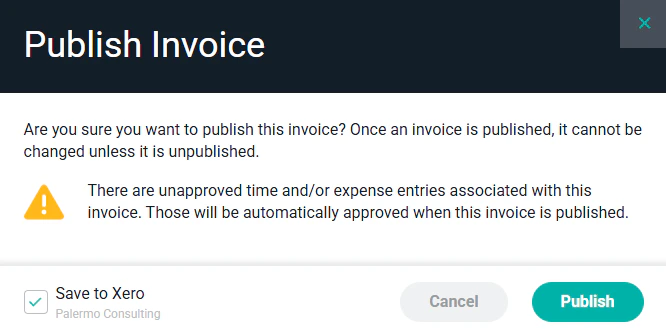 Figure 6 - Publish an Invoice to an Accounting Integration
Once an invoice is saved to an accounting integration, you can view the associated integration by hovering over the integration icon on the Invoices list (Figure 7).
Figure 6 - Publish an Invoice to an Accounting Integration
Once an invoice is saved to an accounting integration, you can view the associated integration by hovering over the integration icon on the Invoices list (Figure 7).
 Figure 7 - Ruddr Displays each Invoice's Accounting Integration
#### Credit Notes and Payments
Any [credit notes](/billing/credit-notes) and / or [payments](/billing/taking-payments) that are associated with an invoice in Ruddr will be saved to the accounting integration that houses the invoice.
Figure 7 - Ruddr Displays each Invoice's Accounting Integration
#### Credit Notes and Payments
Any [credit notes](/billing/credit-notes) and / or [payments](/billing/taking-payments) that are associated with an invoice in Ruddr will be saved to the accounting integration that houses the invoice.